The Best Way to Clean an Air Fryer: Quick and Easy Steps
Cleaning an air fryer can seem tricky. But with the right steps, it’s simple.
Air fryers are popular for their convenience. They make cooking quick and easy. But, like any kitchen gadget, they need regular cleaning. This keeps them working well and ensures your food tastes great. Dirty air fryers can lead to burnt food and bad smells.
Nobody wants that! In this blog post, we’ll share the best way to clean your air fryer. Our tips will help you keep it in top shape. Clean appliances last longer and perform better.
:max_bytes(150000):strip_icc()/ewl-tier-3-detail-cosori-9-1-5qt-air-fryer-nsimpson-777-662692128417430c8d1806dc4cf8e4f5.jpeg)
Credit: www.eatingwell.com
Introduction To Air Fryer Cleaning
Air fryers have become a staple in many kitchens. They provide a quick and healthy way to cook a variety of foods. But like any kitchen appliance, they need regular cleaning to maintain their efficiency and longevity. Cleaning your air fryer might seem daunting, but it’s quite simple with the right steps. This guide will help you understand why cleaning your air fryer is essential and the benefits of doing it regularly.
Why Clean Your Air Fryer?
An air fryer can accumulate grease and food particles over time. This buildup can affect the taste of your food. It can also cause smoke and unpleasant odors. Cleaning your air fryer prevents these problems. It ensures your food always tastes fresh and delicious. It also helps maintain the appliance’s performance and efficiency.
Benefits Of Regular Cleaning
Regular cleaning of your air fryer has many benefits. It prolongs the life of the appliance. It also ensures that your food is cooked evenly. Clean air fryers use less energy. This can save you money on your electricity bill. Regular cleaning also reduces the risk of bacteria buildup. This makes your cooking environment healthier.
:max_bytes(150000):strip_icc()/sea-toaster-ovens-air-fryers-test-cosori-9-1-5qt-rkilgore-160-bcebdb402012405a8a3f34eabb9775a2.jpg)
Credit: www.seriouseats.com
Preparing For Cleaning
Cleaning your air fryer properly ensures it lasts longer and cooks efficiently. The process is straightforward, but you need to prepare adequately. This section will guide you on the essential steps to get ready for cleaning your air fryer.
Gathering Supplies
Before you start, gather all necessary supplies. Having everything on hand makes the process smoother and faster. Here’s a list of items you will need:
- Soft sponge or cloth
- Dish soap
- Warm water
- Non-abrasive brush
- Drying towel
Ensure that your sponge or cloth is soft to avoid scratching the surfaces. Dish soap will help remove grease, while warm water makes it easier to clean. A non-abrasive brush is useful for stubborn residue, and a drying towel will help you finish up.
Safety Precautions
Safety is crucial when cleaning any kitchen appliance. Here are some safety tips to follow:
- Unplug the Air Fryer: Always unplug the appliance before cleaning to avoid electric shock.
- Let it Cool: Ensure the air fryer is completely cool before you start. Cleaning a hot appliance can be dangerous.
- Avoid Submerging: Do not submerge the main unit in water. Only removable parts should be washed with water.
These precautions will help you stay safe and prevent damage to your air fryer.
Initial Cleaning Steps
The initial cleaning steps for your air fryer are crucial. They ensure your appliance lasts long. Starting with a proper cleaning routine helps maintain performance and hygiene. Let’s dive into the steps to get you started on the right foot.
Unplug And Cool Down
First, always unplug your air fryer from the electrical outlet. This step is vital for safety. It prevents any accidental electrical mishaps. Next, allow the air fryer to cool down completely. This can take 15-20 minutes. Cleaning a hot air fryer can lead to burns. Patience here is key.
Disassemble Removable Parts
Once your air fryer is cool, start by disassembling the removable parts. These usually include the basket, tray, and pan. Refer to your user manual if unsure.
- Remove the cooking basket carefully.
- Take out the crisper tray.
- Detach the pan or drawer.
Place these parts on a clean, flat surface. This makes the cleaning process easier and more organized. Always handle the parts gently to avoid damage.
Cleaning The Basket And Tray
Keeping your air fryer clean ensures it works well and lasts longer. The basket and tray are the parts that get dirty the most. They collect food residues and grease. Follow these steps to clean them easily and effectively.
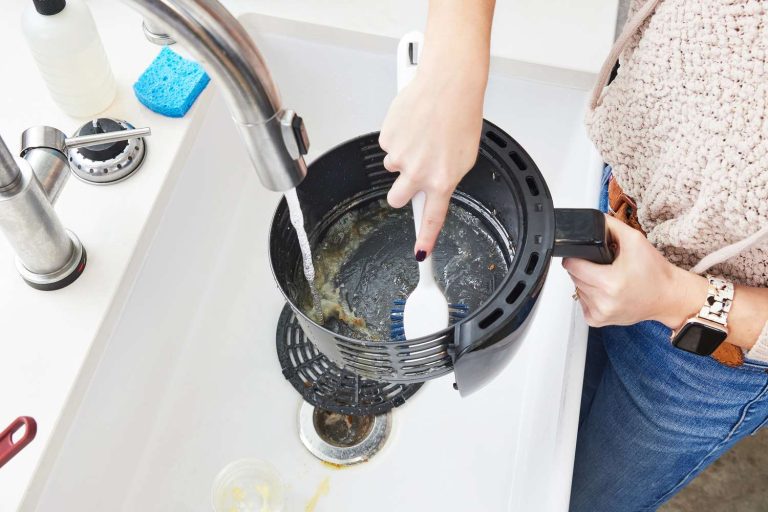
Soaking And Scrubbing
First, remove the basket and tray from the air fryer. Place them in the sink. Fill the sink with warm, soapy water. Let them soak for about 15-20 minutes. This helps loosen any stuck-on food.
After soaking, use a soft brush or sponge to scrub the basket and tray. Pay special attention to corners and crevices. Avoid using abrasive sponges. They can scratch the non-stick coating. For stubborn spots, a paste of baking soda and water works wonders.
Drying And Reassembly
Rinse the basket and tray thoroughly with clean water. Ensure all soap is removed. Use a clean, dry towel to pat them dry. Let them air dry completely to avoid moisture buildup.
Once dry, reassemble the basket and tray into the air fryer. Your air fryer is now ready for the next use. Regular cleaning keeps it in top shape and ensures healthy cooking.
| Step | Description |
|---|---|
| 1. Remove | Take out the basket and tray |
| 2. Soak | Soak in warm, soapy water |
| 3. Scrub | Scrub with a soft brush or sponge |
| 4. Rinse | Rinse with clean water |
| 5. Dry | Pat dry and let air dry |
| 6. Reassemble | Put the basket and tray back |
Cleaning The Interior
Keeping the interior of your air fryer clean ensures it works well and lasts long. Regular cleaning helps remove grease and food particles. This section will guide you through the process.
Wiping Down The Interior
First, unplug your air fryer and let it cool. Use a damp cloth or sponge to wipe down the interior walls. Avoid using abrasive cleaners or brushes. They can damage the non-stick coating.
For stubborn spots, dip the cloth in warm soapy water. Gently scrub the area until clean. Rinse the cloth, then wipe away any soap residue. Dry the interior with a clean towel.
Removing Stuck-on Food
Food bits can get stuck in the basket and on the heating element. To remove them, use a soft brush or an old toothbrush. Gently scrub the areas with stuck-on food.
If the food is hard to remove, soak the basket in warm soapy water for 10-15 minutes. This will loosen the food, making it easier to clean. After soaking, scrub again with the soft brush.
For the heating element, use a damp cloth. Wipe it gently to avoid damage. Make sure the element is completely dry before using the air fryer again.
Cleaning The Exterior
Keeping the exterior of your air fryer clean ensures it looks great and lasts longer. Regular cleaning helps maintain the appliance’s appearance and prevents any build-up of grease or grime. Follow these steps to clean the outer surface and controls effectively.
Wiping The Outer Surface
Start by unplugging the air fryer to ensure safety. Next, use a soft, damp cloth to wipe down the outer surface. Avoid using abrasive materials that might scratch the finish. For stubborn spots, a mild dish soap solution can be used. Gently scrub the area, then wipe it clean with a damp cloth.
| Cleaning Tools | Purpose |
|---|---|
| Soft, damp cloth | Wipe down the surface |
| Mild dish soap solution | Remove stubborn spots |
| Dry cloth | Dry the surface |
After cleaning, use a dry cloth to remove any remaining moisture. This step helps avoid water spots and keeps the air fryer looking polished.
Cleaning The Controls
The controls are essential for operating your air fryer. Keeping them clean ensures they function correctly. Use a soft, dry cloth to gently wipe the controls. If there are any greasy fingerprints or smudges, a slightly damp cloth with a bit of mild soap can be used.
- Gently wipe the controls with a dry cloth
- For smudges, use a slightly damp cloth with mild soap
- Ensure the cloth is not too wet to avoid damage
Be cautious not to let any moisture seep into the control panel. After cleaning, use a dry cloth to ensure all parts are dry. This step is crucial for preventing any potential damage.
Cleaning The Heating Element
Cleaning the heating element of your air fryer is crucial for its performance and longevity. The heating element can collect a lot of grease and debris over time. This can affect the air fryer’s efficiency and might even pose a fire hazard. Follow these steps to safely and effectively clean the heating element.
Accessing The Heating Element
First, make sure the air fryer is unplugged and completely cool. Safety first. Locate the heating element, which is usually at the top of the air fryer.
Some models have a removable top cover. Check your user manual if you are unsure. If the cover is removable, take it off to access the heating element easily. If not, you may need to clean it through the open space at the top.
Removing Grease And Debris
Once you have access to the heating element, use a soft brush or cloth to remove any loose debris. Be gentle to avoid damaging the element.
- Mix warm water with a few drops of dish soap.
- Dampen a cloth with the soapy water.
- Wipe the heating element carefully.
For stubborn grease, consider using a mixture of baking soda and water. Apply the paste to the grease and let it sit for a few minutes. Then, gently scrub with a soft brush or cloth.
Rinse the cloth in clean water and wipe down the element again to remove any soap residue. Let the heating element dry completely before plugging the air fryer back in.
| Step | Description |
|---|---|
| 1 | Unplug and cool the air fryer. |
| 2 | Access the heating element by removing the top cover, if possible. |
| 3 | Use a soft brush or cloth to remove debris. |
| 4 | Wipe with soapy water, then rinse with clean water. |
| 5 | Allow the element to dry completely. |
Regular maintenance will keep your air fryer running smoothly. Clean the heating element at least once a month for the best results.
Maintenance Tips
Keeping your air fryer clean ensures it works well and lasts longer. Regular maintenance prevents bad odors and keeps your food safe. Let’s explore some simple tips to maintain your air fryer.
Regular Cleaning Schedule
Clean your air fryer after every use. This stops food particles from building up. Remove the basket and pan, then wash them with warm soapy water. Dry all parts before reassembling. Check the heating element for any stuck-on food. Wipe it with a damp cloth if needed.
Avoiding Common Mistakes
Do not use metal tools or abrasive sponges. They can damage the non-stick coating. Avoid soaking the main unit in water. It has electrical parts that can be damaged. Always unplug the air fryer before cleaning. This ensures your safety.
Conclusion
Cleaning an air fryer is simple with the right steps. Regular cleaning keeps it working well. Always unplug it before starting. Use warm water and mild soap. Dry all parts thoroughly. Avoid abrasive cleaners or tools. Your air fryer will last longer with proper care.
Clean it after each use to prevent buildup. Enjoy healthier meals without hassle. Follow these tips for an easy cleaning routine.