How to Mount Dyson Stick Vacuum: Easy Step-by-Step Guide

Mounting your Dyson stick vacuum can seem tricky. But it’s actually simple.
This guide will show you how to do it step by step. Dyson stick vacuums are known for their power and convenience. They help keep your home clean without the hassle of cords. To make the most of your Dyson, mounting it on the wall can save space and keep it charged.
This not only keeps your vacuum organized but also makes it ready to use at any time. In this guide, you will learn the tools you need and the steps to mount your Dyson stick vacuum securely.

Credit: www.amazon.com
Introduction To Dyson Stick Vacuum
The Dyson Stick Vacuum is a popular cleaning tool in many homes. Its lightweight design makes it easy to use. The powerful suction helps to clean all floor types efficiently. Mounting your Dyson Stick Vacuum on the wall can save space and make it more accessible. In this guide, we will show you how to mount your Dyson Stick Vacuum.
Benefits Of Mounting
Mounting your Dyson Stick Vacuum offers several benefits:
- Space-saving: Frees up floor space and reduces clutter.
- Convenience: Easier to grab and use your vacuum quickly.
- Organization: Keeps all accessories in one place.
- Charging: Ensures your vacuum is always ready to use.
Tools Needed
Before you start, gather these tools:
| Tool | Purpose |
|---|---|
| Drill | To make holes in the wall |
| Screwdriver | To tighten screws |
| Level | To ensure the mount is straight |
| Measuring Tape | To measure correct height and distance |
| Wall Anchors | To secure screws in drywall |
Gather these tools to make the mounting process smooth. Having everything ready before you start will save time and effort.
Choosing The Perfect Spot
Choosing the perfect spot for your Dyson stick vacuum mount is crucial. It ensures easy access and optimal performance. A well-chosen spot prevents clutter and keeps your vacuum ready for action.
Finding Wall Studs
First, locate the wall studs. Use a stud finder for this task. Wall studs provide strong support. This ensures your vacuum stays mounted securely. Mark the studs with a pencil.
Height Considerations
Next, consider the height of the mount. Place it where it’s easy to reach. The vacuum should be accessible for all family members. Consider the height of your tallest and shortest users. This ensures everyone can use the vacuum comfortably.
Preparing The Wall
Mounting your Dyson stick vacuum securely starts with preparing the wall. A well-prepared wall ensures the vacuum stays in place and is easy to access. Follow these steps for a smooth installation process.
Marking Drill Points
First, determine the best spot on the wall. Hold the vacuum mount against the wall. Use a pencil to mark the drill points through the holes in the mount. Ensure the marks are visible and accurate. These marks will guide your drilling.
Ensuring Level Placement
Use a level to check the placement of the marks. Place the level above the marks and adjust until the bubble is centered. If the marks are not level, adjust them accordingly. This step ensures the vacuum hangs straight. It’s important for both aesthetics and functionality.
Drilling Holes
Mounting your Dyson Stick Vacuum involves drilling holes in the wall. This ensures a secure and stable mount. Follow these steps to get it right.
Drill Bit Selection
Choosing the right drill bit is crucial. The bit should match the wall type and the screws provided.
- For drywall, use a 1/4-inch bit.
- For plaster, use a masonry bit.
- For concrete, use a hammer drill with a masonry bit.
Always check the instructions that came with your Dyson vacuum for specific recommendations.
Safety Precautions
Safety is important when drilling holes. Follow these steps to stay safe:
- Wear safety goggles to protect your eyes.
- Use ear protection if drilling into hard surfaces.
- Ensure the area is clear of electrical wires and plumbing.
- Mark the spots where you will drill with a pencil.
- Drill slowly and steadily to avoid damaging the wall.
Never rush the drilling process. Take your time to ensure accuracy and safety.
Installing The Mounting Bracket
Installing the mounting bracket for your Dyson stick vacuum is a simple task. Follow these steps to ensure it is securely attached to the wall. This will keep your vacuum organized and ready for use.
Screwing Bracket To Wall
First, gather all necessary tools. You will need a drill, screws, and a screwdriver. Ensure you have the correct screws for your wall type. Drywall, wood, and concrete all require different screws.
- Mark the position on the wall where you want to install the bracket.
- Use a level to ensure the bracket will be straight.
- Drill pilot holes into the wall at the marked positions.
- Align the bracket with the pilot holes.
- Screw the bracket into place using the appropriate screws.
Ensure each screw is tight, but avoid over-tightening. This can damage the wall or the bracket.
Checking Stability
After screwing the bracket to the wall, it is essential to check its stability. This ensures the bracket can hold the weight of the vacuum.
- Gently pull on the bracket to ensure it is secure.
- Place the Dyson stick vacuum on the bracket.
- Observe if the bracket holds the vacuum without wobbling or shifting.
If the bracket feels loose, tighten the screws slightly. If it still wobbles, check if the screws are suitable for your wall type. Re-drill pilot holes if necessary.
By following these steps, you can ensure your Dyson stick vacuum is mounted securely. This keeps your space organized and your vacuum ready for its next use.

Credit: www.amazon.com
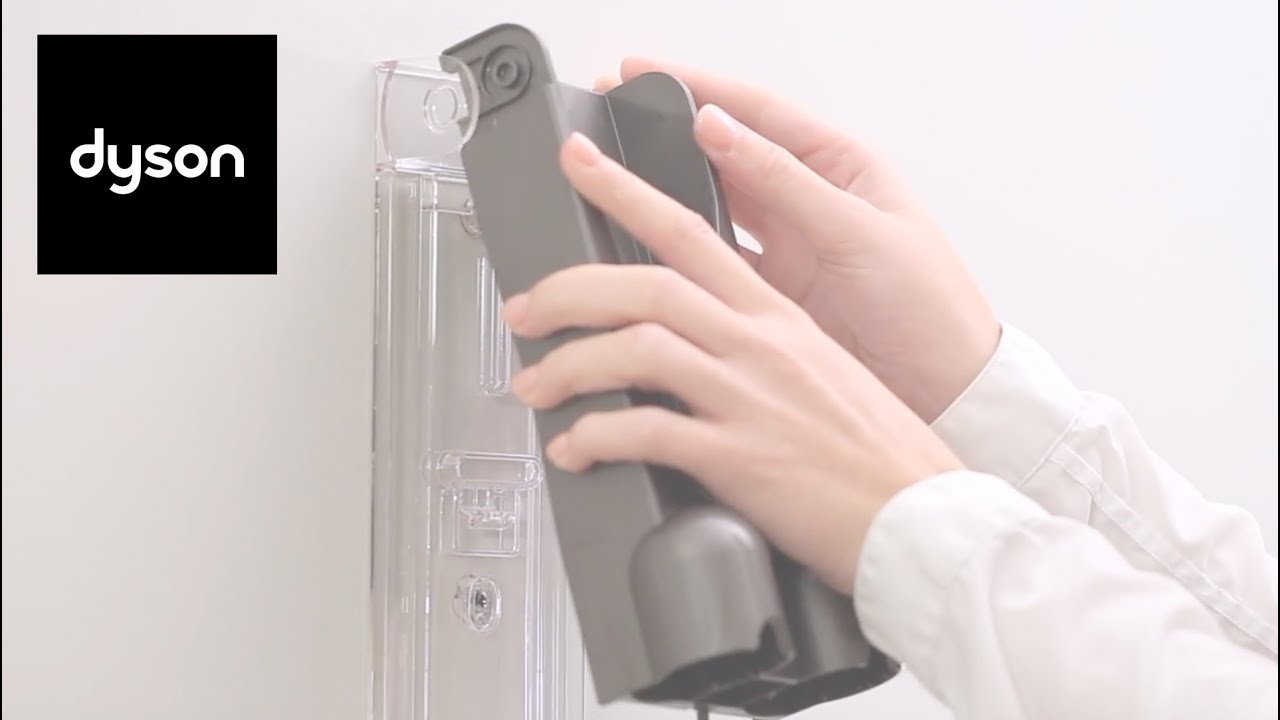
Attaching The Docking Station
Mounting your Dyson stick vacuum on the wall is easy. The first step is attaching the docking station. This ensures your vacuum has a dedicated spot to charge and store. Follow these simple steps to get started.
Aligning With Bracket
First, find a suitable wall spot. Make sure it’s near a power outlet. Hold the docking station against the wall. Use a pencil to mark the screw holes. This helps with proper alignment.
Next, align the bracket with the marks. Check if the bracket is level. Use a spirit level for accuracy. This ensures the docking station will be straight.
Securing The Dock
Now, drill holes where you marked. Use appropriate wall plugs if needed. Insert screws into the holes. Tighten them to secure the bracket. Ensure the dock is firmly attached to the wall.
Slide the docking station onto the bracket. Make sure it clicks into place. Plug in the power cord. Your docking station is now ready for use. Mounting your Dyson stick vacuum is complete!
Mounting The Vacuum
Mounting your Dyson stick vacuum on the wall is a great way to save space. It also keeps your vacuum ready for use. This section will guide you through the steps to mount your Dyson stick vacuum properly.
Placing Vacuum On Dock
Find the perfect spot on your wall. Choose a place near a power outlet. This ensures you can charge the vacuum easily. Mark the spots for screws using the dock as a template. Drill holes and insert wall plugs if needed. Attach the dock to the wall with screws.
Once the dock is secure, place the vacuum on it. Ensure the vacuum clicks into place. This means it is correctly mounted. The charging pins must align with the vacuum’s base. Plug in the charger to test if the vacuum charges.
Ensuring Proper Fit
Check if the vacuum is stable on the dock. It should not wobble or feel loose. Adjust the screws if needed. A secure fit ensures the vacuum stays in place. It also prevents it from falling. Regularly check the fit of the vacuum on the dock. This helps in maintaining the dock’s condition.
Now, you know how to mount your Dyson stick vacuum. This simple process keeps your space organized. Plus, your vacuum is always ready to use. Happy cleaning!
Final Adjustments
Final adjustments ensure your Dyson stick vacuum works perfectly. Proper cable management and a test run are crucial. These steps enhance functionality and prolong the vacuum’s life.
Cable Management
Organize the cables neatly. Avoid tangles and overlaps. Use clips or ties to secure them. This prevents damage and keeps the area tidy. Ensure the power cord is easily accessible. A well-managed cable system boosts efficiency.
Test Run
Perform a test run. Turn on the vacuum. Check for smooth operation. Listen for unusual noises. Ensure all parts function well. Adjust if needed. This step confirms your setup is correct. Your Dyson stick vacuum is ready for use.
Troubleshooting Tips
Mounting your Dyson stick vacuum can sometimes be tricky. Even with the best installation, issues can arise. Here are some troubleshooting tips to help you solve common problems.
Common Issues
Experiencing problems while mounting your Dyson stick vacuum? Check these common issues:
- Loose wall mount: Ensure the screws are tight.
- Vacuum not charging: Verify the power connection.
- Mount not aligning: Check the alignment with a level.
Maintenance Advice
Regular maintenance can prevent many problems. Follow these tips:
- Clean the mount: Dust and debris can affect mounting.
- Inspect the screws: Tighten them periodically.
- Check the power supply: Ensure it is working.
| Issue | Solution |
|---|---|
| Loose mount | Tighten screws |
| Not charging | Check power connection |
| Misalignment | Use a level |
Credit: www.youtube.com
Conclusion
Mounting your Dyson stick vacuum is easier than you think. Follow the steps, secure the bracket, and hang the vacuum. Keep your space tidy and your vacuum accessible. Regular use will become a breeze. Remember, a well-mounted vacuum saves space and time.