How to Fade Your Beard With a Trimmer?
To fade your beard with a trimmer, use a trimmer with an adjustable guard for different lengths, start with a longer setting, then gradually decrease the guard size until desired fade is achieved. Maintaining a well-groomed beard often involves shaping, trimming, and fading to achieve a polished look.
Among the various techniques, fading your beard with a trimmer is an effective way to blend your facial hair seamlessly. Whether you prefer a subtle fade or a more pronounced contrast, using a trimmer with an adjustable guard can help you achieve the desired effect.
By starting with a longer guard setting and gradually reducing the length, you can seamlessly blend the different lengths of hair for a well-defined fade. We will explore the step-by-step process of using a trimmer to fade your beard, allowing you to confidently create a perfectly groomed look. So, let’s dive right in and discover the secrets to achieving a flawless beard fade.
The Importance Of Proper Beard Maintenance
Understanding the significance of a well-groomed beard
Beards have become a popular trend amongst men in recent years. They not only add a touch of masculinity but also serve as a style statement. However, owning a beard comes with great responsibility – proper maintenance being the key. Maintaining your beard not only ensures that you look your best but also keeps your facial hair healthy. And one crucial aspect of this maintenance is fading your beard with a trimmer.
The role of fading in enhancing the overall look
While letting your beard grow can give you a rugged appearance, maintaining a well-groomed beard with a fade takes your look to a whole new level. Fading involves gradually blending the length of your beard hair, resulting in a smooth and seamless transition. By fading your beard, you can achieve a polished and professional appearance, making you stand out in the crowd.
The fading technique allows you to define the lines and contours of your beard, accentuating your facial features. Whether you have a patchy beard that needs some extra attention or a full beard that requires trimming at the edges, utilizing a trimmer to fade your beard ensures a well-balanced and symmetrical look.
Proper fading: enhancing your beard’s potential
When done right, fading your beard with a trimmer can enhance its potential and transform your overall appearance. Here’s why:
| Fading Technique | Benefits |
|---|---|
| Gradual Trimming |
|
| Tapered Edges |
|
| Neckline Blending |
|
Fading your beard with a trimmer not only improves its aesthetic appeal but also helps to keep it manageable. By fading your beard, you can eliminate the risk of an unkempt and unruly appearance. It gives you the flexibility to customize your beard length and shape, allowing you to experiment with different styles that suit your face. The end result is a beard that not only looks good but feels good as well!
So, if you’re looking to enhance your facial hair game and take your beard to the next level, mastering the art of fading with a trimmer is essential. With proper maintenance and the right techniques, you can achieve a well-groomed and effortlessly stylish beard that will surely turn heads.
Choosing The Right Trimmer For Beard Fading
Factors to consider when selecting a trimmer
When it comes to fading your beard, choosing the right trimmer is crucial. A high-quality trimmer can make the fading process easier and deliver professional-looking results. However, with so many options available in the market, selecting the perfect trimmer for beard fading might seem overwhelming. To help you make an informed decision, here are some factors to consider:
- Powerful Motor: Look for a trimmer with a powerful motor to ensure smooth and precise fading. A strong motor prevents snagging or pulling on your beard, providing a comfortable experience.
- Adjustable Guard Lengths: Different beard lengths require different guard lengths. A trimmer with adjustable guard lengths gives you more control and flexibility to achieve the desired fading effect.
- Blade Quality: The quality of the trimmer’s blade is essential for a clean and even fade. Stainless steel blades are known for their durability and sharpness, ensuring efficient trimming and fading.
- Corded or Cordless: Decide whether you prefer the convenience of a cordless trimmer or the unlimited power supply of a corded one. Cordless trimmers are portable and allow for greater flexibility, while corded trimmers provide continuous power without the worry of running out of battery.
- Ease of Maintenance: Opt for a trimmer that is easy to clean and maintain. Detachable blades or trimmer heads make it convenient to remove hair clippings and keep the trimmer hygienic.
A comparison of different trimmer options in the market
Now that you know what factors to consider, let’s take a closer look at some popular trimmer options available in the market:
| Trimmer | Motor Power | Guard Lengths | Blade Quality | Corded/Cordless | Ease of Maintenance |
|---|---|---|---|---|---|
| Brand X Trimmer | 12000 RPM | 0.5mm – 10mm | Stainless Steel Blades | Cordless | Detachable Blade |
| Brand Y Trimmer | 9000 RPM | 0.2mm – 7mm | Titanium Blades | Corded | Washable Blades |
| Brand Z Trimmer | 15000 RPM | 0.4mm – 12mm | Ceramic Blades | Cordless | Detachable Blade |
These are just a few examples of trimmers available in the market. By comparing the motor power, guard lengths, blade quality, corded or cordless feature, and ease of maintenance, you can determine which one suits your needs best.
Remember, finding the right trimmer is an important step towards achieving a perfectly faded beard. Consider these factors and compare the options to find your ideal tool for beard fading.
Preparing Your Beard For Fading
Before you can achieve a flawless fade on your beard, it is crucial to properly prepare it for the trimming process. This involves a few key steps that ensure your facial hair is clean, dry, and primed for the fading technique. By following these steps, you will be well on your way to achieving a sharp and well-groomed look.
Washing and conditioning your beard
One of the first steps in preparing your beard for fading is washing and conditioning it thoroughly. This step is important as it removes any dirt, oil, and product buildup, which can hinder the trimming process and result in an uneven fade. Use a gentle beard shampoo or a mild facial cleanser to cleanse your beard, making sure to cover every inch of hair. Rinse thoroughly to remove all traces of the cleanser.
Once your beard is clean, it’s time to condition it. Applying a good quality beard conditioner helps soften the hair, making it easier to trim and fade. Massage the conditioner into your beard, focusing on the ends and any areas that may be more coarse or dry. Leave the conditioner on for a couple of minutes to allow it to penetrate the hair shaft, then rinse it off completely.
The importance of a clean and dry beard before fading
Now that your beard is both clean and conditioned, it is essential to ensure it is completely dry before attempting to fade it. A wet or damp beard can lead to inaccurate trimming results, as the hair may shrink or expand when dry. To avoid this, gently pat your beard dry using a clean towel. Avoid rubbing the towel vigorously, as this can cause frizz and damage to the hair.
For those with longer beards, it is recommended to use a hairdryer on a low or cool setting to ensure your beard is thoroughly dry. This will help eliminate any moisture that may have been missed during the towel drying process. Take your time and make sure your beard is completely dry, as this will ensure a more precise and even fade when using a trimmer.
Understanding Different Fading Techniques
Exploring popular fading techniques for beards
Fading your beard can be a great way to experiment with different styles and achieve a more polished look. By gradually decreasing the length of your facial hair, you can create a fade effect that adds depth and definition to your beard. However, understanding the different fading techniques is crucial to achieving the desired result. In this section, we will explore some popular fading techniques for beards and provide step-by-step guides for each technique.
Step-by-step guide for each technique
Whether you prefer a subtle fade or a more dramatic transition, there are several techniques you can try to achieve the desired look. Below, we will walk you through step-by-step guides for three popular fading techniques:
Technique 1: Blending with a gradual taper
- Start by selecting the desired length for the base of your beard. This will be the longest part of your facial hair.
- Using a trimmer with an adjustable guard or length settings, trim the rest of your beard gradually, reducing the length as you move towards the neckline.
- Focus on blending the different lengths smoothly, ensuring there are no harsh lines or noticeable transitions.
- Repeat the process, gradually reducing the length of your beard until you achieve the desired fade.
- Once you are satisfied with the overall blend and fade, trim the neckline for a clean and polished finish.
Technique 2: Layered fading
An alternative to the gradual taper technique is layered fading, which involves creating defined layers of different lengths within your beard. Follow these steps to achieve a layered fade:
- Start by defining the base length of your beard. This will serve as the foundation for the layered fade.
- Using a trimmer, create a second layer by trimming a shorter length of facial hair above the base.
- Continue this process, creating additional layers with shorter lengths as you move up towards the cheeks.
- Blend the different layers together by using a trimmer without a guard or by carefully using the trimmer’s edges.
- Trim the neckline and shape the beard as desired to complete the look.
Technique 3: Bald fade
The bald fade is a more extreme fading technique that involves creating a nearly seamless transition from a very short length to completely shaved skin. To achieve a bald fade, follow these steps:
- Start by trimming your beard to a short length using a trimmer with a short guard or length setting.
- Gradually decrease the length of your beard, blending it with the skin without leaving any visible lines or demarcations.
- Continue trimming until you reach the desired length or completely shave off the hair in certain areas for a bald effect.
- Use a razor or electric shaver to achieve a smoother finish.
- Shape the beard and neckline to your preference, and clean up any stray hairs.
Understanding these different fading techniques can help you achieve the desired beard style and ensure a professional-looking result. Experiment with different lengths and fades to find the one that suits you best, and don’t be afraid to get creative with your beard grooming.
Mastering The Fading Technique With A Trimmer
The fading technique is a popular choice for maintaining a well-groomed and stylish beard. It involves gradually reducing the length of your facial hair from top to bottom, creating a seamless fade. While this technique may seem daunting at first, with the right tools and knowledge, you can easily achieve a professional-looking fade from the comfort of your own home. In this article, we will guide you through the process of mastering the fading technique with a trimmer, providing you with tips, tricks, and step-by-step instructions.
Tips for achieving precise and even fades
When it comes to achieving a precise and even fade, attention to detail is crucial. Here are some useful tips to keep in mind:
- Start with clean, dry hair: Before you begin the fading process, ensure that your beard is clean and dry. This will make it easier to manipulate the hair and achieve a more accurate fade.
- Use a good quality trimmer: Investing in a high-quality trimmer with adjustable guard lengths is essential for achieving a professional fade. A trimmer with multiple guard lengths will give you more control over the length of your beard, allowing you to create a seamless transition from top to bottom.
- Work in small sections: Instead of attempting to fade your entire beard in one go, it’s best to work in small sections. Start at the top and gradually work your way down, paying attention to each section of hair to ensure a seamless fade.
- Take your time: Fading requires patience and precision. Take your time and work slowly, making small adjustments as needed. Rushing through the process may result in an uneven fade.
Choosing the right guard length for desired results
The guard length you choose will greatly impact the final result of your fade. Here’s a guide to help you choose the right guard length for your desired results:
| Guard Length | Effect |
|---|---|
| 1/16 inch (1.5mm) | A very close fade, almost similar to a clean shave. |
| 1/8 inch (3mm) | A subtle fade that maintains a bit of length, creating a well-groomed look. |
| 1/4 inch (6mm) | A longer fade that still showcases some beard length, suitable for those who prefer a more rugged appearance. |
Choosing the right guard length depends on your personal preference and the overall look you want to achieve. Experimenting with different lengths can help you find the perfect fade for your beard.
By following these tips and choosing the right guard length, you will be well on your way to mastering the fading technique with a trimmer. With practice and patience, you can achieve a professional-looking fade that enhances your facial hair and boosts your confidence.

Credit: thebeardclub.com
Step-By-Step Guide To Fading Your Beard With A Trimmer
Fading your beard with a trimmer is a popular technique among men who want a well-groomed and stylish look. Whether you’re looking to achieve a subtle fade or a more dramatic effect, this step-by-step guide will help you master the art of fading your beard with a trimmer. From preparing the trimmer to applying the right techniques, we’ve got you covered. Let’s dive in!
Preparing the Trimmer for Precision Fading
Before you begin fading your beard, it’s important to ensure that your trimmer is properly prepared for the task at hand. Follow these steps to get your trimmer ready:
- Clean and oil your trimmer blades. Using a small brush, remove any hair or debris that may have accumulated on the blades. Then, apply a few drops of oil to keep the blades running smoothly.
- Adjust the trimmer guard. Depending on the length of the fade you desire, choose the appropriate guard attachment for your trimmer. Attach it securely to ensure consistent results.
- Check the battery level. Make sure your trimmer is fully charged or has fresh batteries. This will prevent any interruptions during the fading process.
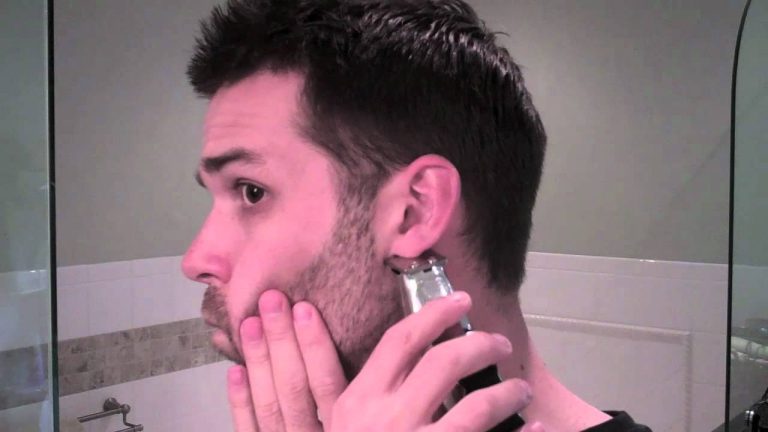
Techniques for Fading the Beard Seamlessly
Now that your trimmer is ready, it’s time to master the techniques that will help you achieve a seamless beard fade. Follow these steps:
- Start with the longest guard attachment: Begin fading your beard by using the longest guard attachment. This will create a baseline for the rest of the fade.
- Work your way down: Gradually switch to shorter guard attachments as you move down towards your desired fade length. Use smooth, upward motions to blend each section seamlessly into the next.
- Pay attention to the neckline: When fading your beard, don’t forget to pay attention to your neckline. Use a smaller trimmer guard or remove it entirely to create a clean, defined neckline.
- Check for symmetry: Regularly check your progress in the mirror to ensure that both sides of your beard are symmetrical. Make any necessary adjustments to maintain a balanced fade.
- Gradual blending: To achieve a natural-looking fade, focus on gradually blending each section. Use a lighter touch as you approach the transition points to avoid harsh lines.
By following these step-by-step techniques and tips, you’ll be able to fade your beard with a trimmer like a pro. Remember to take your time, practice, and experiment to find the perfect fade for your personal style. Happy trimming!
Troubleshooting Common Fading Mistakes
Fading your beard using a trimmer can be a great way to achieve a stylish and well-groomed look. However, even the most experienced trimmers often encounter some common fading mistakes along the way. Don’t worry – these mistakes can be easily fixed with a little know-how. In this section, we’ll guide you through identifying and fixing uneven fades and dealing with unexpected mistakes during the process. So, let’s dive in and ensure your beard fading journey stays on track!
Identifying and Fixing Uneven Fades
One of the most common mistakes when fading your beard is achieving uneven results. It can be frustrating to notice patches or inconsistencies in the fade, but fear not – there are steps you can take to correct this issue.
Here’s how to identify and fix uneven fades:
- Take a step back and evaluate your beard in a well-lit area. Look for any noticeable differences or patches in the fade.
- Using a trimmer with an adjustable guard or length setting, go over the areas that need adjustment. Gradually decrease the guard length as you move toward the desired fade point.
- Blend the areas between different lengths by using an upward motion with the trimmer. This will help create a more seamless fade.
- After making adjustments, step back and evaluate the fade again. Repeat the process as needed until you achieve a smooth and even transition between lengths.
Dealing with Unexpected Mistakes During the Process
Even the most skilled trimmers can sometimes make unexpected mistakes while fading their beards. It could be cutting too much in a specific area or accidentally creating a harsh line. But don’t fret – there are ways to fix these mistakes and save your fade.
Here’s how to deal with unexpected mistakes during the fading process:
- If you accidentally cut too much hair in a certain area, don’t panic. Use a slightly longer guard size on your trimmer and gently blend the area with the surrounding hair. Take it slow and make small adjustments until the mistake is less noticeable.
- In case you create a harsh line while fading, use a higher guard size or even a comb attachment to gradually blend the line out. Start from the line and work your way upward, ensuring a natural and seamless transition.
- If the mistake is severe and requires a more significant correction, consider trimming your entire beard to a shorter length and starting the fading process from scratch.
Remember, mistakes happen to everyone, even professionals. The key is to stay calm and make adjustments with patience. By following these troubleshooting techniques, you’ll be able to fix common fading mistakes and achieve a well-blended and stylish beard fade.
Maintaining And Touching Up Faded Beards
Tips for Keeping the Faded Look Fresh and Sharp
Once you have successfully achieved the perfect faded beard using a trimmer, the next step is to maintain and touch it up regularly. By following these simple tips, you can ensure your faded beard always looks fresh and sharp.
1. Set a Maintenance Schedule
To keep your faded beard looking its best, it’s important to establish a regular maintenance schedule. This could depend on how quickly your facial hair grows, but a touch-up every one to two weeks is generally recommended. Set a specific day or time each week to ensure you don’t forget to maintain the desired fade.
2. Invest in a Quality Beard Trimmer
A quality beard trimmer is an essential tool for maintaining a faded beard. Look for a trimmer with adjustable guard settings that allow you to achieve the desired length seamlessly. Ensure your trimmer is well-maintained, clean, and the blades are sharp for optimal performance.
3. Start with a Clean and Dry Beard
Before touching up your faded beard, make sure it’s clean and dry. A damp beard can be harder to trim evenly, potentially compromising the fade. Wash your beard thoroughly with a gentle shampoo and pat it dry with a towel before getting started.
4. Trim Against the Grain
When touching up your faded beard, trim against the grain to achieve a clean and precise look. Start by trimming the hair at the lowest fade point, gradually working your way up to the desired length. Use smooth, steady strokes, and be mindful not to trim too much hair in one go.
5. Blend the Fade Seamlessly
To maintain a natural and seamless faded look, blend the fade carefully. Gradually adjust the guard settings on your trimmer as you move from the lower fade point to the higher fade point. This will help create a smooth transition and avoid any harsh lines.
6. Pay Attention to Detail
Don’t forget the small details when touching up your faded beard. Use a precision trimmer or a pair of grooming scissors to tidy up any stray hairs or uneven patches. Take your time and ensure every area of your beard is well-groomed for a sharp and polished appearance.
Remember, maintaining a faded beard requires regular touch-ups and attention to detail. By following these tips, you can keep your beard looking fresh and sharp, ensuring your faded style continues to turn heads wherever you go.
Taking Your Faded Beard To The Next Level
Congratulations on achieving a seamlessly faded beard! Now that you’ve mastered the technique, it’s time to take your beard to the next level by exploring various styling options and experimenting with different beard shapes and designs. By doing so, you can effortlessly enhance your overall appearance and showcase your personal style. In this section, we will delve into the exciting possibilities that await you in the realm of beard styling.
Styling options for complementing the fade
When it comes to styling a faded beard, the options are nearly endless. By choosing the right hairstyle, you can perfectly complement your fade and create a cohesive and stylish look. Consider the following styling options:
- Short and textured: Pairing a faded beard with a short and textured hairstyle is an excellent choice for a low-maintenance yet trendy look. The textured hair adds dimension and a touch of ruggedness to your overall appearance, perfectly accentuating the fade.
- Pompadour: For those seeking a more polished and refined style, the pompadour is a fantastic choice. By slicking back the hair on top and leaving the beard neatly faded, you create a contrast that exudes a sense of sophistication and elegance.
- Undercut: The combination of a faded beard and an undercut hairstyle is a striking option that demands attention. The shaved sides and back of the head seamlessly blend with the faded beard, resulting in an edgy and fashionable look.
- Crew cut: If you prefer a classic yet timeless style, pairing a faded beard with a crew cut is an excellent choice. This clean-cut hairstyle perfectly complements the fade, giving you a neat and polished appearance.
Experimenting with different beard shapes and designs
Now that your faded beard is in top form, why not experiment with different beard shapes and designs to showcase your individuality and creativity? Here are some ideas to get you started:
- Goatee: Trim your beard into a stylish goatee shape by completely removing the hair from your cheeks and keeping a well-defined beard along your jawline and chin. This classic style adds a refined touch to your overall look.
- Mutton chops: For a bold and distinctive appearance, consider growing your sideburns into mutton chops. This eye-catching style adds a touch of vintage charm while allowing you to maintain your faded beard.
- Soul patch: For those seeking a minimalistic and unique style, keeping a small patch of hair just below your lower lip can make a big impact. This small detail adds a touch of individuality to your faded beard.
Remember, experimenting with different beard shapes and designs allows you to express your personality and stand out from the crowd. Whether you opt for a subtle goatee or daring mutton chops, let your creativity shine through and embrace the freedom of personal expression!
Conclusion: The Art Of Fading Your Beard With A Trimmer
Conclusion: The Art of Fading Your Beard with a Trimmer
Fading your beard with a trimmer goes beyond just grooming – it’s an art form. By mastering the technique, you can achieve a well-groomed look that exudes confidence and style. In this blog post, we have discussed the step-by-step process of fading your beard with a trimmer, highlighting key tools and techniques to achieve the perfect fade. Now, let’s emphasize the importance of practice and patience, as well as the impact a well-faded beard can make in enhancing your overall appearance.
Emphasizing the Importance of Practice and Patience
When it comes to fading your beard with a trimmer, practice truly makes perfect. Familiarizing yourself with your trimmer and understanding its settings is crucial. Take the time to experiment with different blade attachments, guard lengths, and trimming techniques. Remember, everyone’s beard is unique, so it may take time and trial-and-error to find the right combination that works for you.
Patience is key when mastering the art of beard fading. It’s important to take your time and work in small, gradual increments. Rushing the process can lead to uneven results and potentially irreversible mistakes. So, be patient with yourself and trust the process. With practice, your skills will improve, and you’ll be able to achieve a flawlessly faded beard.
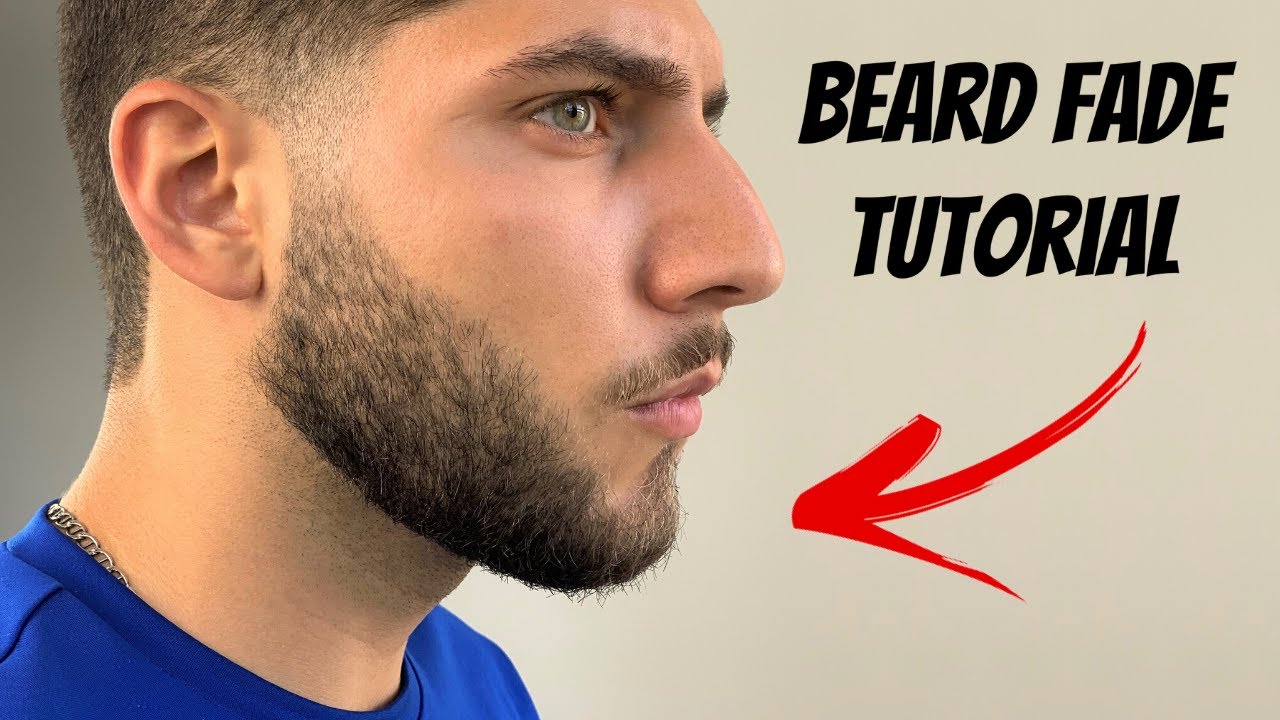
Reminding Readers of the Impact a Well-Faded Beard Can Make
A well-faded beard can have a transformative effect on your overall appearance. It adds depth, dimension, and style to your facial hair, making it appear more polished and intentional. A precisely faded beard can also enhance your facial structure, providing a more defined and flattering look. Whether you’re aiming for a professional, sophisticated, or rugged look, a well-faded beard can help you achieve your desired style.
A well-groomed beard is often associated with confidence and self-care. It shows that you take pride in your appearance and are willing to put in the effort to maintain it. This can have a positive impact on how others perceive you as well, leaving a lasting impression. So, don’t underestimate the power of a well-faded beard – it can be a game-changer in your overall style and confidence.
Mastering the art of fading your beard with a trimmer takes practice, patience, and a keen eye for detail. By dedicating time to refine your technique and being patient with the process, you can achieve a flawlessly faded beard that enhances your overall appearance. So, grab your trimmer, embrace the artistry, and start fading your beard like a true professional!
Frequently Asked Questions Of How To Fade Your Beard With A Trimmer
How Can I Taper My Beard At Home?
To taper your beard at home, follow these steps:
1. Start by cleaning and combing your beard.
2. Use a beard trimmer to trim the sides gradually, going from long to short.
3. Blend the longer top hair into the shorter sides using the trimmer.
4. Define the neckline by trimming any excess hair below the Adam’s apple.
5. Finish by styling your beard with a beard brush or comb.
Is It Easy To Fade Your Beard?
Fading your beard is easy. Just follow these steps: trim your beard, use a lower guard setting on your trimmer, blend the cut hair with longer hair, and repeat until desired fade is achieved.
Where Should I Fade My Beard?
To fade your beard, consult a professional barber who will skillfully blend the length from the longer to shorter areas. This ensures a seamless and natural look. Trust an expert for a proper beard fade.
Do You Trim Up Or Down With A Beard Trimmer?
You trim up with a beard trimmer. It helps in shaping and maintaining your beard’s length, style, and overall appearance.
Conclusion
Achieving a well-faded beard using a trimmer is a skill worth mastering. By carefully selecting the right trimmer, using the appropriate techniques, and taking the time to blend and fade, you can create a stylish and polished beard look. Remember to go slow and be patient, as practice makes perfect.