How to Clean Your Beard Trimmer?
To clean your beard trimmer, simply follow these steps: Remove the blades, brush off any hair and debris, wash with soapy water, dry thoroughly, and reassemble. Keeping your beard trimmer clean is crucial for its performance and longevity.
Importance Of Cleaning Your Beard Trimmer
Why regular maintenance is necessary for a clean and healthy trim
Proper maintenance of your beard trimmer is crucial not only for extending its lifespan but also for ensuring a clean and healthy trim every time you use it. Regular cleaning and maintenance help prevent bacteria, dirt, and oils from accumulating on the trimmer’s blades and other components. Here’s why you should make it a habit to clean your beard trimmer:
- Hygiene: A beard trimmer that is not cleaned regularly can become a breeding ground for bacteria. When you use an unclean trimmer, these bacteria can transfer to your skin, potentially causing infections or irritations. By cleaning your trimmer after each use, you maintain proper hygiene and minimize the risk of skin issues.
- Efficiency: Over time, hair clippings, oils, and residue can build up on the trimmer’s blades, leading to clogging and reduced cutting performance. Regular cleaning ensures that the trimmer operates smoothly and efficiently. With a clean trimmer, you can achieve precise and even trims without any snagging or pulling of your hair.
- Blade sharpness: When hair clippings build up on the trimmer’s blades, they can blunt the sharpness, resulting in an uneven and unsatisfactory trim. Cleaning your trimmer helps to maintain blade sharpness, ensuring a clean and precise cut every time.
- Durability: A beard trimmer is an investment, and proper cleaning and maintenance can prolong its lifespan. By keeping the trimmer clean and free from debris, you reduce the likelihood of mechanical failures and ensure that it continues to operate effectively for years to come.
The impact of a dirty trimmer on performance and longevity
A dirty trimmer can have significant consequences for both its performance and longevity. Ignoring regular cleaning and maintenance can lead to various issues that affect its functionality and overall lifespan:
- Poor cutting performance: As mentioned earlier, a build-up of hair clippings and dirt can impede the trimmer’s cutting performance. This can result in uneven trims, hair pulling, and frustration during your grooming routine.
- Decreased battery life: When a trimmer is clogged with debris, it needs to work harder to achieve the desired cutting results. This excessive strain can drain the battery faster and reduce the overall battery life of your trimmer.
- Motor damage: A dirty trimmer can put extra stress on its motor, causing it to wear out more quickly. When debris accumulates in the motor area, it can impede the cooling mechanism, leading to overheating and potential damage to the internal components.
- Potential rusting: Without proper cleaning, moisture from damp hair clippings can cause the trimmer’s blades to rust over time. This not only affects the trimmer’s performance but also poses a risk of irritation and skin infections when used on your face.
Regular cleaning and maintenance are simple tasks that can greatly improve the performance and longevity of your beard trimmer. By taking a few extra minutes to clean your trimmer after each use, you’ll ensure a clean, precise, and efficient trim every time, while also maximizing the lifespan of this essential grooming tool.
Gathering The Necessary Supplies
Before you begin the process of cleaning your beard trimmer, it’s important to gather all the necessary supplies. With the right tools and equipment on hand, you’ll be able to efficiently clean your trimmer and keep it in optimal condition. In this section, we’ll go over the essential tools for the cleaning process, as well as additional items that are recommended for a thorough clean.
Essential tools for the cleaning process
When it comes to cleaning your beard trimmer, having the right tools is essential. Here are the must-have items for the cleaning process:
- Cleaning brush: A small cleaning brush with soft bristles is crucial for removing loose hairs and debris from the trimmer head.
- Cotton swabs: Cotton swabs are ideal for reaching those hard-to-clean areas, such as the corners and crevices of the trimmer.
- Compressed air canister: A canister of compressed air is useful for blowing away any remaining dust or particles that may be stuck in the trimmer.
- Microfiber cloth: A microfiber cloth is great for wiping down the trimmer and removing any remaining residue or cleaning solution.
Additional recommended items for a thorough clean
In addition to the essential tools mentioned above, there are a few additional items that can help ensure a thorough clean:
- Barber cape or towel: Using a barber cape or towel can help contain any loose hairs or debris while you’re cleaning your trimmer, making the process less messy.
- Clipper oil: Applying a few drops of clipper oil to the trimmer blades after cleaning can help maintain their sharpness and prolong the life of your trimmer.
- Disinfectant solution: If you’re sharing your trimmer with others, using a disinfectant solution can help prevent the spread of bacteria and keep your trimmer hygienic.
- Storage case: To keep your trimmer clean and protected when not in use, consider investing in a storage case specifically designed for beard trimmers.
By gathering these necessary supplies, you’ll be well-prepared to tackle the cleaning process and ensure that your beard trimmer stays in top-notch condition.
Remember, regular cleaning and maintenance are essential for keeping your beard trimmer functioning at its best and prolonging its lifespan. So, let’s dive in and get your trimmer looking and performing like new!
Step 1: Preparing Your Beard Trimmer For Cleaning
Before diving into the process of cleaning your beard trimmer, it’s essential to properly prepare it for the task. A little careful preparation will go a long way in ensuring a thorough clean and the longevity of your trusty grooming tool.
Disconnecting the Trimmer from Power Source and Removing any Attachments or Accessories
The first thing you want to do is ensure your safety by disconnecting the beard trimmer from its power source. This will help prevent any accidents while cleaning. Remove the plug from the wall socket or detach the battery, depending on the type of trimmer you have, before proceeding with the cleaning process.
Once you’ve unplugged the trimmer, it’s time to remove any attachments or accessories. This step will allow for a more effective and thorough cleaning. Detach the blade guard, comb, or any other removable parts from the trimmer. Pay special attention to the manufacturer’s instructions as different trimmers may have specific guidelines for detachment. Keep these attachments aside for cleaning separately.
Brushing off Loose Hairs and Debris from the Trimmer
Now that you’ve disconnected the trimmer and removed the attachments, it’s time to rid the device of any loose hairs and debris that may have accumulated. For this, you’ll need a small brush with soft bristles, like a toothbrush or a specialized cleaning brush. Use the brush to gently sweep away any visible hairs or debris from the trimmer’s surface. Be thorough and ensure you get into all the nooks and crannies where dirt tends to accumulate.
During this process, pay close attention to the trimmer’s blades. Carefully clean between the blades, making sure to remove any trapped hair that may affect the trimmer’s performance and longevity. Regularly check the brush to ensure it is free of loose hairs and debris, disposing of them in a proper waste receptacle.
Remember, a clean trimming tool is not only hygienic but also ensures a smoother and more effective shave. With these steps completed, your beard trimmer will be ready for a deep clean, ensuring optimal performance for your grooming needs.
Step 2: Disassembling The Trimmer
Once you’ve prepared your workspace and gathered all the necessary cleaning supplies, it’s time to dive into step 2: disassembling your beard trimmer. Disassembling the trimmer ensures that you can thoroughly clean each individual part to maintain optimal performance and hygiene.
Removing the Blade or Cutting Attachment
The first part you’ll want to remove is the blade or cutting attachment of your beard trimmer. This is the main component responsible for trimming and shaping your facial hair, so it’s crucial to clean it properly.
Here’s a step-by-step guide on how to remove the blade or cutting attachment:
- Switch off the trimmer and unplug it from the power source to ensure safety.
- Carefully locate the release button or lever located on the trimmer head.
- Press the release button or move the lever in the designated direction to detach the blade or cutting attachment.
- Once detached, set the blade or cutting attachment aside for cleaning.
Remember to exercise caution while handling the blade or cutting attachment as it is sharp and delicate. Place it in a safe spot to prevent any accidents or damage.
Detaching and Cleaning Other Removable Parts
In addition to the blade or cutting attachment, there may be other removable parts in your beard trimmer that require cleaning. These parts can include combs, guards, detachable heads, or any other accessories that can be detached for maintenance.
To detach and clean these parts, follow these simple steps:
- Inspect the trimmer to identify any removable parts apart from the blade or cutting attachment.
- If needed, consult the user manual that came with your trimmer for specific instructions regarding detachable parts.
- Gently remove the identified parts from the trimmer by either sliding, twisting, or pressing the release buttons, if applicable.
- Once detached, clean each part individually using the cleaning solution or mild soap and warm water.
- Rinse thoroughly and pat dry with a clean towel.
Ensure that each removable part is completely dry before reassembling the trimmer to prevent any moisture-related damage.
By disassembling your beard trimmer and cleaning each part separately, you’ll be able to maintain the performance and durability of your trimmer for a long time. In the next step, we’ll cover how to clean the individual parts in-depth, ensuring a thorough cleaning process.
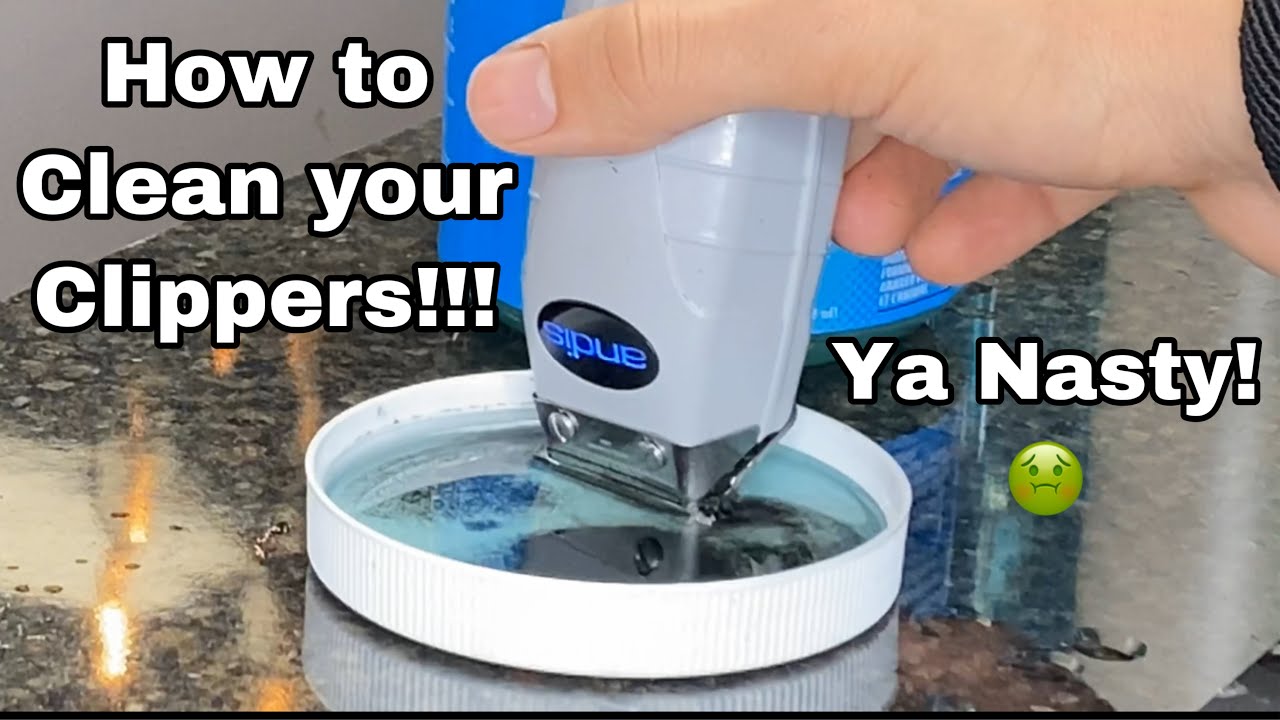
Step 3: Cleaning The Blade Or Cutting Attachment
After removing the cutting attachment from your beard trimmer, it’s important to clean it thoroughly to maintain optimal performance and longevity. Cleaning the blade or cutting attachment may vary depending on the type of blade you have. Here are some proper techniques for cleaning different types of blades:
Proper techniques for cleaning different types of blades
1. Stainless steel blades:
Stainless steel blades are the most common type used in beard trimmers. To clean stainless steel blades, follow these steps:
- Detach the blade from the trimmer and use a small brush or toothbrush to remove any loose hair or debris.
- Wipe the blade gently with a cloth or tissue dampened with rubbing alcohol to remove any remaining residue.
- Ensure that the blade is completely dry before reattaching it to the trimmer.
2. Ceramic blades:
Ceramic blades are known for their sharpness and durability. To clean ceramic blades, follow these steps:
- Remove the blade from the trimmer and use a cleaning brush to remove any hair or debris.
- Wash the blade under running water or immerse it in a bowl of warm, soapy water.
- Gently scrub the blade with a soft brush or cloth to remove any residue.
- Rinse the blade thoroughly to remove any soap or cleaning solution.
- Dry the blade completely before reattaching it to the trimmer.
Using cleaning solutions or sprays to remove stubborn residue
If you notice stubborn residue on the blade or cutting attachment, you can use a cleaning solution or spray designed specifically for beard trimmers. Follow these steps to ensure effective cleaning:
- Detach the blade from the trimmer.
- Apply a small amount of the cleaning solution or spray to the blade.
- Use a cleaning brush or cloth to gently scrub the blade, paying extra attention to areas with residue.
- Rinse the blade under running water to remove any cleaning solution.
- Dry the blade thoroughly before reattaching it to the trimmer.
Cleaning your beard trimmer’s blade or cutting attachment is crucial for maintaining hygiene and performance. By following these proper cleaning techniques and using cleaning solutions when necessary, you can ensure that your trimmer remains in top condition for a neat and precise beard trim every time.
Step 4: Cleaning The Body Of The Trimmer
Once you have successfully removed and cleaned the blades of your beard trimmer, it’s time to move on to cleaning the body of the trimmer itself. This step is essential to maintain the hygiene and longevity of your trimmer, as the body can accumulate dirt, grime, and product residue over time. Follow these simple steps to ensure your trimmer stays in top condition:
Wiping down the handle and body of the trimmer
To begin, take a soft, lint-free cloth and dampen it slightly with warm water. Gently wipe down the handle and body of the trimmer, removing any visible dirt or debris. Pay special attention to the areas where your fingers usually grip the trimmer, as these spots tend to accumulate oils from your skin.
By regularly wiping down the handle and body, you not only keep your trimmer looking clean but also prevent the buildup of bacteria and germs, which can be transferred to your face during the trimming process.
Removing any dirt or grime from hard-to-reach areas
In addition to wiping down the handle and body, it’s important to remove any dirt or grime that may have accumulated in the hard-to-reach areas of your trimmer. These areas can include the gaps between the blade and the body, as well as the crevices around the power switch or charging port.
One effective way to clean these areas is by using a small brush, such as a toothbrush or a soft-bristled brush specifically designed for trimmer cleaning. Gently brush away any debris, making sure to reach all the nooks and crannies.
If you notice stubborn dirt or grime that is difficult to remove with a brush alone, you can also use a cotton swab dipped in rubbing alcohol to carefully clean these areas. However, be cautious not to saturate the trimmer with alcohol, as it can damage the internal components.
Remember, regular cleaning of the body of your trimmer not only ensures its longevity but also helps to maintain its overall performance and hygiene. Following these simple steps will keep your trimmer in top condition, allowing for precise and comfortable trimming every time.
Step 5: Drying And Reassembling The Trimmer
After thoroughly cleaning the individual parts of your beard trimmer, the next crucial step is to ensure that everything is properly dried and reassembled. This step is essential to maintain the longevity and functionality of your trimmer. Here’s what you need to do:
Ensuring all parts are completely dry before reassembly
Before proceeding with reassembling your beard trimmer, make sure that all the cleaned parts are completely dry. Any moisture left can lead to rust or damage in the long run. To effectively dry the components, follow these steps:
- Use a clean and dry cloth or towel to gently pat-dry each individual part. Ensure that there are no damp spots left.
- If necessary, use a blow dryer on a low heat setting to remove any residual moisture. Be cautious not to overheat or damage the parts.
- Leave the components on a clean, dry surface for a few minutes to air-dry completely. This will allow any remaining moisture to evaporate.
Properly attaching the blade or cutting attachment
Once all the parts of your beard trimmer are thoroughly dried, it’s time to reassemble them. Pay careful attention to properly attaching the blade or cutting attachment. Here’s how to do it correctly:
- Securely position the blade or cutting attachment onto the trimmer’s head, aligning the grooves or notches to ensure a proper fit.
- Gently push or slide the blade or attachment until you feel and hear it click into place.
- Give it a light tug to ensure it is securely attached, without any loose movements.
Taking the time to ensure that the parts of your beard trimmer are dried and reassembled correctly will contribute to its overall performance and longevity. Now that your trimmer is clean and ready, you can confidently maintain your well-groomed beard with ease.
Remember, regular cleaning of your trimmer and proper maintenance are key to keeping it in optimal condition. By following these steps and incorporating them into your grooming routine, you’ll be able to enjoy a clean and well-functioning beard trimmer for years to come.
Step 6: Lubricating The Trimmer
The importance of lubrication for smooth operation
To ensure your beard trimmer functions smoothly and efficiently, it is crucial to properly lubricate the blade or cutting attachment. Lubrication helps reduce friction and prevents the trimmer from pulling or tugging on your hair, resulting in a comfortable and precise trimming experience.
Applying a small amount of oil to the blade or cutting attachment
To lubricate your beard trimmer effectively, follow these simple steps:
- Clean the trimmer thoroughly using the steps mentioned earlier in this guide.
- Once the trimmer is dry, apply a small amount of lubricating oil specifically designed for trimmers. The oil helps to reduce friction and ensures smooth movement of the blades.
- Open the oil container and carefully apply a few drops of oil to the blade or cutting attachment. Be sure not to overdo it, as excessive oil can lead to sticky residue accumulation.
- After applying the oil, turn on the trimmer and let it run for a few seconds. This ensures that the oil is evenly distributed across the blade or cutting attachment.
- If there is any excess oil, simply wipe it off with a clean cloth or tissue.
- Repeat this process every few months or as recommended by the trimmer manufacturer to maintain optimal performance.
Remember, lubricating your beard trimmer is a quick and easy task that goes a long way in extending its lifespan and ensuring a comfortable and efficient trimming experience. By incorporating this simple step into your regular maintenance routine, you can enjoy well-groomed facial hair without any hassles.
Step 7: Final Touches And Storage
Once you have completed the cleaning and drying process for your beard trimmer and its attachments, it’s time to give some attention to the final touches and proper storage. This step is crucial in maintaining the cleanliness of your trimmer and ensuring its longevity. Proper storage will also save you time and effort when you need to use your trimmer again. Here’s what you need to do:
Cleaning and Drying any Attachments or Accessories
Before you put away your beard trimmer, make sure to clean and dry any attachments or accessories that you may have used during your grooming session. Neglecting this step may lead to product buildup and compromise the effectiveness of the trimmer in the future.
Here’s a simple process to follow:
- Start by detaching the attachments or accessories from the main unit of the trimmer. This may include guards, combs, or blade covers.
- Refer to the manufacturer’s instructions to determine the appropriate cleaning method for each attachment or accessory.
- Typically, you can use a small brush or toothbrush to remove any hair or product buildup from the attachments. You can also rinse them with warm water if necessary, but be cautious not to immerse any electronic parts.
- Once cleaned, pat dry the attachments or accessories with a clean towel or let them air dry completely before storing them.
Proper Storage to Maintain the Cleanliness of the Trimmer
Proper storage is essential in maintaining the cleanliness of your beard trimmer and protecting it from damage. Follow these tips to ensure your trimmer remains in top condition:
- Always store your beard trimmer in a dry and well-ventilated area to prevent moisture buildup. Moisture can lead to rust or mold growth, which can damage the trimmer.
- If your trimmer came with a protective cap or blade cover, make sure to put it back on before storing. This will shield the blades from dust, debris, and accidental damage.
- Consider using a dedicated storage case or pouch to keep your trimmer and its attachments organized and protected. This will also prevent them from being misplaced or damaged.
- Avoid storing your trimmer near any chemicals, cleaning agents or other potentially damaging substances. Keep it away from direct sunlight and extreme temperatures as well.
By following these final touches and proper storage practices, you can ensure that your beard trimmer remains clean, functional, and ready to use whenever you need it. Taking these extra steps will not only help prolong the lifespan of your trimmer but also ensure optimal performance for your grooming routine.
Credit: www.menshealth.com
Maintaining Your Clean Beard Trimmer
Regular cleaning and maintenance are essential for keeping your beard trimmer in optimal condition. By following a few simple tips, you can ensure that your trimmer stays clean, efficient, and long-lasting. In this section, we will discuss the importance of regular cleaning and maintenance and the recommended frequency for deep cleaning your beard trimmer.
Tips for Regular Cleaning and Maintenance
Keeping your beard trimmer clean is crucial, as it will help prevent the buildup of hair, oil, and debris that can affect its performance and longevity. Here are a few handy tips to ensure your trimmer stays fresh:
- Brush off loose hairs: After each use, use a small cleaning brush, generally included with the trimmer, to remove any loose hairs from the blades and comb attachments. This will prevent the accumulation of hair and maintain optimum cutting performance.
- Wipe with a damp cloth: Use a soft, damp cloth to wipe the trimmer body and handle. This will help remove any residue or excess oil from the device, keeping it hygienic and preventing any potential damage.
- Lubricate the blades: Lubricating the blades is crucial for the smooth operation of your trimmer. Apply a few drops of lubricating oil on the blades after cleaning to ensure they stay sharp and rust-free. Check the manufacturer’s instructions for the best oil to use for your specific model.
- Store in a clean, dry place: After cleaning and lubricating, make sure to store your trimmer in a clean, dry location. This will prevent the buildup of moisture, which can lead to rust and corrosion.
Recommended Frequency for Deep Cleaning
While regular cleaning should be performed after each use, deep cleaning your beard trimmer is necessary to maintain its performance over time. How often you should deep clean your trimmer will depend on the frequency of use and personal preferences. Here are some guidelines to consider:
| Usage Frequency | Recommended Frequency for Deep Cleaning |
| Occasional use (once a week or less) | Every 2-3 months |
| Regular use (2-3 times a week) | Every 4-6 weeks |
| Frequent use (daily or more than 3 times a week) | Every 2-4 weeks |
| Professional use (barbers, hairstylists) | Every 1-2 weeks |
Deep cleaning involves disassembling the trimmer, removing the blades and attachments, and thoroughly cleaning them. Refer to your trimmer’s instruction manual for specific disassembly and cleaning instructions. Remember to dry the parts completely before reassembling the trimmer.
By following these tips for regular cleaning and maintenance, as well as deep cleaning when necessary, you can ensure that your beard trimmer remains in excellent condition, providing optimal performance and longevity.
Troubleshooting Common Issues
While cleaning your beard trimmer is an essential part of maintenance, sometimes you may encounter certain issues that can hinder its performance. In this section, we will address some common problems that may arise during the cleaning process and provide practical tips for resolving these issues, ensuring that your trimmer remains in optimal condition.
Addressing common problems during the cleaning process
When it comes to cleaning your beard trimmer, you may encounter a few hurdles along the way. Here are some common issues that you might face and ways to address them:
1. Trimmer not turning on after cleaning
One of the most common issues people face is their trimmer not turning on after cleaning. This can be extremely frustrating, especially when you’re in a rush to groom your beard. To tackle this problem, try the following steps:
- Check that the trimmer is properly reassembled and all parts are securely in place.
- Ensure that the battery is charged or the power cord is correctly connected.
- If the trimmer still doesn’t turn on, try replacing the batteries or using a different power outlet.
2. Trimmer blades not cutting effectively
If you notice that your trimmer blades are not cutting as efficiently as they used to, it’s essential to address the issue promptly. Here are a few tips to improve the trimming performance:
- Thoroughly clean the blades and remove any hair or debris that may be causing them to clog.
- Oil the blades regularly to prevent rusting and ensure smooth operation.
- If the blades are dull, it may be time to replace them with new ones.
3. Trimmer producing loud noises
A noisy trimmer can be quite bothersome while trimming your beard. If your trimmer has become excessively loud, try the following troubleshooting steps:
- Ensure that the blades are properly aligned and tightened. Loose or misaligned blades can cause vibrations and increased noise.
- Clean the blades and remove any hair or debris that may be causing friction.
- If the trimmer continues to produce loud noises, it might be a sign of mechanical damage, and it’s best to get it checked by a professional.
By following these troubleshooting tips, you can overcome common issues that may arise while cleaning your beard trimmer. Remember, regular maintenance and cleaning are vital for the longevity and performance of your trimmer.
Frequently Asked Questions On How To Clean Your Beard Trimmer
What Can I Use To Clean My Beard Trimmer?
To clean your beard trimmer, you can use a small brush or toothbrush to remove hair and debris. Then, apply a few drops of cleaning solution to a cloth and wipe the blades and comb attachments. Remember to oil the trimmer regularly to keep it working smoothly.
How Should I Clean My Trimmer?
To clean your trimmer, follow these steps: Disconnect the trimmer from the power source. Use a small brush to remove hair and debris from the blades. Wipe the blades with a soft cloth dipped in rubbing alcohol. Lubricate the blades with trimmer oil.
Reassemble and store in a safe place.
How Do You Clean Beard Trimmer Blades?
To clean beard trimmer blades, follow these steps: 1. Remove the blades from the trimmer. 2. Brush off any hair or debris using a small brush. 3. Rinse the blades under running water. 4. Use a mild soap or cleaner to remove any buildup.
5. Dry the blades thoroughly before reattaching them to the trimmer.
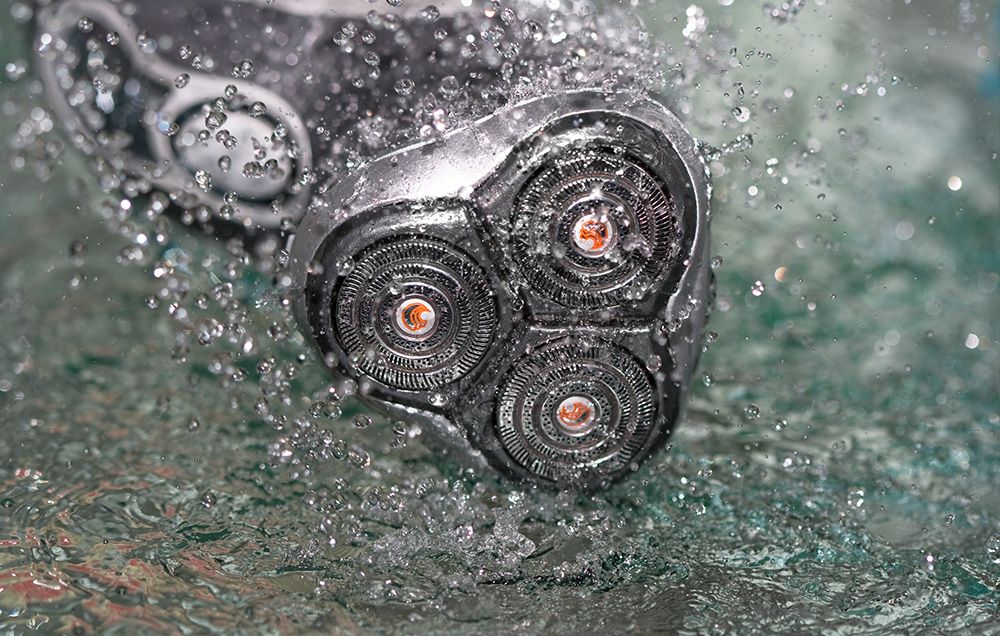
Is It Ok To Wash Trimmer?
Yes, it is okay to wash a trimmer. Washing helps remove dirt and debris, ensuring optimal performance. To do so, follow the manufacturer’s instructions and make sure the trimmer is unplugged. Use mild soap and water to clean the blades and housing, then dry thoroughly before use.
Conclusion
A clean beard trimmer is crucial for maintaining precise grooming. With our guide, you’ve gained the knowledge and techniques to keep your trimmer in top-notch condition. Regular cleaning will ensure longevity and optimal performance, allowing you to effortlessly achieve the desired beard style. Embrace cleaning your grooming tool, and may your grooming experiences always be smooth and precise.