How to Clean the Inside of Toaster Oven: Quick and Easy Guide

Cleaning the inside of a toaster oven can seem tricky. But it’s easier than you think.
Your toaster oven is a handy kitchen tool. It cooks, toasts, and bakes quickly. Over time, crumbs and grease build up inside. This can affect how well it works and even cause a fire hazard. Cleaning the inside not only makes it safer but also keeps your food tasting fresh.
Plus, a clean toaster oven looks better in your kitchen. In this guide, we will show you simple steps to clean it. You don’t need fancy tools or special skills. Just a few household items and some time.

Credit: www.youtube.com
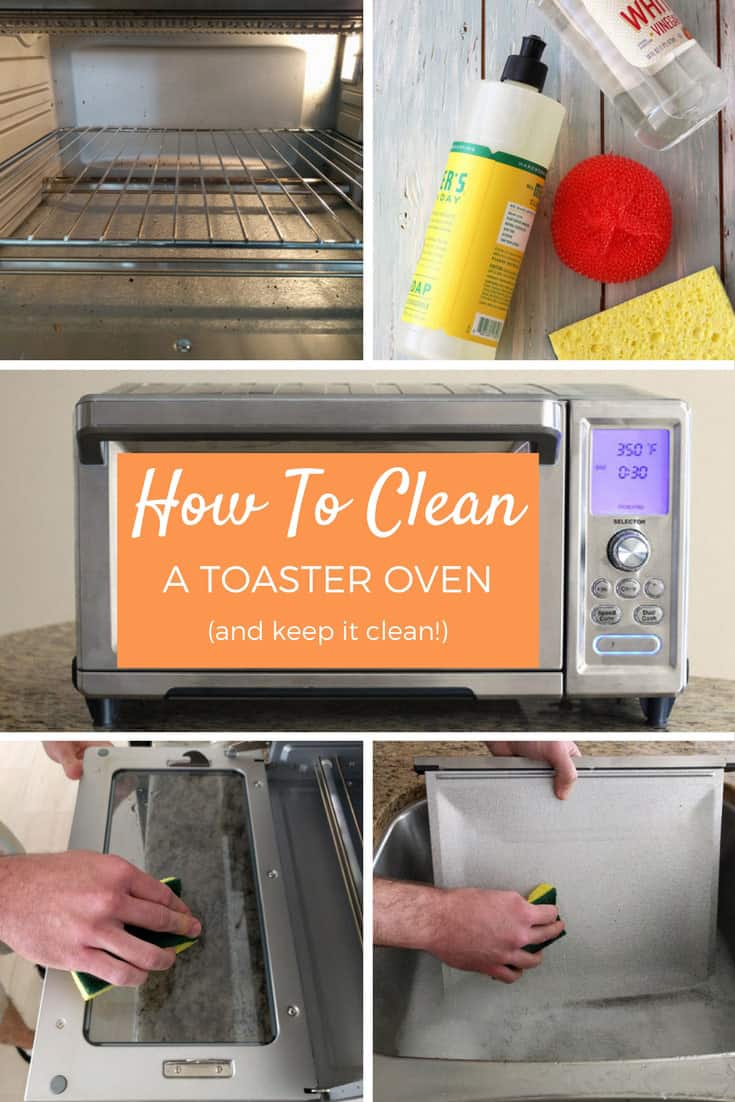
Gather Supplies
Cleaning your toaster oven starts with gathering the right supplies. This step ensures you have everything needed for a thorough clean. Proper tools and solutions make the process easier and more effective. Let’s look at what you need.
Cleaning Tools
A few basic tools help with cleaning your toaster oven. Grab a soft sponge or cloth to avoid scratching the surface. A small brush, like a toothbrush, is great for tight spots. You will also need a microfiber cloth for the final wipe down. These tools are gentle but effective.
Cleaning Solutions
Use the right cleaning solutions to avoid damage. Mild dish soap mixed with warm water works well. White vinegar is another good choice for tougher spots. It cleans and disinfects. Baking soda is useful for stubborn stains. It acts as a gentle abrasive. Always test a small area first to be safe.
Unplug And Cool Down
Keeping your toaster oven clean is crucial for its performance and longevity. The first step in this process is to unplug and let the appliance cool down. This ensures both your safety and the effectiveness of the cleaning process.
Safety First
Before cleaning, always unplug the toaster oven. This simple step can prevent accidents. Electricity and cleaning tools don’t mix well. By unplugging the appliance, you eliminate the risk of electric shock.
Additionally, a plugged-in toaster oven can accidentally turn on. This can cause burns or other injuries. Always prioritize safety first.
Cooling Time
After unplugging, allow the toaster oven to cool down completely. Touching hot surfaces can cause burns. Let the oven sit for at least 15-20 minutes. This ensures it is safe to handle.
You can use this time to gather your cleaning supplies. Prepare a soft cloth, mild detergent, and a sponge. Avoid harsh chemicals. They can damage the interior of your toaster oven.
Remove Crumbs And Debris
Cleaning the inside of your toaster oven is important for its performance. Removing crumbs and debris regularly helps maintain the appliance. Follow these steps to keep your toaster oven clean and efficient.
Tray Removal
First, unplug the toaster oven and let it cool completely. Carefully remove the crumb tray from the bottom of the appliance. This tray catches most of the debris, making it the first step in the cleaning process.
Brush Off Crumbs
Use a soft brush or cloth to brush off crumbs from the interior. Pay special attention to the corners and crevices where crumbs can hide. A small brush can help reach tight spots.
Make sure all crumbs and debris are removed to prevent burning during future use. A clean toaster oven not only works better but also lasts longer.
Credit: toasterovenlove.com
Clean Removable Parts
Cleaning the inside of your toaster oven can seem daunting. Start by focusing on the removable parts. These parts are easy to take out and clean separately. Below, we will guide you through the process step-by-step.
Soak In Soapy Water
First, remove all detachable parts from the toaster oven. This includes the rack, crumb tray, and baking pan.
- Fill a sink or large basin with warm water.
- Add a few drops of dish soap to the water.
- Place the removable parts into the soapy water.
- Let them soak for at least 15 minutes.
Soaking helps loosen any stuck-on food or grease, making it easier to clean.
Scrub And Rinse
After soaking, use a soft sponge or brush to scrub each part.
- Scrub gently to avoid scratching the surfaces.
- Pay special attention to corners and edges.
- Rinse each part thoroughly with clean water.
- Dry them with a clean towel or let them air dry.
Ensure all parts are completely dry before reassembling your toaster oven.
Regular cleaning of the removable parts will keep your toaster oven working well and looking nice.
Wipe Interior Walls
Cleaning the inside of your toaster oven is essential for its longevity. To keep it in good condition, you need to wipe the interior walls regularly. This simple step helps remove crumbs and grease. It also prevents bad smells and ensures your food tastes great.
Use Damp Cloth
First, unplug the toaster oven. Wait until it cools down completely. Then, take a damp cloth and gently wipe the interior walls. Focus on areas with visible grime. Avoid soaking the cloth too much. Excess water can damage the appliance. A slightly damp cloth works best.
Avoid Heating Elements
Be careful around the heating elements. They are delicate and can break easily. Do not use harsh chemicals or abrasive materials. These can scratch or damage the elements. Instead, use a soft cloth or sponge. Wipe gently to avoid damaging your toaster oven.
Tackle Stubborn Stains
Cleaning the inside of a toaster oven can be a chore. Stubborn stains are often the hardest part. These stains can come from grease, burnt food, or spills. To make your toaster oven look new, follow these simple steps.
Baking Soda Paste
Baking soda paste is great for cleaning. It’s easy to make. Mix baking soda with water. Create a thick paste. Apply this paste to the stains. Let it sit for 10-15 minutes. This will help loosen the grime.
Gentle Scrubbing
After the paste has sat, it’s time to scrub. Use a soft sponge or cloth. Avoid using metal scrubbers. They can scratch your toaster oven. Gently scrub the stains. This should remove the grime. Wipe clean with a damp cloth. Repeat if necessary.
Clean Glass Door
Keeping the glass door of your toaster oven clean not only ensures better visibility but also maintains the appliance’s efficiency. Over time, food splatters and grease can accumulate, making it look unsightly. Follow these steps to clean the glass door effectively.
Use Vinegar Solution
Start with a simple vinegar solution. Mix equal parts of white vinegar and water in a spray bottle. Vinegar is a natural cleaner that effectively cuts through grease and grime.
- Spray the solution generously on the glass door.
- Let it sit for a few minutes to loosen the dirt.
- Use a soft cloth or sponge to wipe the surface.
For stubborn stains, add a bit of baking soda to the solution. This creates a mild abrasive that helps scrub away tough grime.
Polish With Dry Cloth
After cleaning with the vinegar solution, it’s important to polish the glass door to remove any streaks or residue.
- Use a dry, lint-free cloth for polishing.
- Wipe the glass in a circular motion.
- Ensure the glass is completely dry and streak-free.
This step not only makes the glass shine but also ensures there’s no moisture left that can attract dust.
By following these simple steps, you can keep the glass door of your toaster oven looking new and functioning well. Regular cleaning prevents buildup and makes future cleanings easier.
:max_bytes(150000):strip_icc()/how-to-clean-toaster-4777498-12-0f21cbd8709946829e4ebdeb011d4f72.jpg)
Credit: www.thespruce.com
Reassemble And Test
Put the toaster oven back together and test it. Ensure everything is working properly before using it again.
After cleaning your toaster oven, it’s time to put it back together. Reassembling the unit correctly ensures it works safely and efficiently. Follow these steps to make sure everything is in place.
Reinstall Parts
First, gather all the parts you removed earlier. This may include racks, trays, and any other removable components. Make sure they are completely dry before reinstalling.
- Place the racks back into their slots.
- Reinsert the crumb tray at the bottom.
- Ensure the heating elements are securely in place.
Check that each part fits snugly. A loose part can cause issues later.
Test Run
Now, it’s time to test your toaster oven. Plug it in and set it to a low temperature.
- Turn the dial to a low setting, around 200°F.
- Wait for a few minutes to see if it heats up.
- Check for any unusual smells or smoke.
If everything seems fine, increase the temperature gradually. Let it run for about 10 minutes to ensure it’s working properly.
Testing ensures your toaster oven is safe to use. If you notice any issues, refer to the manual or contact customer support.
By following these steps, your toaster oven will be clean and ready for use. Enjoy your freshly cleaned appliance!
Conclusion
Cleaning the inside of your toaster oven is simple and rewarding. Regular maintenance keeps it working efficiently. Follow these steps to ensure a clean and safe appliance. Unplug, remove crumbs, and use mild cleaners. Pay attention to corners and crevices.
Wipe all surfaces thoroughly. Let it dry completely before use. Repeat this process monthly for best results. A clean toaster oven improves your cooking experience. Enjoy hassle-free meals and a longer-lasting appliance.