How to Clean an Oven Toaster: Easy Steps for Sparkling Results
Cleaning an oven toaster is essential for its longevity and performance. It ensures your food tastes fresh and the appliance works efficiently.
Oven toasters are handy kitchen tools. They make quick meals and snacks easy. But like any appliance, they need regular cleaning. Grease, crumbs, and spills can build up over time. This not only looks bad but can also affect how well your toaster works.
A dirty toaster can be a fire hazard. In this guide, we’ll show you the best way to clean your oven toaster. It’s simple and doesn’t take much time. Follow these steps to keep your toaster in top shape and enjoy better-tasting food.
Gathering Supplies
Cleaning your oven toaster can be a breeze with the right supplies. Before diving into the cleaning process, make sure you have everything you need. This will save you time and make the task easier.
Essential Cleaning Tools
To clean your oven toaster, gather these essential tools:
- Soft sponge – For gentle scrubbing.
- Microfiber cloth – To wipe surfaces without scratching.
- Soft-bristle brush – To clean small crevices and corners.
- Old toothbrush – Perfect for tough spots and hard-to-reach areas.
- Gloves – To protect your hands from harsh chemicals.
- Bucket – For mixing and holding cleaning solutions.
Recommended Cleaning Products
Using the right products ensures effective cleaning. Here are some recommended cleaning products:
| Product | Description |
|---|---|
| Dish soap | Gentle and effective for removing grease. |
| Baking soda | Great for scrubbing and deodorizing. |
| Vinegar | Natural cleaner that cuts through grime. |
| All-purpose cleaner | Useful for cleaning the exterior and non-removable parts. |
Ensure you have these tools and products ready before starting. This preparation will make cleaning your oven toaster efficient and stress-free.

Credit: www.youtube.com
Preparing The Oven Toaster
Before diving into the cleaning process, it’s essential to prepare your oven toaster. This ensures safety and makes the cleaning process easier. Follow these simple steps to get started.
Unplugging And Cooling
First, unplug the oven toaster from the electrical outlet. This prevents any risk of electric shock. Next, allow the oven toaster to cool completely. This step is crucial to avoid burns. Cleaning a hot appliance can be dangerous. Wait until it is safe to touch.
Removing Racks And Trays
Once the oven toaster is cool, open the door. Carefully remove the racks and trays inside. These parts can be cleaned separately. Taking them out makes it easier to reach every corner of the oven toaster.
Cleaning The Interior
Cleaning the interior of your oven toaster can seem daunting. But with the right steps, it becomes easy and manageable. A clean interior ensures better performance and healthier food. Let’s break down the process into simple steps.
Applying Cleaning Solution
First, unplug the oven toaster. Safety is always a priority. Remove all racks and trays. Mix a solution of warm water and mild dish soap. Avoid harsh chemicals. They can damage the interior. Dip a sponge or cloth in the solution. Squeeze out excess water. You want it damp, not dripping.
Scrubbing And Wiping
Gently scrub the interior surfaces. Pay attention to stubborn spots. Use a soft-bristled brush for hard-to-reach areas. Don’t forget the corners. Wipe down with a clean, damp cloth. Ensure no soap residue remains. For tough stains, baking soda paste works wonders. Apply it to stains and let it sit for 15 minutes. Then scrub and wipe clean.
Dry the interior thoroughly with a soft towel. Let the oven toaster air out before using it again. Regular cleaning keeps your oven toaster in top shape. It also extends its lifespan.
Credit: www.apartmenttherapy.com
Cleaning The Racks And Trays
Cleaning the racks and trays of your oven toaster is essential. It ensures your food tastes great and your appliance lasts longer. This section will guide you through the process step-by-step.
Soaking In Cleaning Solution
First, remove the racks and trays from your oven toaster. Fill your sink with warm water. Add a few drops of dish soap or a baking soda solution. Let the racks and trays soak in this cleaning solution. This helps to loosen any baked-on grime and grease. Allow them to soak for at least 30 minutes.
Scrubbing And Rinsing
After soaking, use a non-abrasive scrubber. Gently scrub the racks and trays. Pay attention to corners and crevices. These areas often hold the most dirt. Rinse each rack and tray thoroughly with clean water. Make sure no soap residue is left behind. Dry them completely with a clean towel before placing them back in the oven toaster.
Tackling Tough Stains
Cleaning an oven toaster can be challenging, especially with tough stains. Grease and burnt food can make your appliance look dirty. Tackling these stains requires effective methods. Below, we explore two powerful ways to clean these stubborn spots.
Using Baking Soda Paste
Baking soda is a fantastic cleaner. It is natural and non-toxic. To make a paste, mix baking soda with water. Here’s a simple guide:
- In a bowl, combine 1/2 cup of baking soda with a few tablespoons of water.
- Stir to form a thick paste.
- Apply the paste to the tough stains inside the oven toaster.
- Let it sit for at least 15 minutes.
- Use a sponge or cloth to scrub the area.
- Wipe with a damp cloth to remove any residue.
Baking soda helps break down grease and grime. It leaves your oven toaster clean and fresh.
Applying Vinegar Solution
Vinegar is another great cleaner. It cuts through grease and kills bacteria. Follow these steps to use vinegar:
- Mix equal parts of white vinegar and water in a spray bottle.
- Spray the solution onto the stained areas.
- Allow it to sit for 10-15 minutes.
- Use a sponge or cloth to scrub the stains.
- Rinse with a damp cloth to remove any vinegar smell.
Vinegar is effective and leaves your oven toaster sparkling clean. It is a natural and safe option for tackling tough stains.
Credit: www.reddit.com
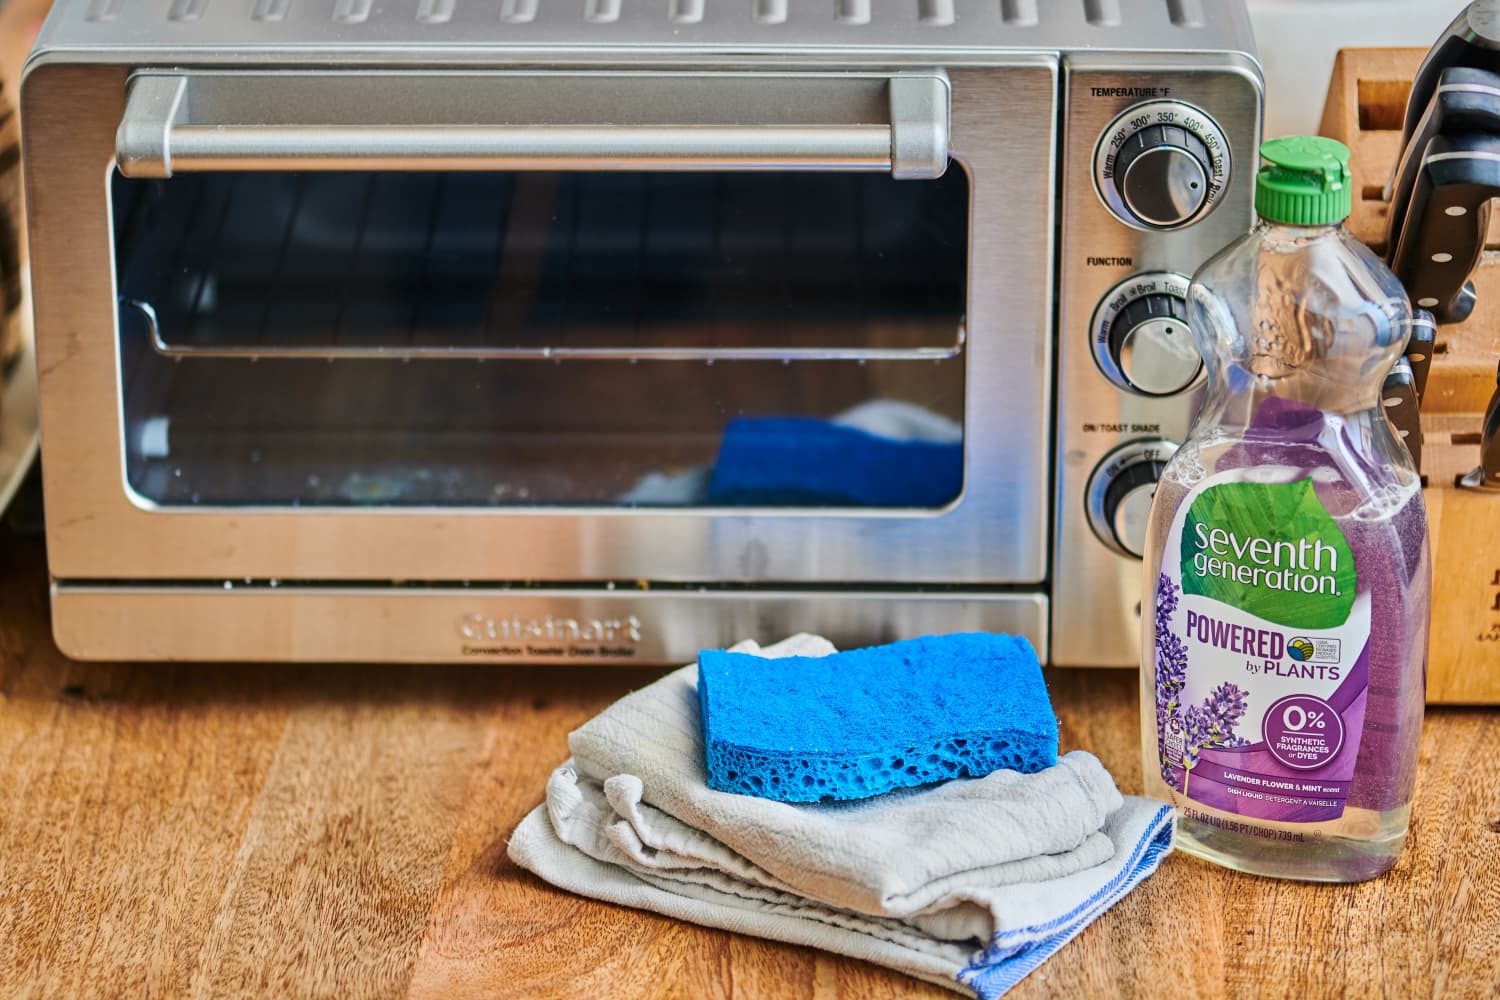
Cleaning The Exterior
Keeping the exterior of your oven toaster clean is essential. It not only improves its appearance but also ensures hygiene. Regular cleaning prevents the build-up of grease and grime. In this section, we will guide you through cleaning the exterior of your oven toaster.
Wiping Down Surfaces
Start by unplugging your oven toaster. This ensures safety. Next, gather your cleaning supplies. You will need a soft cloth, warm soapy water, and a dry towel.
Dip the cloth in the soapy water. Wring out the excess water. Gently wipe down the exterior surfaces. Pay attention to areas with visible stains or grease.
For stubborn spots, use a bit more pressure. Avoid using abrasive cleaners. They can damage the finish. After wiping, use a dry towel to remove any moisture.
Cleaning Control Knobs
The control knobs can accumulate dirt and grease. Cleaning them is simple. Remove the knobs if possible. Refer to your manual for instructions.
Soak the knobs in warm, soapy water for a few minutes. This loosens any grime. Use a soft brush or cloth to scrub them gently.
Rinse the knobs with clean water. Dry them thoroughly before reattaching. If the knobs are not removable, use a damp cloth to clean around them.
| Supplies Needed | Purpose |
|---|---|
| Soft Cloth | Wiping surfaces |
| Warm Soapy Water | Cleaning solution |
| Dry Towel | Drying surfaces |
| Soft Brush | Scrubbing control knobs |
Remember, regular cleaning of your oven toaster’s exterior keeps it looking new. It also extends its lifespan. Happy cleaning!
Reassembling The Oven Toaster
Reassembling your oven toaster is the final step in your cleaning journey. After thoroughly cleaning each component, it’s important to put everything back together correctly. This will ensure your toaster works efficiently and safely. Let’s dive into the steps for reassembling your oven toaster.
Drying Components
Ensure all components are completely dry before reassembling. Use a clean, dry cloth to wipe each part. Leave them out to air dry for a few minutes. This prevents any moisture from causing damage or rust.
Reinserting Racks And Trays
Start with the racks. Slide them back into their original positions. Make sure they are secure and level. Next, place the trays back into the toaster. Ensure they fit snugly and are aligned properly. This helps in even cooking and prevents them from moving around.
Maintenance Tips
Maintaining your oven toaster is crucial for its longevity and efficiency. Consistent care prevents grime buildup, ensuring it works flawlessly every time. Here are some practical tips to keep your oven toaster in top shape.
Regular Cleaning Schedule
Set a weekly cleaning routine for your oven toaster. Remove crumbs and food particles after every use. Use a damp cloth to wipe down the interior and exterior surfaces. This simple habit can prevent stubborn stains and buildup.
Preventing Future Buildup
Always use a baking sheet or aluminum foil to catch spills. This minimizes direct contact with heating elements. Regularly check and clean the crumb tray. Avoid using harsh chemicals; instead, opt for mild dish soap and water. These steps can help maintain the appliance’s efficiency and lifespan.
Conclusion
Cleaning an oven toaster is simple with the right steps. Regular maintenance keeps it working well. Use mild cleaners and avoid harsh chemicals. Always unplug before cleaning to stay safe. Dry all parts thoroughly before reassembling. A clean oven toaster ensures better food taste.
Make cleaning a habit to extend its life. A little effort goes a long way in maintaining your kitchen appliances. Enjoy a clean, efficient oven toaster with these easy tips.