How Do You Charge a Dyson Stick Vacuum: Step-by-Step Guide
Charging a Dyson stick vacuum is simple and straightforward. Plug the charger into a wall outlet, then connect the vacuum.
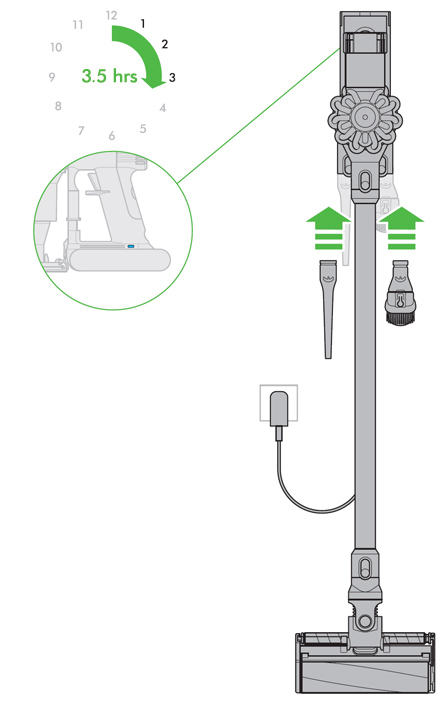
Charging takes about 3. 5 hours for a full battery. Dyson stick vacuums are known for their powerful suction and convenience. But to keep them running, you need to charge them correctly. Understanding the charging process ensures your vacuum is always ready for use.
A full charge provides enough runtime to clean your home efficiently. Proper charging also extends the battery life, saving you money in the long run. In this guide, we will explore the steps to charge your Dyson stick vacuum. We will also share some tips to maintain your vacuum’s battery. Keep reading to learn how to keep your Dyson stick vacuum charged and ready for action.

Credit: www.youtube.com
Unboxing And Setup
Unboxing and setting up your Dyson Stick Vacuum is an exciting moment. It’s important to follow the right steps to ensure your vacuum is ready for use. This section will guide you through the unboxing process and how to assemble your new Dyson Stick Vacuum.
Contents Of The Box
When you open the box, you will find several components. Each part is essential for the function of your Dyson Stick Vacuum. Here’s a list of what you should expect to find:
- Main body of the vacuum
- Extension wand
- Motorized cleaner head
- Docking station
- Charger
- Accessory tools (like crevice tool, combination tool)
- User manual
Assembling The Vacuum
Assembling your Dyson Stick Vacuum is straightforward. Follow these simple steps:
- Attach the extension wand to the main body of the vacuum.
- Connect the motorized cleaner head to the other end of the extension wand.
- Ensure all connections click into place firmly.
Once assembled, you can mount the docking station on a wall. This will keep your vacuum charged and ready for use. Follow the instructions in the user manual for proper wall mounting.
Plug the charger into the docking station and connect it to a power outlet. Place the vacuum in the docking station to begin charging. Your Dyson Stick Vacuum is now ready for its first use!

Credit: www.wikihow.com
Locating The Charging Port
Charging your Dyson stick vacuum is simple once you find the charging port. This section will help you locate the port quickly. Charging your vacuum correctly ensures it performs at its best. Let’s dive into the details.
Identifying The Port Location
The charging port is usually on the main body of the vacuum. It is a small, round hole. Look for a small symbol or label near the port. This makes it easier to find.
Common Charging Port Positions
Dyson stick vacuums have charging ports in different places. Here are the common positions:
| Model | Charging Port Position |
|---|---|
| Dyson V7 | On the side, near the handle |
| Dyson V8 | On the back, near the battery |
| Dyson V10 | On the side, below the dustbin |
| Dyson V11 | On the back, near the filter |
These positions help you quickly find the charging port. Always refer to the user manual for specific details. This ensures you are looking in the right place.
Choosing The Charging Location
Choosing the right location to charge your Dyson stick vacuum is crucial. It ensures optimal performance and longevity of the device. Below, we discuss some vital aspects to consider when selecting the perfect spot for charging your vacuum.
Ideal Charging Conditions
For best performance, charge your Dyson in a cool, dry place. Avoid areas with direct sunlight or high humidity. These conditions can affect the battery’s life.
Keep the charging area well-ventilated. This helps in maintaining the battery’s temperature. Overheating can reduce its efficiency.
Safety Considerations
Place the charger away from water sources. Wet environments pose electrical hazards. Ensure the surface is stable and flat.
Keep the charging station out of children’s reach. This prevents accidental injuries and damage to the vacuum.
Use the original charger provided by Dyson. Using third-party chargers can harm the battery and void the warranty.
Charging Placement Tips
- Avoid high-traffic areas to prevent tripping hazards.
- Consider installing the charging dock on a wall for convenience.
- Ensure easy access to a power outlet.
By choosing the right charging location, you ensure the durability and safety of your Dyson stick vacuum. Follow these guidelines for hassle-free charging and optimal performance.
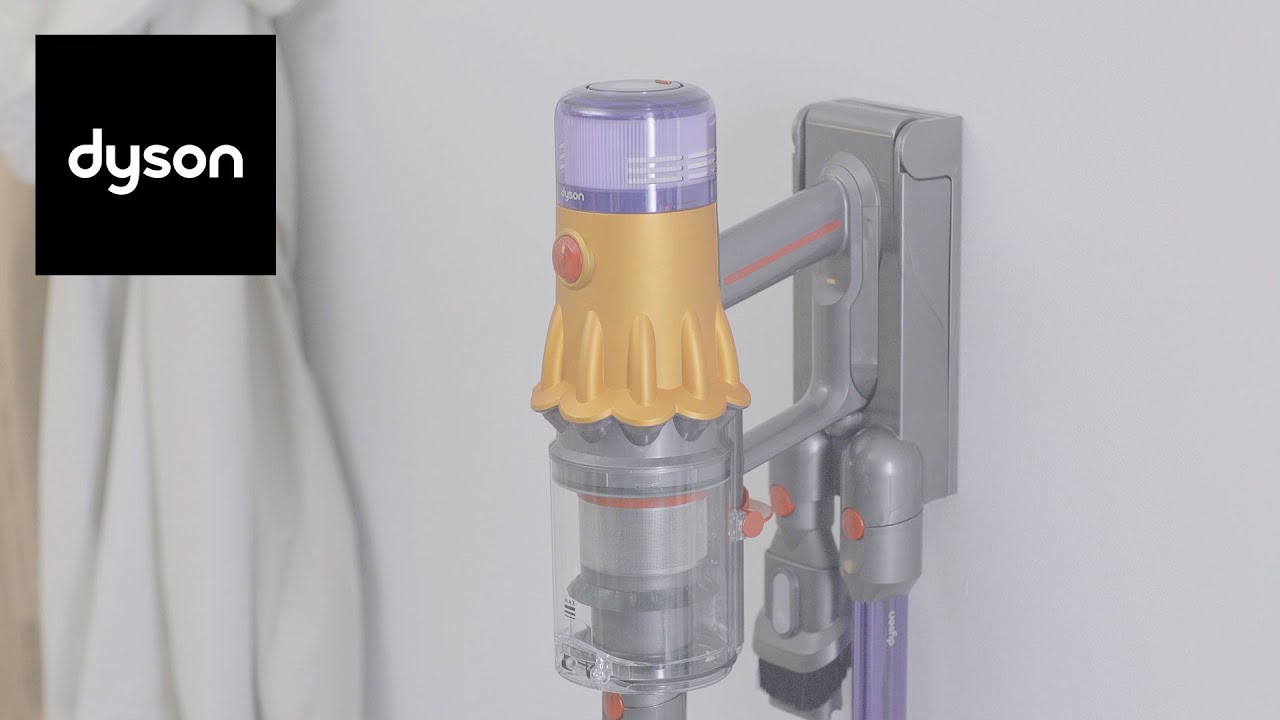
Credit: support.dyson.co.nz
Connecting The Charger
Charging your Dyson stick vacuum is essential to keep it running efficiently. Knowing how to connect the charger correctly ensures that your vacuum is always ready for use.
We’ll guide you through the process of connecting the charger. This includes plugging it in and ensuring a secure connection.
Plugging In The Charger
Locate the charging port on your Dyson stick vacuum. This is usually on the handle or near the base. Find the charging cable that came with your vacuum.
Plug the charging cable into a power outlet. Make sure the outlet is functional. You should see a light indicator on the charger or vacuum.
Ensuring A Secure Connection
After plugging in the charger, check the connection. The charging cable should fit snugly into the port. If it feels loose, try repositioning it.
Look for a light indicator on the vacuum. This shows that charging has started. If the light doesn’t appear, recheck the connections.
Ensure no debris or dust is in the charging port. This can prevent a secure connection.
Once connected, leave the vacuum to charge until the indicator shows a full battery. This ensures your Dyson stick vacuum is always ready for your cleaning tasks.
Charging Indicators
Charging Indicators are essential for understanding the status of your Dyson Stick Vacuum. These indicators let you know when your vacuum is fully charged, needs charging, or is experiencing any issues. They ensure your vacuum is always ready for use.
Understanding Led Lights
The Dyson Stick Vacuum uses LED lights to communicate its charging status. Here’s what each light means:
- Solid Blue Light: The vacuum is charging.
- No Light: Charging is complete, or the vacuum is off the charger.
- Flashing Red Light: There is an issue with the battery.
- Flashing Blue Light: The vacuum is too hot or too cold to charge.
Troubleshooting Indicator Issues
If your vacuum shows a flashing red light, follow these steps:
- Check the battery connection. Make sure it is secure.
- Ensure the charger is plugged in properly.
- If the problem persists, you may need to replace the battery.
For a flashing blue light:
- Move the vacuum to a room with a moderate temperature.
- Wait for the vacuum to cool down or warm up before charging again.
By understanding and troubleshooting these charging indicators, you can maintain the efficiency of your Dyson Stick Vacuum. Keeping an eye on the LED lights ensures your vacuum is always ready for any cleaning task.
Charging Duration
Charge your Dyson stick vacuum by plugging the charger into a wall outlet. Connect it to the vacuum’s charging port. The battery takes about 3. 5 hours to fully charge.
Proper charging of your Dyson stick vacuum ensures optimal performance. Understanding the charging duration is essential for maintaining your vacuum’s efficiency. Learn about typical charging times and how to optimize charge cycles.
Typical Charging Times
Dyson stick vacuums typically require a few hours to charge. Most models need about 3 to 5 hours. This duration varies depending on the model and battery capacity. Always refer to the user manual for specific details.
Optimizing Charge Cycles
To extend battery life, avoid frequent short charging. Allow the battery to discharge fully before recharging. This practice helps maintain battery health. Charge your vacuum in a cool, dry place. Extreme temperatures can affect battery performance. Regularly check the charging port for dust or debris. Clean it to ensure a proper connection. Following these tips helps keep your Dyson stick vacuum running smoothly.
Maintenance Tips
Maintaining your Dyson stick vacuum ensures it runs efficiently and has a long life. Proper care and storage of your vacuum can prevent many common issues. Follow these maintenance tips to keep your Dyson stick vacuum in top shape.
Battery Care
The battery is a crucial part of your Dyson stick vacuum. Charge the battery fully before using the vacuum for the first time. Avoid letting the battery completely drain before recharging. Plug in the vacuum after each use to keep the battery topped up. Use the original charger to prevent any damage or compatibility issues.
Storage Recommendations
Proper storage can protect your vacuum from damage. Store your Dyson stick vacuum in a cool, dry place. Avoid places with extreme temperatures or humidity. Use the wall-mounted dock provided with the vacuum. The dock keeps the vacuum upright and ready to use. Ensure the area around the vacuum is clear of obstacles.
Conclusion
Charging a Dyson stick vacuum is simple and easy. First, find a power outlet. Next, plug in the charger to your vacuum. Ensure it connects properly. Wait for the light indicator to turn green. This means your vacuum is fully charged. Regular charging keeps your vacuum ready for use. Follow these steps to extend battery life.