Best Way to Clean a Dirty Air Fryer: Quick and Easy Steps

Cleaning a dirty air fryer can be a daunting task. But it doesn’t have to be.
Air fryers are a kitchen favorite for many. They make cooking quick, easy, and healthier. But like any appliance, they need regular cleaning. A dirty air fryer can affect the taste of your food. It can also shorten the lifespan of the appliance.
In this guide, we will share the best way to clean a dirty air fryer. No more burnt residue or stubborn grease. With a few simple steps, your air fryer will be spotless and ready for your next meal.

Credit: www.thekitchn.com
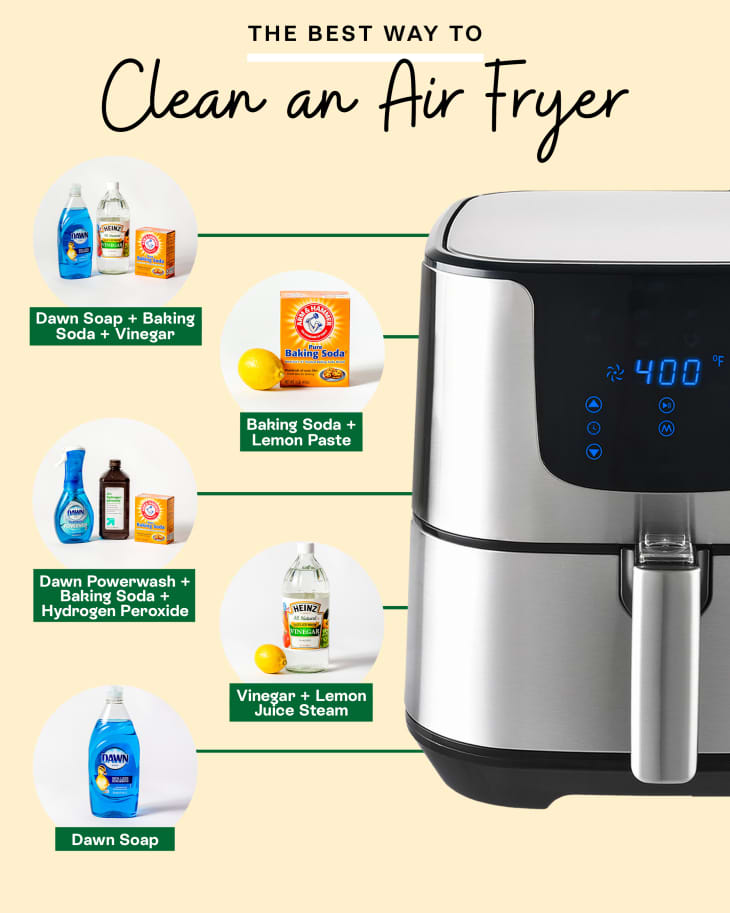
Gather Cleaning Supplies
Cleaning your air fryer can be simple and quick if you have the right supplies. Gathering the proper cleaning items ensures you can tackle any grime or grease. Below, we outline the essential items and optional extras you need to clean your air fryer effectively.
Essential Items
- Dish soap: A mild dish soap will help break down grease and food particles.
- Soft sponge or cloth: Use a non-abrasive sponge to avoid scratching the non-stick surface.
- Warm water: Warm water helps dissolve grease and makes cleaning easier.
- Microfiber cloth: Use a microfiber cloth for drying and polishing the air fryer.
- Brush: A small brush can help clean hard-to-reach spots.
Optional Extras
- Baking soda: Use baking soda to tackle stubborn stains and odor.
- White vinegar: White vinegar can help disinfect and remove tough grease.
- Toothpick: A toothpick helps clean tiny crevices and corners.
- Old toothbrush: An old toothbrush can scrub away residue without damaging surfaces.
- Non-toxic cleaner: Use a non-toxic cleaner for an extra layer of cleanliness.
Unplug And Cool Down
Cleaning a dirty air fryer might seem like a daunting task, but it’s easier than you think. One crucial step is to unplug and cool down the appliance. This ensures safety and makes the cleaning process smoother.
Safety First
Before cleaning, always unplug the air fryer. Electricity and water don’t mix well. Unplugging prevents electrical shocks. It’s a simple step but very important.
Cooling Period
After unplugging, let the air fryer cool down. Hot surfaces can cause burns. Wait until it’s completely cool. This cooling period also helps in handling the parts easily. Patience is key. Never rush this step. It only takes a few minutes.
Disassemble The Air Fryer
Disassembling your air fryer is a crucial step in its cleaning process. This ensures a thorough clean, removing all food particles and grease. Follow these simple steps to disassemble your air fryer and prepare it for cleaning.
Removing Parts
Start by unplugging your air fryer. This ensures safety during the process. Next, remove the basket or tray inside the air fryer. Gently pull it out and set it aside. If your air fryer has a pan beneath the basket, remove it too. Check for any other removable parts. Take them out carefully.
Identifying Components
Different air fryers have different components. Identify each part to understand its role. Common parts include the basket, pan, and heating element cover. Some models have additional trays or racks. Make sure you know where each part goes. This helps in reassembling later.
Soak Removable Parts
Cleaning your air fryer can be easier than you think. The key is to soak the removable parts. This method helps break down grease and food particles. Let’s dive into the details.
Warm Soapy Water
First, gather all removable parts of your air fryer. This includes the basket, tray, and any other detachable components. Fill your sink or a large basin with warm water. Add a few drops of dish soap. Make sure the water is soapy but not overly foamy. This will help in removing grease and grime effectively.
Soaking Duration
Place the parts in the soapy water. Let them soak for at least 20 minutes. This soaking duration allows the soap to break down stubborn grease. For heavily soiled parts, you can extend the soaking time up to an hour. After soaking, use a soft brush or sponge to scrub away any remaining debris.
Here is a simple table for quick reference:
| Part | Soaking Time |
|---|---|
| Basket | 20-60 minutes |
| Tray | 20-60 minutes |
| Other components | 20-60 minutes |
Remember to rinse all parts thoroughly after soaking. This removes any soapy residue. Then, let them air dry or use a clean cloth to dry them. Clean parts mean a cleaner air fryer. This ensures better performance and longer lifespan for your appliance.
Clean The Basket And Pan
Cleaning the basket and pan of your air fryer is essential. This ensures your meals stay delicious and healthy. This section will guide you through effective methods to clean these parts.
Scrubbing Tips
First, remove the basket and pan from the air fryer. Place them in the sink. Fill the sink with warm water and add a few drops of mild dish soap. Let them soak for 10-15 minutes. This helps loosen the grease and food particles.
Use a non-abrasive sponge or soft brush for scrubbing. Avoid using steel wool or abrasive pads. These can scratch the non-stick coating. Focus on scrubbing both the interior and exterior surfaces. Pay extra attention to the corners and edges where food tends to stick.
If there are stubborn stains, make a paste with baking soda and water. Apply the paste to the stains and let it sit for a few minutes. Then, scrub gently to remove the stains. Repeat if necessary.
Rinsing Thoroughly
Once the basket and pan are scrubbed, rinse them thoroughly with warm water. Ensure no soap residue remains. Soap residue can affect the taste of your food.
Check the basket and pan for any remaining food particles. If you find any, rinse them again. Shake off excess water and dry with a clean towel. Allow the basket and pan to air dry completely before reassembling.
For a thorough clean, you can also use a toothbrush. A toothbrush can reach into small crevices and remove trapped food particles. This ensures every part of the basket and pan is clean.
Wipe Down The Interior
Keeping your air fryer clean ensures it works efficiently and lasts longer. After each use, it’s important to wipe down the interior. This simple step helps remove leftover food particles and grease.
Soft Cloth Usage
Use a soft cloth to wipe the interior of your air fryer. A microfiber cloth is a great choice. It gently removes debris without scratching the surface. Dampen the cloth slightly with warm water for better results.
Follow these steps:
- Unplug the air fryer and let it cool.
- Remove the basket and pan.
- Use the damp cloth to wipe the interior walls and base.
- Dry with a clean, dry cloth.
Avoiding Abrasive Cleaners
Do not use abrasive cleaners on your air fryer. These can damage the non-stick coating inside. Avoid steel wool, scouring pads, and harsh chemicals.
Instead, use mild dish soap and warm water. For stubborn spots, mix baking soda with water to form a paste. Apply the paste with a soft cloth, then wipe clean.
| Cleaning Item | Use |
|---|---|
| Soft Cloth | Wipe interior walls and base |
| Baking Soda Paste | Remove stubborn spots |
Remember, regular cleaning keeps your air fryer in top condition. A little effort goes a long way.
Clean The Heating Element
Cleaning the heating element of your air fryer ensures it works efficiently. The heating element can accumulate grease and food particles. Regular cleaning prevents this buildup. This section will guide you through the process. Follow these steps for a thorough clean.
Gentle Brushing
Use a soft brush to clean the heating element. A toothbrush works well. Gently brush off the debris. Don’t use a hard brush. It can damage the element. Move the brush in small circles. This helps remove stuck particles. Be patient and thorough.
Avoiding Water Contact
Keep water away from the heating element. Water can cause damage. It may also lead to electrical issues. Use a dry brush or cloth. If needed, dampen a cloth slightly. Wipe carefully without letting water drip. Safety is important. Proper cleaning ensures your air fryer lasts longer.
Credit: www.reddit.com
Reassemble And Dry
After cleaning your air fryer, the next step is to reassemble and dry it. Proper drying and reassembly are crucial to ensure your air fryer works efficiently. Follow these steps to maintain your device and keep it in top condition.
Ensuring Dryness
Make sure all parts of the air fryer are completely dry. Use a clean towel to wipe down each component. Pay special attention to corners and crevices where water might hide. Moisture left behind can cause rust and damage.
Let the parts air dry for a while. This ensures that no moisture is left before reassembling. Placing them on a dish rack or clean towel can help. Patience at this stage can save you from future problems.
Proper Reassembly
Start by placing the basket back into the drawer. Ensure it fits snugly and clicks into place. Next, insert the drawer back into the main unit. Check that it slides in smoothly and locks properly.
Reconnect any removable parts, like the crisper plate or racks. Each piece should fit securely and without force. Double-check that all components are in their proper positions. This ensures the air fryer operates safely and efficiently.
Once reassembled, your air fryer should be ready for its next use. Keeping it clean and dry will extend its lifespan and maintain its performance.
Regular Maintenance Tips
Keeping your air fryer clean is crucial. Regular maintenance ensures it works efficiently and lasts longer. Follow these tips to keep your air fryer in top condition.
Preventing Buildup
Preventing buildup is key to a clean air fryer. Here are some tips:
- Use parchment paper: This prevents food from sticking.
- Wipe down after each use: A simple wipe can remove grease.
- Avoid overcrowding: This helps in reducing residue buildup.
- Shake the basket: Shake halfway through cooking to avoid stuck food.
Routine Cleaning Schedule
Following a routine cleaning schedule helps maintain your air fryer. Here is a simple plan:
| Frequency | Task |
|---|---|
| After Each Use | Wipe down the basket and tray with a damp cloth. |
| Weekly | Remove and wash all removable parts with warm soapy water. |
| Monthly | Check and clean the heating element. Remove any stuck-on food. |
:max_bytes(150000):strip_icc()/faw-toaster-ovens-air-fryers-test-chefman-3-7qt-turbofry-rkilgore-111-487d903950824b019a89d671ec68e254.jpg)
Credit: www.foodandwine.com
Conclusion
A clean air fryer improves your cooking experience. Regular cleaning keeps it efficient. Follow these simple steps to maintain it. Remove food residue and grease frequently. Use gentle tools and avoid harsh chemicals. A clean air fryer ensures healthier meals.
Invest a few minutes for regular upkeep. Your food will taste better, and your device will last longer. Clean consistently, and enjoy hassle-free cooking.