How to Fix Brakes on Electric Scooter: Quick Guide
To fix brakes on an electric scooter, adjust the brake cable tension and check the brake pads for wear. Replace or tighten components as needed.
Electric scooters offer a convenient and eco-friendly mode of transportation. However, maintaining the braking system is crucial for safety. Regular inspection ensures the brakes function correctly and prevents accidents. Tightening the brake cable or replacing worn brake pads can restore optimal performance.
Properly maintained brakes enhance control and ensure a smooth ride. Routine checks are simple and can be done at home. If the issue persists, consider consulting a professional. Keeping your electric scooter’s brakes in top condition guarantees a safe and enjoyable experience. Prioritize brake maintenance to ensure reliability on every ride.
Introduction To Electric Scooter Brake Maintenance
Functional brakes are vital for safety. They help you stop quickly. This prevents accidents. Regular brake checks ensure they work well. Good brakes give you confidence. Poor brakes can cause crashes. Always check your brakes before riding. Fix any issues immediately. This keeps you safe on the road.
Squeaking sounds mean brake problems. Slow stopping is another sign. A loose brake lever shows trouble. Feel for vibrations when braking. These are all signs of brake issues. Check for worn brake pads. Inspect for fluid leaks. Address these symptoms quickly.
Safety First: Preparing For Repair
Ensure safety by wearing protective gear and using the right tools. Follow step-by-step instructions to fix electric scooter brakes. Regular maintenance enhances performance and prolongs the scooter’s life.
Tools And Equipment Needed
Always wear safety gloves and goggles. You need a wrench set, screwdrivers, and pliers. A brake pad set and brake fluid are essential. Have a clean cloth nearby. A work light helps you see better. Make sure you have a repair manual.
Securing The Scooter Before Work Begins
Place the scooter on a flat surface. Use a kickstand or support to hold it steady. Remove the battery for safety. Use wheel chocks to prevent movement. Ensure the brakes are not engaged. Double-check all connections are secure. Now, you are ready to start the repair.
Identifying Your Electric Scooter’s Brake Type
Disc brakes use a metal disc attached to the wheel. Drum brakes have a cylinder that presses against the wheel. Disc brakes provide better stopping power. Drum brakes require less maintenance. Disc brakes are exposed to dirt and water. Drum brakes are enclosed, keeping them cleaner. Both types need regular checks for wear and tear.
Electronic brakes slow the scooter using the motor. This brake type uses regenerative braking. It charges the battery while braking. Electronic brakes are usually combined with disc or drum brakes. They provide smooth and controlled stops. Always check the electronic brake system for errors.
Common Brake Problems And Solutions
Brake pads can wear out over time. Worn brake pads reduce braking power. Check brake pads regularly. Replace them if they are thin. Use the right tools. Remove the wheel first. Take out the old pads. Install new brake pads carefully. Ensure they fit well. Test the brakes after replacing pads.
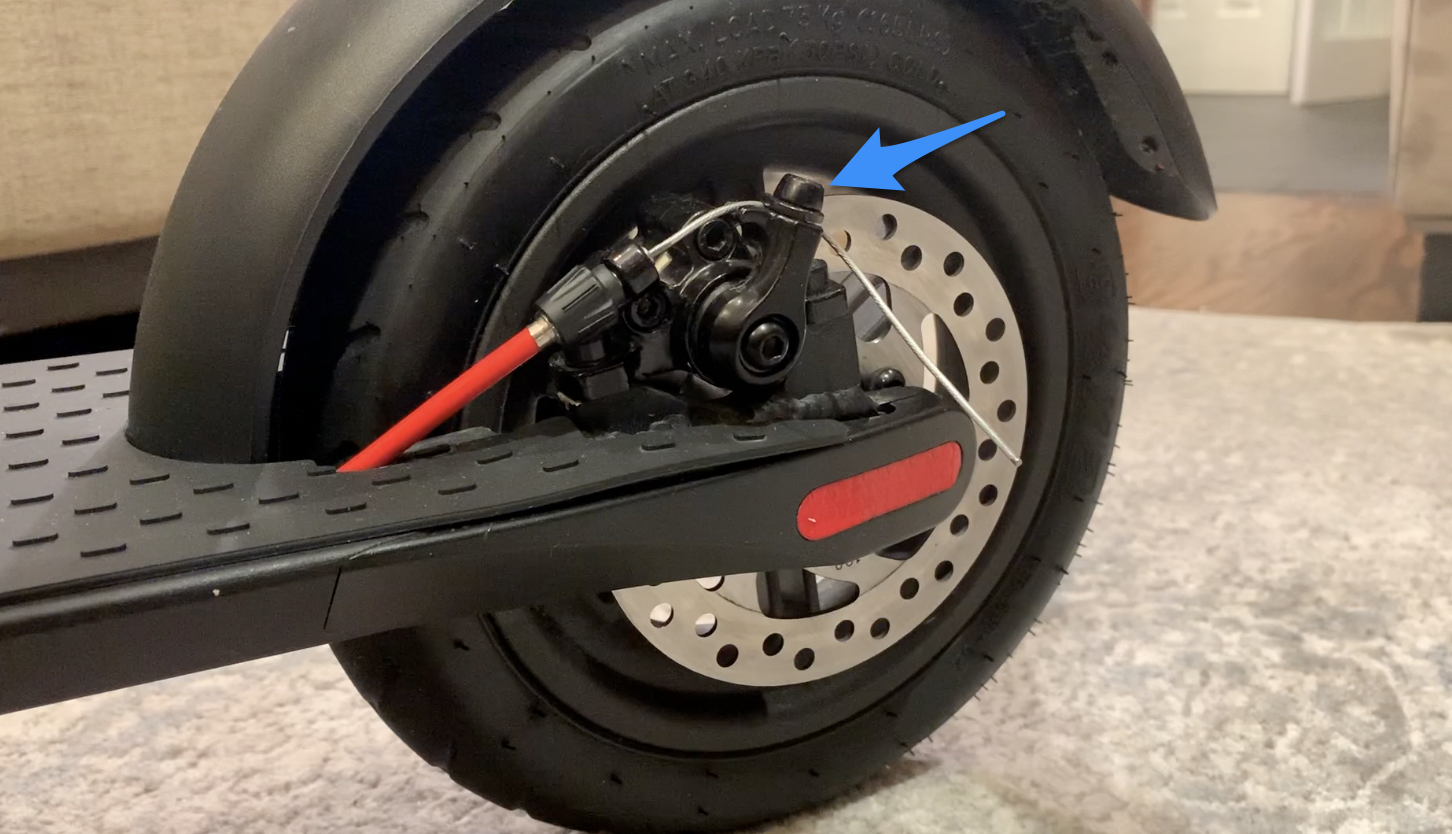
Loose brake cables can cause problems. Tighten the brake cable if needed. Locate the adjustment barrel. Turn the barrel to adjust tension. Clockwise to tighten. Counterclockwise to loosen. Ensure the brake lever feels firm. Test the brakes after adjusting. Make sure the scooter stops quickly. Repeat adjustments if necessary.
Step-by-step Guide To Fixing Disc Brakes
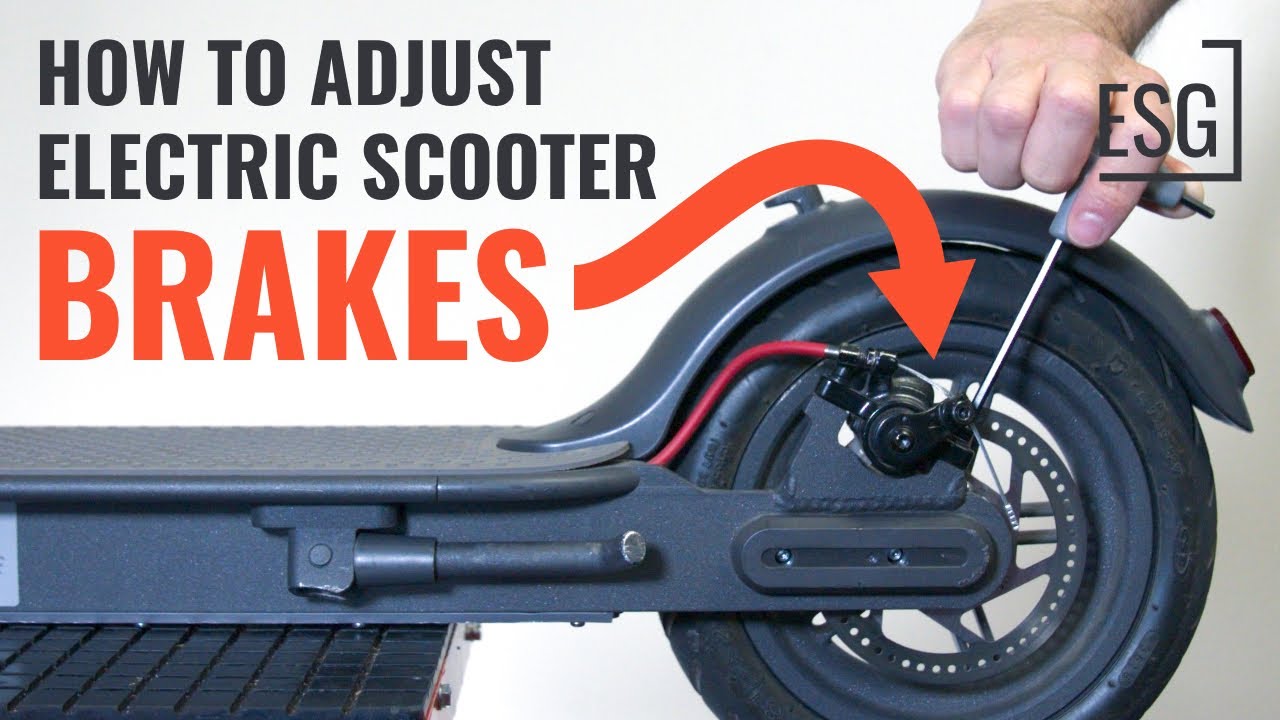
Check the disc for any cracks or bends. Spin the wheel and observe the disc. It should remain straight and not wobble. Look for any deep scratches or grooves. These can affect braking performance. A damaged disc should be replaced immediately.
Remove the wheel from the scooter. Locate the brake pads near the disc. Use a tool to carefully remove the old pads. Insert the new brake pads in the same position. Ensure they are aligned correctly. Test the brakes after replacing the pads. Make sure they work smoothly.
Credit: varlascooter.com
Drum Brake Repair Simplified
First, place the scooter on a flat surface. Use a wrench to remove the wheel. This will expose the drum brake mechanism. Make sure the scooter is turned off. Safety first. Carefully take off the drum cover. The drum mechanism is now accessible. Inspect the inside for any wear and tear. You are now ready to repair it.
Remove the old brake shoes from the drum. Take note of their position. Insert the new brake shoes carefully. Ensure they are aligned correctly. Tighten any screws or bolts. Reattach the drum cover. Finally, put the wheel back on the scooter. Test the brakes to make sure they work well.
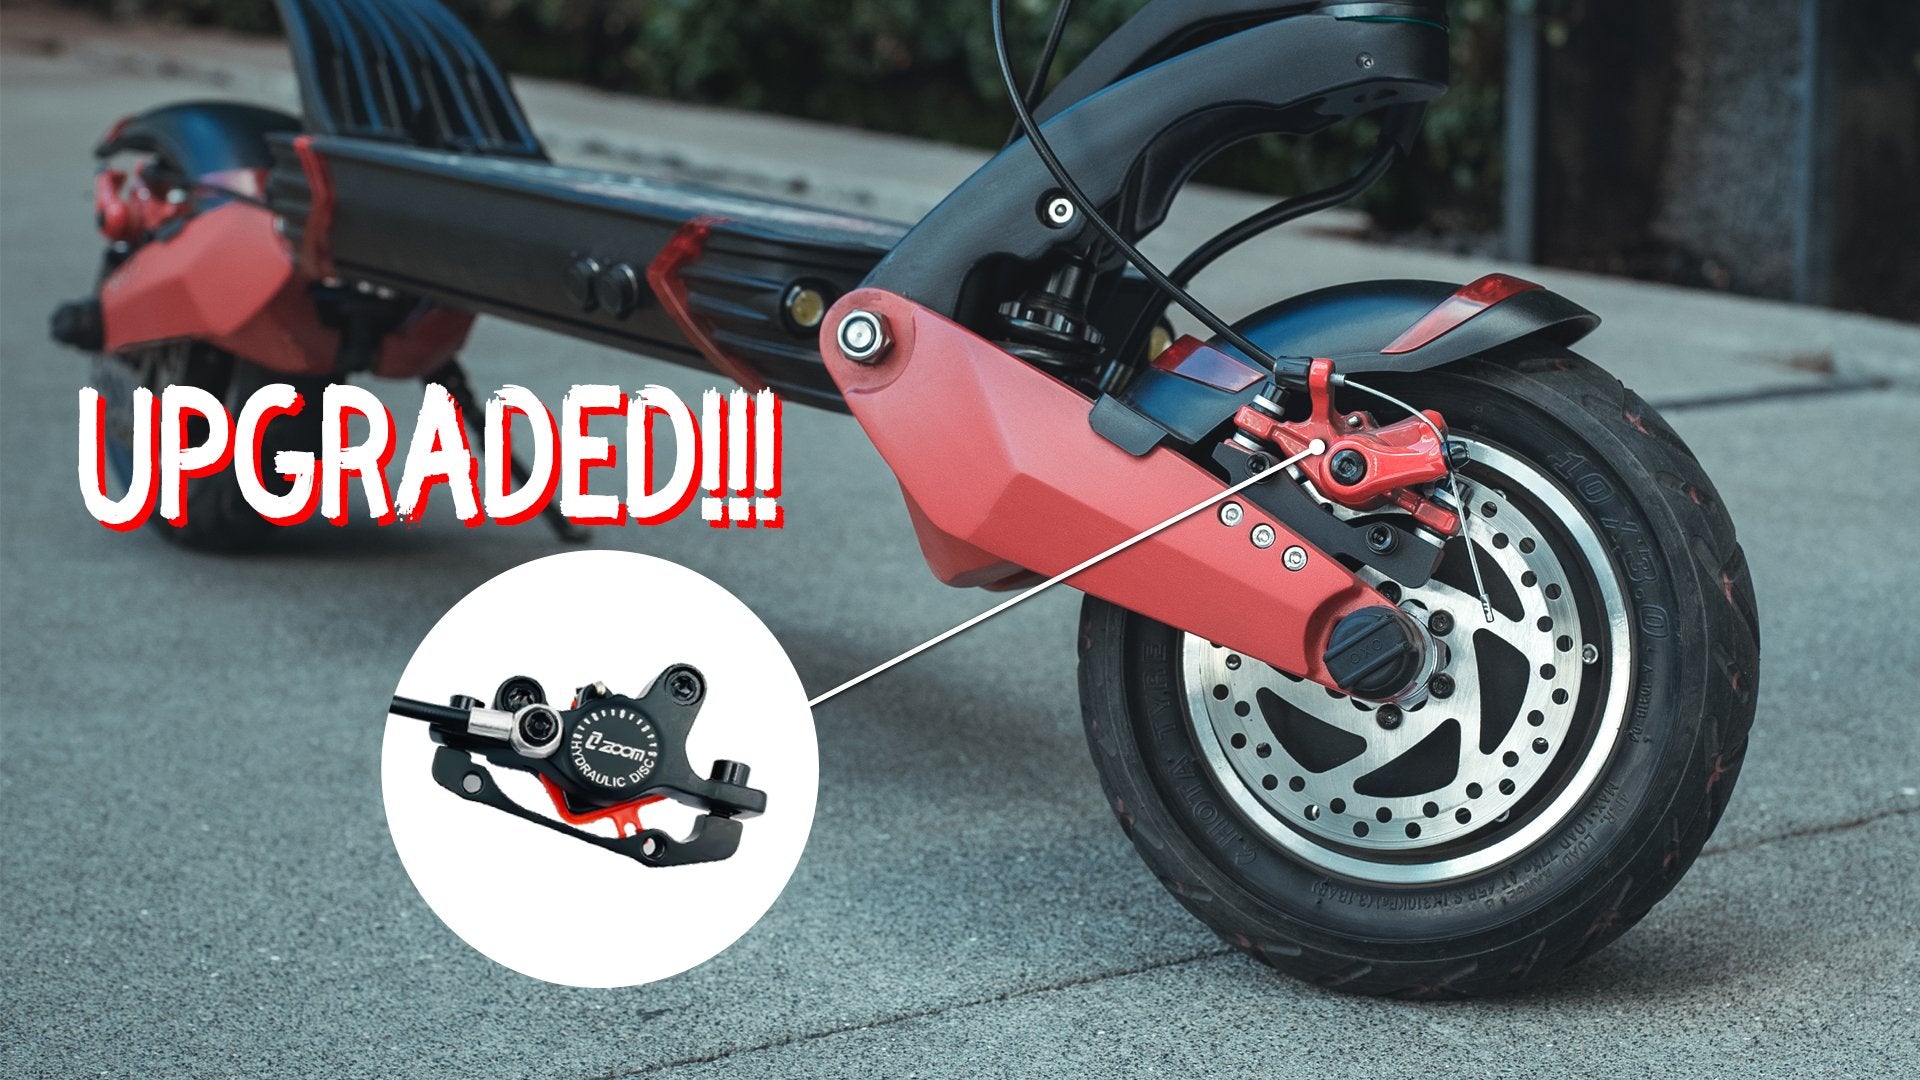
Bleeding And Refilling Hydraulic Brakes
Use a bleed kit to remove air bubbles. Attach the syringe to the brake lever. Push the fluid through the brake lines. Watch for air bubbles escaping. Ensure no air remains in the system. This step is crucial for brake performance. Repeat the process if needed.
Always use manufacturer-recommended brake fluid. Different fluids can damage the system. Fill the reservoir to the max line. Avoid overfilling to prevent leaks. Replace the cap securely. Test the brakes to ensure they work properly. Proper fluid ensures smooth braking. Check for any leaks after refilling.

Credit: m.youtube.com
Electronic Brake Adjustments
Ensure your scooter’s software is updated to the latest version. Open the scooter’s mobile app and find the brake settings section. Adjust the brake sensitivity to a comfortable level. Test the brakes after each adjustment. Fine-tuning may be necessary for the best performance. Keep the scooter on a flat surface during calibration.
Inspect the brake sensors for any dirt or debris. Clean the sensors gently with a soft cloth. Check the sensor alignment to ensure they are properly positioned. Misaligned sensors can cause brake issues. Verify the connections are secure and free of corrosion. Regular maintenance helps prevent sensor malfunctions.
Final Testing And Safety Checks
Ensure the electric scooter’s brakes are functioning properly by conducting final testing and safety checks. Verify all components for optimal performance and safe operation.
Performing A Stationary Brake Test
Start by placing the scooter on a flat surface. Ensure the scooter is turned on. Gently press the brake lever. The scooter should stop moving immediately. Listen for any unusual noises. Check if the brake pads make contact with the wheel. If they don’t, you may need to adjust them. Repeat the process a few times. Make sure the brakes are working smoothly. This simple test can prevent accidents.
The Importance Of A Test Ride
Before riding the scooter, wear safety gear. Begin with a slow ride in a safe area. Test the brakes by gently squeezing the brake lever. The scooter should stop without delay. Feel the brake response in different conditions. Try braking on flat and sloped surfaces. Listen for any odd sounds while braking. Ensure the scooter stops smoothly and quickly. A test ride confirms your brakes are reliable.
Maintenance Tips To Prolong Brake Life
Clean the brakes every week. Use a damp cloth to wipe them down. Inspect for wear and tear. Look for cracks or rust on the brake pads. Check the brake cables. Ensure they are not frayed. Tighten any loose screws. A clean and well-inspected brake lasts longer.
Seek help if the brakes make a squealing noise. Consult a professional if the brakes feel soft or unresponsive. Visit a repair shop if you see fluid leaks near the brakes. Get expert help for any complex issues.
Troubleshooting Persistent Brake Problems
Strange noises can mean brake issues. Check if the brake pads are worn out. Replace them if needed. Vibrations might mean loose parts. Tighten screws and bolts. Look for debris stuck in the brake system. Clean it carefully.
Brake fade happens when brakes overheat. Allow the brakes to cool down. Avoid using brakes too much. Check the brake fluid level. Low fluid can cause fade. Refill if necessary. Inspect for air bubbles in the brake line. Bleed the brakes to remove air.
Ensuring Ongoing Safety And Performance
Maintaining electric scooter brakes ensures ongoing safety and optimal performance. Regular inspections and timely adjustments prevent accidents and enhance riding comfort. Proper brake care extends the scooter’s lifespan and reliability.
Recap Of Key Steps In Brake Repair
Identify the problem with your scooter’s brakes. Check for worn-out brake pads or misaligned brake cables. Tighten or replace brake cables if needed. Adjust the brake pads to ensure they are properly aligned. Test the brakes after making adjustments to ensure they work well.
Encouragement To Stay Proactive With Maintenance
Regular maintenance keeps your electric scooter safe. Check your brakes often for wear and tear. Replace any damaged parts to avoid accidents. Keep your scooter clean and free from debris. Proper care extends the life of your scooter.
Credit: support.levyelectric.com
Conclusion
Fixing brakes on an electric scooter is crucial for safety. Follow the steps outlined to ensure optimal performance. Regular maintenance can prevent issues and prolong the scooter’s lifespan. Always consult the manual and consider professional help if needed. Stay safe and enjoy your smooth, worry-free rides!