How to Fix Electric Scooter Controller: Quick Guide
To fix an electric scooter controller, check for loose connections and replace any damaged components. Reset the controller to factory settings.
Electric scooters have become a popular mode of transportation, offering convenience and eco-friendliness. However, like any other electronic device, they can encounter issues. The controller is a critical component responsible for managing the scooter’s speed and power. Regular maintenance is essential to keep it functioning properly.
Identifying common problems and knowing how to address them can save time and money. This guide helps you understand the basics of troubleshooting and fixing your electric scooter controller, ensuring a smooth and safe ride. Proper care and timely repairs can extend the lifespan of your scooter.

Credit: www.youtube.com
Introduction To Electric Scooter Controller Issues
Electric scooters may face various issues. A faulty controller is common. Scooter does not start is a major sign. Speed fluctuates randomly. Throttle response is poor. Lights flicker unexpectedly. Scooter may stop suddenly.
Always turn off the scooter first. Remove the battery to prevent shocks. Wear gloves for safety. Use insulated tools. Work in a dry area. Keep children away from the work area.
Tools And Materials Needed
A screwdriver set is very important. You will need pliers and a wrench. A multimeter helps to check electrical parts. Wire cutters are needed to cut wires. Electrical tape is useful for safety. A heat gun can shrink tubing. Don’t forget safety gloves and glasses.
Get the correct controller for your scooter model. Check the voltage and amperage ratings. Buy from a trusted supplier to ensure quality. Look for warranty and return policies. Ensure you have the right connectors and wires.
Diagnosing The Problem
First, turn off the scooter. Look for loose wires or burn marks on the controller. Check if any parts look damaged or worn out. A visual inspection can reveal obvious problems. Inspect the connectors for any signs of corrosion. Make sure all connections are secure. It’s important to spot any physical damage early. This can save you time later.
Use a multimeter to test the controller’s voltage. Check the battery voltage first. Make sure it matches the scooter’s specifications. Measure the output voltage from the controller. Compare the readings with the user manual. Low or no voltage suggests a problem. Test each wire connection for continuity. Broken wires can cause issues. Electrical tests help you find hidden problems. Accurate diagnosis is key to fixing the controller.

Credit: www.youtube.com
Opening The Scooter’s Deck
First, gather your tools. You will need a screwdriver. Locate the screws on the deck. They are usually at the edges. Unscrew each one carefully. Keep the screws in a safe place. Lift the deck slowly. Be careful not to damage the wires. Check for any clips holding the deck. If there are clips, unclip them gently. Now, you have access to the inside of your scooter.
Organize the components you remove. Place each part in a specific spot. Use a tray or a box. Label each component if possible. This helps when you reassemble the scooter. Keep the screws together. Use a small container for them. Take pictures of each step. These will help you remember the order. Work in a clean area. A clutter-free space makes it easier. Make sure you do not lose any parts.
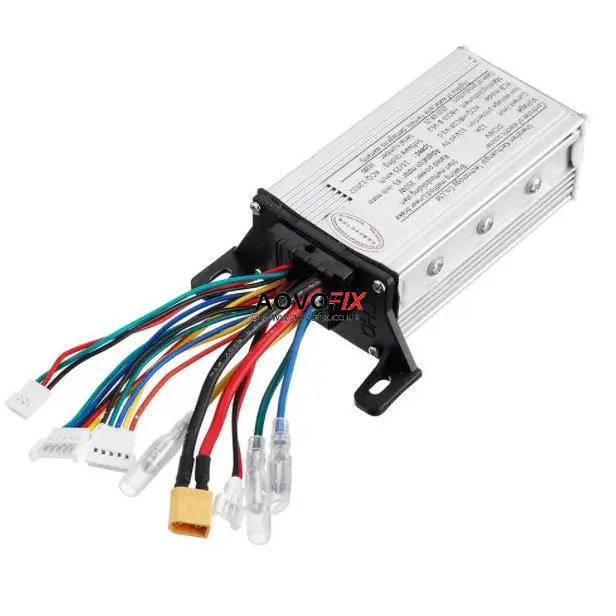
Controller Removal
Removing the electric scooter controller involves disconnecting the battery and unscrewing the mounting screws. Carefully detach the wiring connectors to ensure a smooth replacement process.
Disconnecting Wires And Connectors
Turn off the scooter before starting. Locate the controller inside the scooter. Identify the wires connected to the controller. Carefully unplug each wire from the connectors. Avoid pulling the wires too hard to prevent damage. Use a label or take a photo to remember the wire connections. This helps during reassembly.
Removing The Controller Safely
Locate the screws that hold the controller in place. Use the right screwdriver to remove the screws. Keep the screws in a safe place. Gently pull the controller out of its slot. Avoid using excessive force to prevent damage. Inspect the controller for any visible damage or burn marks. This helps in identifying issues.
Installing The New Controller
Installing the new controller involves connecting wires to the appropriate terminals and securing the device in place. Ensure all connections are tight to avoid loose contacts and potential malfunctions. Properly aligning the controller guarantees optimal scooter performance.
Wiring The New Controller Correctly
Connect the wires to the new controller. Match the colors of the wires. Red wire goes to the power. Blue wire connects to the motor. Green wire links to the battery. Black wire is for ground. Check the connections twice.
Securing The Controller In Place
Use screws to secure the controller. Make sure it is tight and firm. A loose controller can cause problems. Zip ties can help keep the wires neat. Ensure the controller is away from moving parts. This will keep it safe.
Testing The Scooter Post-repair
After fixing the electric scooter controller, ensure smooth operation by conducting a thorough test ride. Check for responsive acceleration and consistent braking.
Initial Power-up And Testing
Turn on the scooter and listen for any unusual sounds. Check the display for any error codes. Ensure the lights and indicators are working. Test the throttle response by gently pressing it. Observe the motor for smooth operation. Check the brakes for proper function. If everything seems fine, proceed to the next step.
Safety Checks And Test Ride
Wear safety gear before starting the test ride. Ensure the scooter is on a flat surface. Start slowly and test the acceleration. Check the turning ability and braking efficiency. Observe the scooter for any unusual behavior. Listen for any strange noises. Stop and inspect if something feels off. A thorough test ensures a safe ride.
Maintenance Tips To Avoid Future Issues
Check your scooter every week for loose parts. Make sure the brakes work well. Clean the scooter to remove dirt. Dirt can cause problems. Charge the battery fully. A full battery lasts longer. Look for damaged wires. Replace them if needed.
Some problems need a professional. If the scooter doesn’t start, get help. Strange noises mean trouble. Call an expert if you see sparks. Sparks are dangerous. A professional can fix complex issues safely.
Credit: www.aovoescooter.co.uk
Conclusion
Fixing your electric scooter controller can be straightforward with the right steps. Always ensure safety first. Follow our guide for efficient results. Regular maintenance prevents future issues. Enjoy smoother rides and extend your scooter’s lifespan. Stay informed and keep your scooter in top condition.