How Do You Empty a Dyson Stick Vacuum: Step-by-Step Guide
Emptying a Dyson stick vacuum is simple and quick. Follow a few steps to keep your vacuum clean.
Dyson stick vacuums are popular due to their convenience and efficiency. But, like any vacuum, they need regular maintenance. Emptying the dust bin is crucial for optimal performance. This task might seem challenging if you are new to it. Don’t worry, it is straightforward once you know the process.
Keeping your vacuum clean not only improves its efficiency but also extends its lifespan. In this guide, we will walk you through the steps to empty your Dyson stick vacuum. Stay with us to learn how to keep your vacuum in top shape with just a few easy steps.
Preparation
Preparing to empty your Dyson stick vacuum is essential. Proper preparation ensures a smooth and efficient process. It also helps prevent any mess or damage to the unit.
Gather Supplies
Before starting, gather all necessary supplies. You’ll need a trash bag or can. This is where you’ll dispose of the dirt. Have a damp cloth ready. This helps in cleaning the dust container. Also, keep a small brush handy. It helps to clean any stubborn dirt.
Ensure Safety
Ensure the vacuum is turned off. Unplug it if necessary. This prevents any accidental activation. Make sure the vacuum is cool. This prevents burns if the motor has been running. Use gloves if you prefer. This keeps your hands clean and safe.
Credit: support.dyson.co.nz
Power Off The Vacuum
Before you empty your Dyson stick vacuum, it’s crucial to turn it off. Ensuring the vacuum is off prevents accidents and keeps you safe. Below, we’ll guide you through the steps to power off your vacuum.
Locate Power Button
First, locate the power button on your Dyson stick vacuum. The button is usually on the handle. It’s clearly marked for easy identification. Check the user manual if you have trouble finding it.
Unplug If Necessary
If your Dyson stick vacuum uses a cord, unplug it from the wall. This step is vital for safety. Unplugging ensures no power flows to the vacuum while you empty it.
For cordless models, just make sure the battery is fully off. Confirm no lights are on before you proceed.
Now your vacuum is safely powered off. You can move on to emptying the bin.
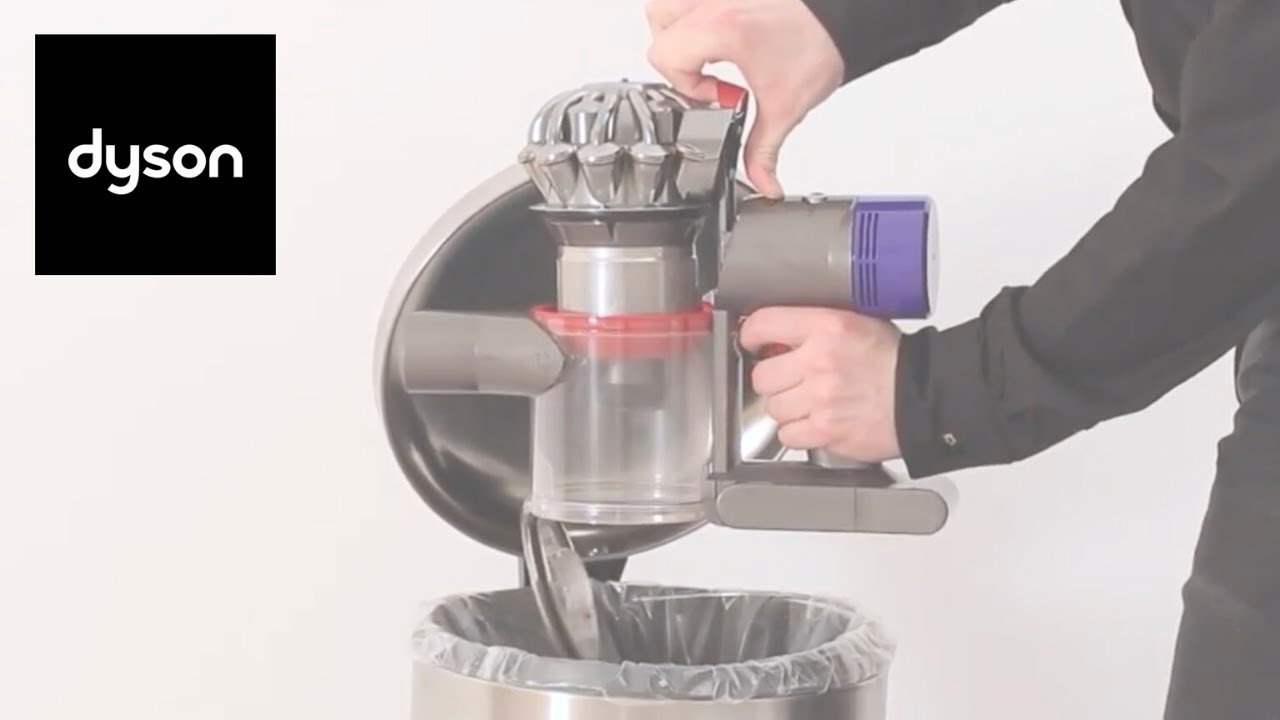
Remove The Dust Canister
Emptying your Dyson stick vacuum is simple. The first step is to remove the dust canister. This process is quick and easy. Follow these steps for a clean and efficient vacuum.
Find The Release Button
Locate the release button on your Dyson stick vacuum. This button is usually red and near the handle. Pressing it will allow you to detach the canister.
Detach The Canister
Once you press the release button, the dust canister will detach. Hold the canister over a trash bin. This ensures that all the dust and debris fall directly into the bin.
| Step | Action |
|---|---|
| 1 | Locate the red release button. |
| 2 | Press the release button firmly. |
| 3 | Detach the canister and hold it over a trash bin. |
Make sure the canister is completely empty. Shake it gently if needed. This ensures no debris is left behind.
- Ensure the vacuum is turned off before removing the canister.
- Clean the canister with a damp cloth if necessary.
- Avoid getting water inside the vacuum’s electronic parts.
- Press the release button.
- Detach the canister.
- Empty the contents into a trash bin.
Reattach the canister by aligning it with the vacuum. Push it until you hear a click. Your Dyson stick vacuum is now ready to use again.
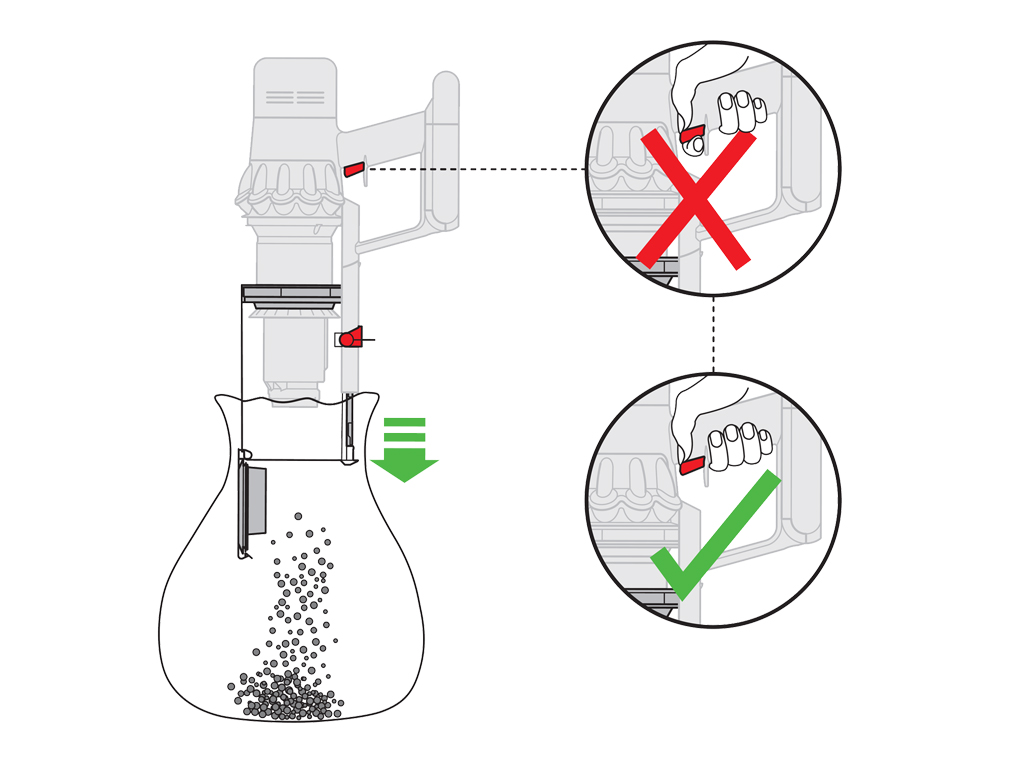
Empty The Dust Canister
Emptying the dust canister of your Dyson stick vacuum is essential. It ensures your vacuum runs efficiently. This process is straightforward and quick. In this section, we will guide you on how to do it properly.
Position Over Trash
Position the vacuum over a trash bin. This prevents dust from spreading. Hold the vacuum firmly. Ensure the bin is large enough to catch the debris.
Open The Bottom Lid
Next, locate the bottom lid release. This is usually a red button. Press the button to open the lid. Dust and debris will fall out. Make sure to do this gently. Avoid shaking the vacuum too much.
Clean The Dust Canister
Keeping your Dyson stick vacuum in top shape means regularly cleaning the dust canister. A clean canister ensures your vacuum runs efficiently. Follow these steps to clean it properly.
Use A Brush
First, remove the dust canister from the vacuum. Check for any stuck-on debris inside. A small brush can help remove dust and dirt. Make sure to brush all corners and edges.
Wipe With A Damp Cloth
After using the brush, take a damp cloth to wipe the inside. This helps remove fine dust. Ensure the cloth is not too wet. A damp cloth works best.
For stubborn spots, you can use a bit of mild soap. Wipe again with a clean, damp cloth to remove any soap residue. Let the canister dry completely before reattaching it to your vacuum.
Check And Clean The Filters
Maintaining your Dyson stick vacuum is crucial for its performance. One key step is checking and cleaning the filters. This ensures your vacuum runs efficiently. Let’s break down the process into simple steps.
Locate Filters
Find the filters in your Dyson stick vacuum. Most models have two filters. One is near the cyclone. The other is at the back of the motor. Refer to your user manual if unsure.
Rinse Under Water
Once located, remove the filters carefully. Rinse each filter under cold water. Avoid using soap or detergents. Gently squeeze out excess water. Repeat until the water runs clear.
Let the filters dry completely before reattaching. This may take up to 24 hours. Do not place them in a dryer or use heat.
Reassemble The Vacuum
Once you have emptied your Dyson stick vacuum, the next step is to reassemble it. Reassembling the vacuum is crucial for its proper functioning. It ensures that the device works efficiently the next time you use it. Follow these steps to put your vacuum back together correctly.
Attach The Dust Canister
To begin, locate the dust canister. Place it back in its designated spot on the vacuum. Ensure that it aligns correctly with the attachment points. The canister should click into place easily.
Ensure Proper Fit
After attaching the dust canister, check the fit. Make sure it is secure. A loose canister can cause the vacuum to malfunction. Look for any gaps or misalignments. Adjust the canister if needed to ensure a snug fit.
Following these steps will help you reassemble your Dyson stick vacuum correctly. Your vacuum will be ready for the next cleaning session.
Final Checks
After you have emptied your Dyson stick vacuum, some final checks ensure it works perfectly. These steps guarantee you have removed all debris and the vacuum is ready for use. Let’s go through the final steps to make sure everything is in order.
Power On The Vacuum
You need to power on the vacuum. Ensure the vacuum is fully charged or plugged in. Press the power button and listen for any unusual sounds. The motor should run smoothly and consistently.
Test For Proper Function
Now, it’s time to test for proper function. Place the vacuum on a clean floor and run it for a few minutes. Observe its suction power and brush roll movement. Here are the key points to check:
- Is the suction strong and steady?
- Is the brush roll spinning correctly?
- Are there any unusual noises?
If everything is working well, you can be confident your Dyson stick vacuum is ready for action. If you notice any issues, refer to the user manual for troubleshooting steps.

Credit: www.youtube.com
Conclusion
Emptying a Dyson stick vacuum is quick and easy. Just follow the steps. Release the bin latch and let the dirt fall. Close the bin securely. Regularly emptying keeps your vacuum working efficiently. Clean the filters too. A well-maintained vacuum lasts longer.