How to Take Apart Shark Stick Vacuum: Step-by-Step Guide
Disassembling your Shark Stick Vacuum can seem tough. But don’t worry; it’s simpler than you think.
Shark Stick Vacuums are popular for their power and ease of use. Yet, over time, they need a deep clean or repair. To do this, you must take it apart. Knowing how to disassemble your vacuum can save you time and money.
This guide will walk you through each step. You’ll learn which parts to remove first and how to handle each component. By the end, you’ll feel confident about taking apart and putting back together your Shark Stick Vacuum.
Preparation
Taking apart a Shark stick vacuum can seem daunting. Proper preparation makes the process easier and safer. Follow these simple steps to get started.
Unplug The Vacuum
Ensure the vacuum is turned off. Unplug it from the power source. This prevents accidental shocks. Double-check that it’s fully unplugged before proceeding.
Clear A Workspace
Find a flat, clean surface. A table or a large desk works well. Remove any clutter from the area. This gives you ample space to work and keeps small parts from getting lost.
Removing The Dust Cup
Removing the dust cup is a crucial step in maintaining your Shark Stick Vacuum. A clean dust cup ensures optimal performance and extends the life of your vacuum. Follow these simple steps to remove the dust cup efficiently.
Locating The Dust Cup
First, locate the dust cup on your Shark Stick Vacuum. It is usually situated near the handle. Look for a clear plastic container that holds the dirt and debris. The dust cup is designed for easy access and visibility.
Steps To Remove
- Turn off the vacuum: Ensure your vacuum is switched off and unplugged from the power source.
- Press the release button: Find the release button near the dust cup. Press it to unlock the dust cup from the vacuum.
- Lift the dust cup: Gently lift the dust cup away from the vacuum. Be careful not to spill any debris.
- Empty the dust cup: Hold the dust cup over a trash bin. Open the bottom lid to empty the contents.
- Close the dust cup: After emptying, close the bottom lid securely. Ensure it clicks into place.
- Reattach the dust cup: Align the dust cup with the vacuum and press it back into place. Ensure it locks firmly.
Following these steps will keep your Shark Stick Vacuum in top shape. Regularly emptying the dust cup prevents clogs and maintains suction power.
Detaching The Handle
Properly detaching the handle of your Shark stick vacuum is essential. It ensures efficient cleaning and maintenance. Below are the steps to help you remove the handle easily and safely.
Identifying The Handle Lock
First, locate the handle lock. It is usually near the top of the vacuum. Look for a small button or lever. This lock secures the handle to the main body.
Steps To Detach
- Turn off the vacuum. Unplug it from the power source.
- Press the handle lock button or lever. Hold it down firmly.
- Gently pull the handle upwards. Do this while holding the lock down.
- Continue pulling until the handle is completely detached.
If the handle does not come off easily, check the lock again. Ensure you are pressing it correctly. Do not force the handle. This may cause damage.
Once detached, store the handle safely. This will prevent any damage or loss.
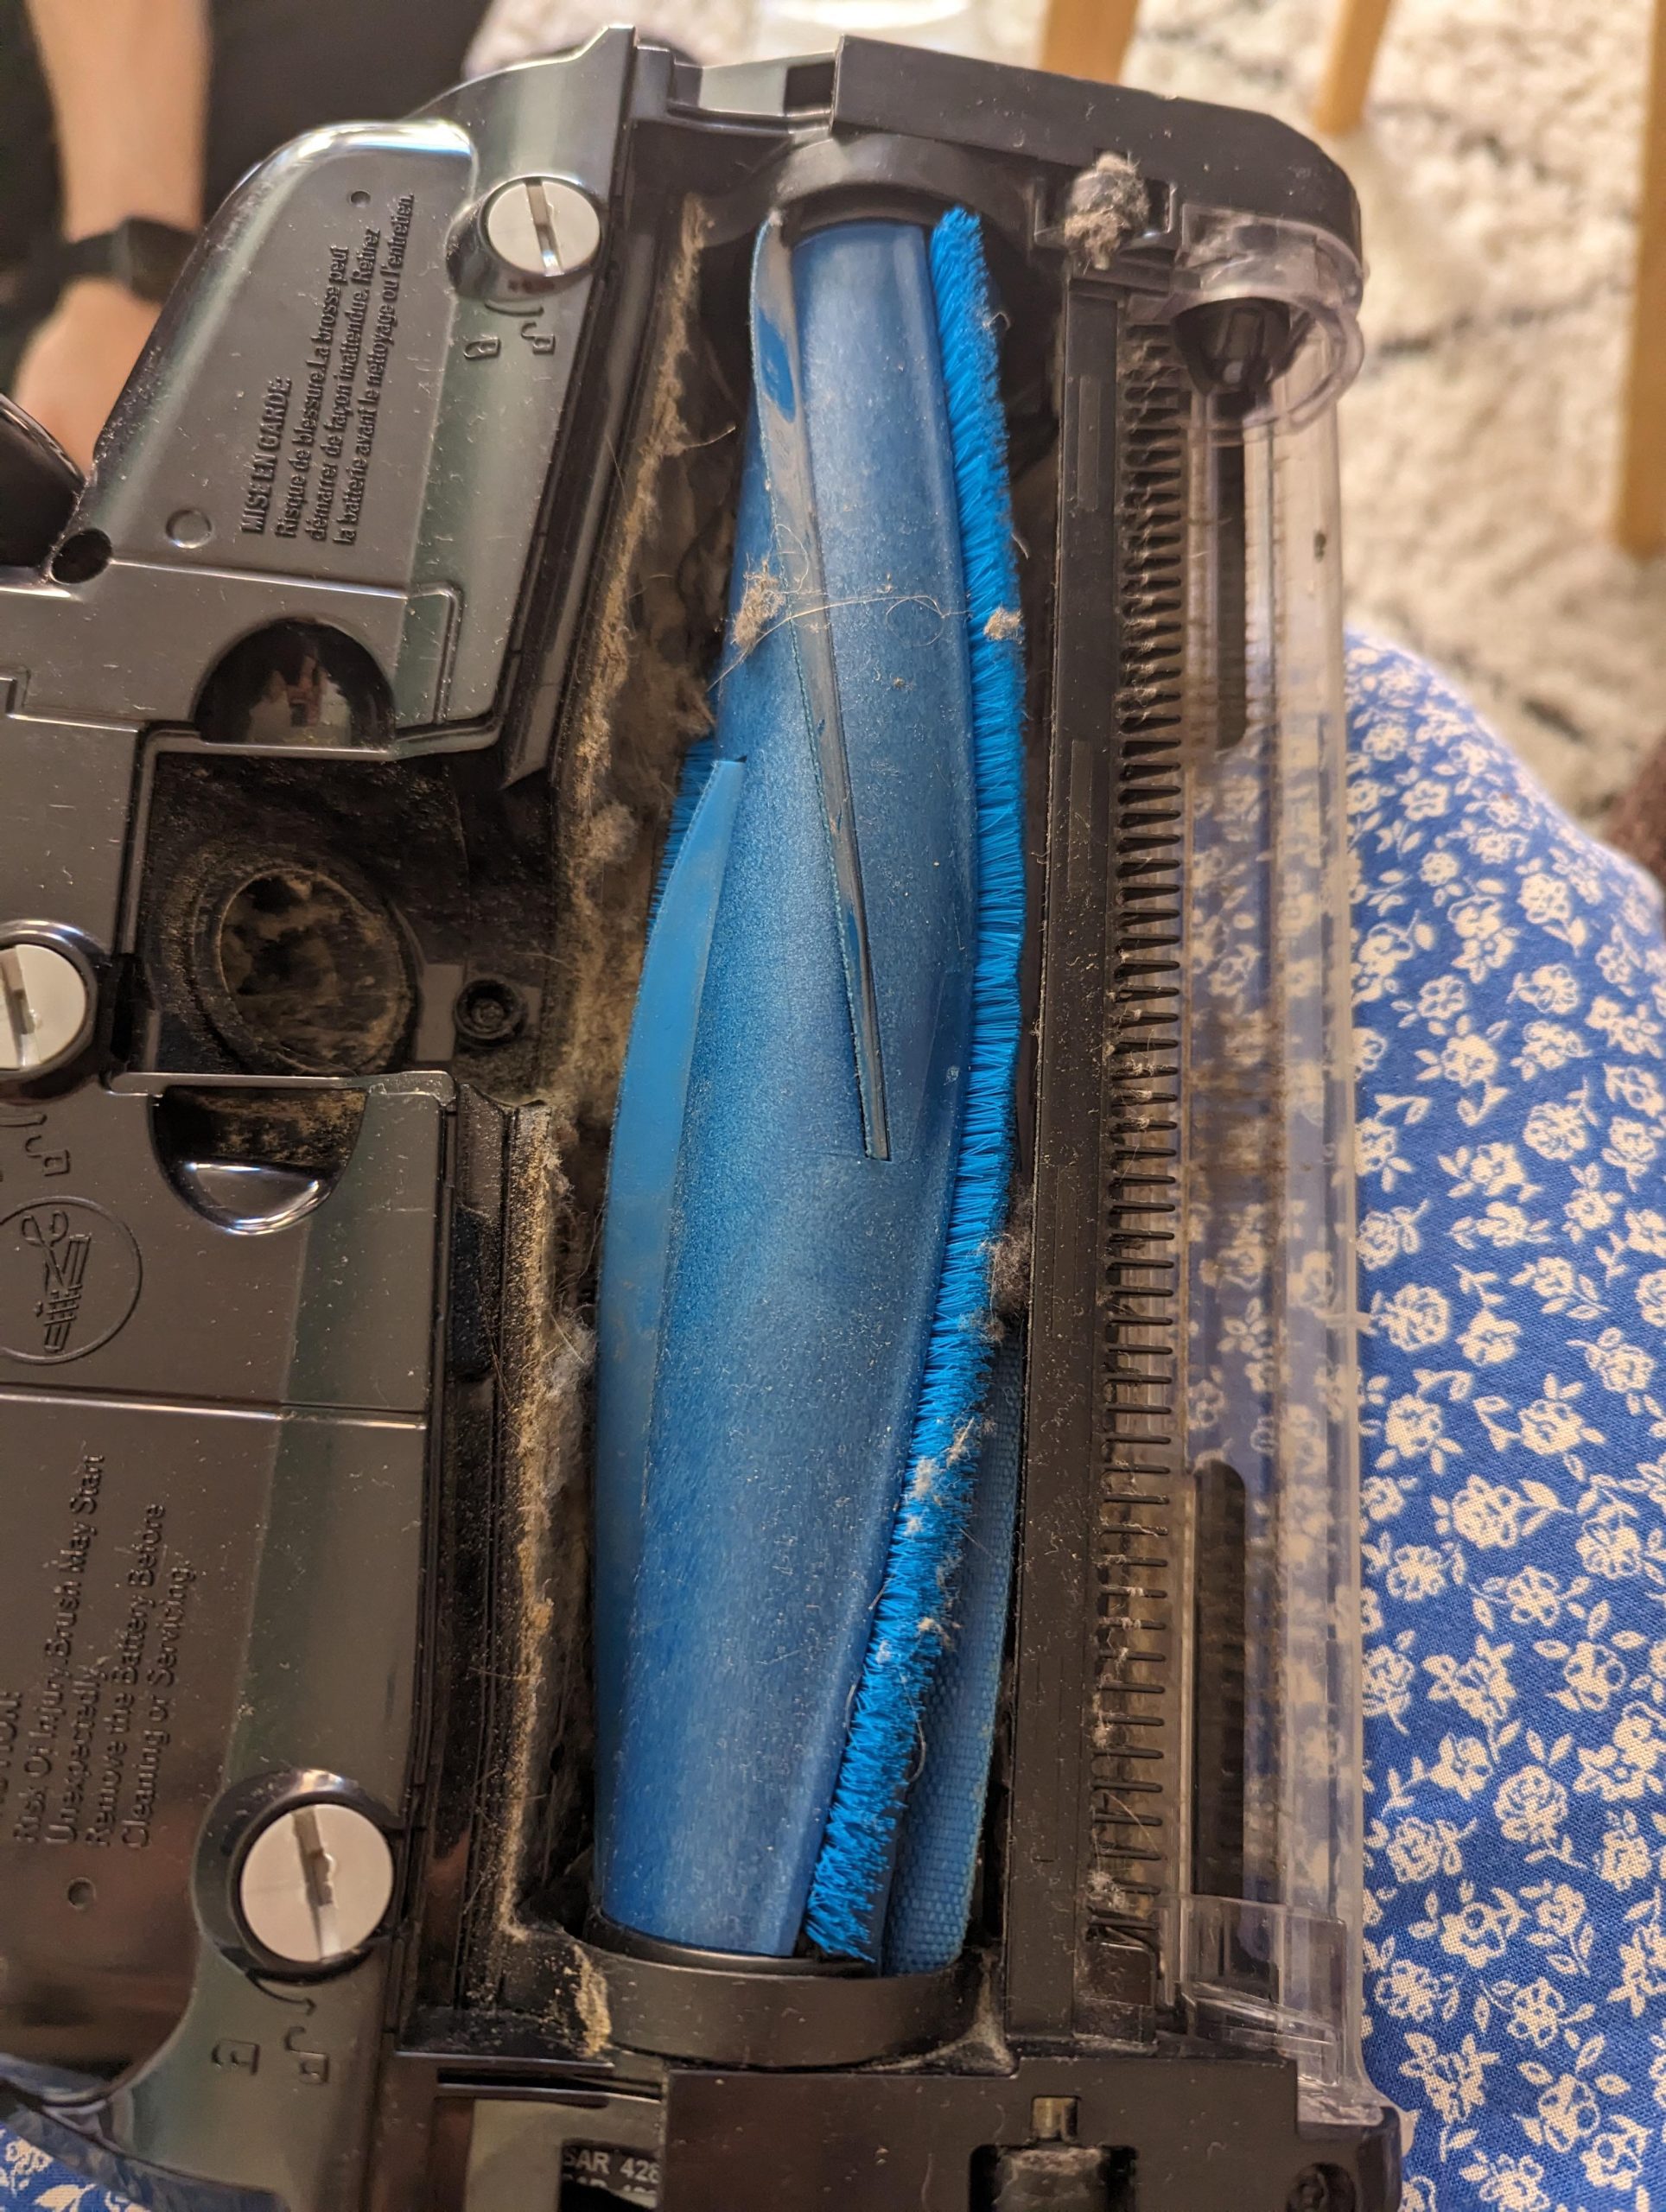
Taking Apart The Brush Roll
Knowing how to take apart your Shark stick vacuum’s brush roll is essential. This task helps keep your vacuum performing at its best. A clean brush roll picks up dirt and debris more efficiently. Follow these simple steps to ensure you do it right.
Accessing The Brush Roll
Unplug your vacuum for safety. Lay the vacuum flat on the floor. Locate the brush roll cover on the underside of the vacuum head. There are usually a few screws holding this cover in place. Use a screwdriver to remove these screws carefully. Place the screws in a safe spot so you don’t lose them.
Steps To Remove The Brush
Once the cover is off, you can see the brush roll. Gently pull the brush roll out. If it is stuck, wiggle it slightly until it comes free. Check for any hair or debris wrapped around the brush roll. Use scissors or a brush to remove this debris. If the brush roll is very dirty, rinse it with water and let it dry completely. Reinsert the clean brush roll back into the vacuum head. Secure the cover with the screws you saved earlier.
Disassembling The Motor
Disassembling the motor of your Shark stick vacuum can help with maintenance and repairs. By understanding the process, you can extend the life of your vacuum. The motor is the heart of your vacuum, so handle it with care.
Locating The Motor Housing
You need to find the motor housing. It is usually located near the handle. The housing is often covered with a plastic shield. This shield protects the motor from dust and debris.
Look for screws or clips holding the shield in place. You might need a screwdriver to remove them. Once the screws or clips are out, you can see the motor housing clearly.
Steps To Open And Remove
Start by unplugging the vacuum. Safety first. Then, lay it flat on a clean surface. Remove the screws around the motor housing. Keep the screws safe; you will need them later.
Gently lift the cover off the motor housing. Be careful not to damage any wires. Once the cover is off, you will see the motor. Disconnect any wires attached to the motor. They might have clips or connectors.
You can carefully lift the motor out of its housing. Handle it gently to avoid damage. If you need to replace the motor, ensure you get the correct model. Reassemble by following these steps in reverse.
Cleaning And Maintenance
Keeping your Shark Stick Vacuum in top condition requires regular cleaning and maintenance. This ensures optimal performance and extends the vacuum’s lifespan. Follow these steps to keep your vacuum clean and functional.
Cleaning The Parts
Unplug the vacuum. Remove the dust cup by pressing the release button. Empty the contents into a trash bin. Rinse the dust cup with warm water. Let it air dry completely before reassembling. Next, take out the filters. Wash them under cold water. Do not use soap or detergents. Allow the filters to air dry for at least 24 hours. Reinsert the dry filters into the vacuum.
Inspecting For Damage
Regular inspection of your vacuum parts is crucial. Check the brush roll for tangled hair or debris. Use scissors to cut away any obstructions. Examine the hose for any blockages or cracks. A damaged hose can reduce suction power. Inspect the power cord for any signs of wear. Ensure there are no exposed wires. Replace any damaged parts immediately to avoid further issues.
Reassembly Process
The reassembly process is crucial after disassembling your Shark stick vacuum. Proper reassembly ensures your vacuum works efficiently. Follow these steps carefully to put your vacuum back together. This will help maintain its performance and longevity.
Steps To Reassemble
Begin by attaching the main body to the motor unit. Make sure it clicks into place. Next, reattach the dust canister. Ensure it is secure and properly aligned. Then, connect the handle to the main body. Tighten any screws to secure it firmly.
Now, reattach the vacuum head. Align it correctly and push until it clicks. Reconnect any hoses or attachments. Check that they are firmly in place. Finally, reinsert the battery if it is removable. Ensure it is fully charged before use.
Final Checks
Once reassembled, perform a few checks. Turn on the vacuum to test its functionality. Listen for unusual noises. Check all connections to ensure they are tight. Inspect the vacuum head for proper movement.
Make sure the dust canister is properly sealed. This prevents any loss of suction. Verify that the filters are correctly placed. This ensures optimal performance. Your vacuum should now be ready to use. Enjoy a clean home!

Credit: www.youtube.com
Troubleshooting Tips
When dealing with a Shark Stick Vacuum, knowing how to troubleshoot can save time and stress. This section will cover common issues and when you should consider seeking professional help.
Common Issues
One common issue is a loss of suction. Check for clogs in the hose or filters. Another issue could be the brush roll not spinning. This often happens due to tangled hair or debris. Clean the brush roll and remove any obstructions. If your vacuum is making strange noises, inspect the interior parts. Tighten any loose screws and ensure all parts are properly aligned.
When To Seek Professional Help
Sometimes, DIY fixes are not enough. If your vacuum still has problems after cleaning and checking, it might need professional repair. Electrical issues are best handled by experts. If the motor does not run, or there is a burning smell, seek professional help. If you are unsure about taking apart certain components, it is safer to consult a technician.

Credit: www.youtube.com
Conclusion
Taking apart your Shark Stick Vacuum doesn’t have to be hard. Follow the steps carefully. Keep track of all the parts you remove. Regular maintenance helps your vacuum last longer. Clean parts mean better suction. Remember to unplug before starting.