How to Clean a Shark Stick Vacuum: Step-by-Step Guide
Cleaning your Shark stick vacuum keeps it running smoothly. Regular maintenance ensures top performance.
A Shark stick vacuum is a handy tool for keeping your home clean. But, like any tool, it needs regular care to function its best. Over time, dirt and debris can clog the filters, affecting suction power. Cleaning your vacuum might seem daunting, but it’s simpler than you think.
With just a few steps, you can keep your vacuum in top shape. This guide will walk you through the process, ensuring your vacuum remains efficient and effective.
Introduction To Shark Stick Vacuum Cleaning
Cleaning your Shark Stick Vacuum is crucial. Regular maintenance ensures optimal performance. This guide will help you understand how to clean and maintain your vacuum.
Importance Of Regular Maintenance
Regular maintenance keeps your Shark Stick Vacuum running smoothly. It prolongs the vacuum’s life. Dust and debris can clog the vacuum. This reduces its efficiency. Cleaning the vacuum regularly can prevent these issues. It ensures that your vacuum always works at its best.
Tools And Materials Needed
Before you start cleaning, gather the necessary tools. You will need a soft brush, a microfiber cloth, and a pair of scissors. A mild detergent and warm water are also essential. These tools will help you clean different parts of the vacuum.
Ensure you have a clean, flat surface to work on. This will make the cleaning process easier. Having all tools ready will save you time. You can clean your vacuum efficiently and effectively.

Credit: www.youtube.com
Preparation Steps
Before you start cleaning your Shark stick vacuum, it’s important to prepare properly. Following these steps ensures safety and efficiency. Let’s dive into the preparation steps.
Unplugging The Vacuum
First, unplug the vacuum from the power outlet. This step is crucial to avoid any electrical hazards. Make sure the cord is safely out of the way. You don’t want it to trip you while working.
Disassembling Parts
Next, start disassembling the parts of the vacuum. This process allows you to clean each part thoroughly. Begin by removing the dust cup. Press the release button and pull it out gently.
Then, detach the floor nozzle. Check for any visible screws and unscrew them if needed. Separate the brush roll carefully. Ensure you remember how each part fits back together. Taking pictures during disassembly can help.
Here’s a quick checklist to follow:
- Unplug the vacuum
- Remove the dust cup
- Detach the floor nozzle
- Separate the brush roll
- Take pictures during disassembly
Cleaning The Dust Cup
Maintaining your Shark Stick Vacuum ensures it performs at its best. One of the most important tasks is cleaning the dust cup. A clean dust cup allows your vacuum to work efficiently. Here’s a step-by-step guide to help you keep your dust cup spotless.
Emptying The Dust Cup
First, unplug the vacuum for safety. Locate the dust cup release button and press it. This will detach the dust cup from the vacuum body. Hold the dust cup over a trash bin and press the button to open the bottom lid. Let the debris fall into the bin. Shake the cup gently to remove any stuck dirt. Close the lid and reattach the dust cup to the vacuum.
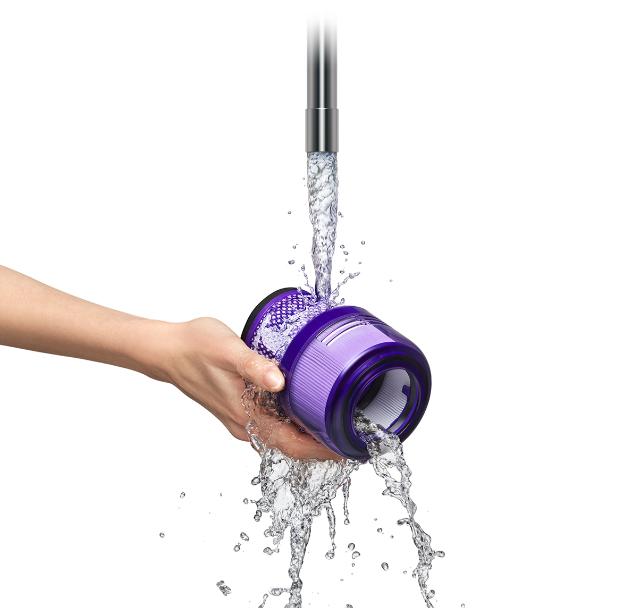
Washing The Dust Cup
After emptying, remove the dust cup once more. Rinse it with warm water. Use a soft brush if needed to clean the inside. Avoid using soap, as it can leave residue. Let the dust cup dry completely before reattaching it. This prevents mold and ensures optimal performance.

Credit: www.walmart.com
Cleaning The Filters
Keeping your Shark stick vacuum in top shape means cleaning the filters regularly. Clean filters ensure optimal performance and a longer lifespan for your vacuum. This process is simple and can be done in a few easy steps. Let’s dive into the details.
Removing The Filters
First, unplug your Shark stick vacuum. Locate the filter compartment. It is usually near the dust cup. Open the compartment and carefully remove the filters. Depending on your model, you may have one or two filters. Take note of their placement for reassembly.
Washing And Drying Filters
Rinse the filters under cold water. Avoid using soap or chemicals. Gently squeeze out the excess water. Do not wring them out, as this can damage the filters. Lay them flat to dry. Ensure the filters are completely dry before reinstalling them. This can take up to 24 hours.
Cleaning The Brush Roll
A clean brush roll is essential for optimal performance of your Shark stick vacuum. Over time, debris such as hair and dirt can accumulate around the brush roll, reducing its efficiency. Regular cleaning ensures your vacuum picks up all dirt effectively and extends the life of the appliance. Follow these steps to keep the brush roll in top condition.
Removing Debris From Brush Roll
First, turn off and unplug the vacuum. Lay it flat on the floor. Use a pair of scissors to cut through tangled hair and threads around the brush roll. Be careful not to damage the bristles. After cutting, pull the debris out with your fingers or use a pair of tweezers for smaller particles.
Next, remove the brush roll if your model allows. Check the user manual for instructions. Once removed, rinse the brush roll under warm water. Use mild soap if needed. Let it dry completely before reattaching it to the vacuum.
Checking For Damage
Inspect the brush roll for any signs of wear and tear. Look for broken bristles or cracks in the roll. If you notice any damage, replace the brush roll to maintain the vacuum’s performance.
Check the end caps of the brush roll for any obstructions. Clean these areas to ensure smooth rotation. Regular inspection and maintenance can prevent costly repairs and keep your Shark stick vacuum working efficiently.
Credit: www.sharkclean.com
Cleaning The Vacuum Hose
Cleaning the vacuum hose is crucial for maintaining your Shark Stick Vacuum’s efficiency. A clogged hose can hinder performance and reduce suction power. Regular cleaning ensures your vacuum works at its best. Let’s dive into the process step-by-step.
Detaching The Hose
First, turn off and unplug the vacuum. This step is essential for safety. Locate the hose connection point on the vacuum. Press the release buttons to detach the hose. Be gentle to avoid damage. Now, you can easily access the hose for cleaning.
Removing Blockages
Inspect the hose for any visible blockages. Use a long, flexible brush to clear debris. Push the brush through the hose to dislodge any clogs. For stubborn blockages, use a straightened coat hanger. Be careful not to puncture the hose. Once clear, rinse the hose with warm water. Let it dry completely before reattaching.
Reassembling The Vacuum
After cleaning your Shark Stick Vacuum, the next step is putting it back together. Proper reassembly ensures that the vacuum works efficiently. Follow these steps to reattach the cleaned parts and ensure a proper fit.
Reattaching Cleaned Parts
Begin by reattaching the dustbin. Align it with the base and snap it back into place. Listen for a click to ensure it is secure.
Next, attach the filters. Place the foam filter into its slot first. Then, add the felt filter on top. Make sure they are seated properly.
Reattach the brush roll to the vacuum head. Slide it in carefully. Ensure it is positioned correctly before securing it with the screws.
Ensuring Proper Fit
Check each part to ensure it fits snugly. Gaps or loose parts can reduce suction power. Verify the dustbin and filters are seated well.
Inspect the brush roll for proper alignment. It should spin freely and be secure. Tighten the screws if necessary.
Finally, test the vacuum. Turn it on and check for any unusual sounds. If everything works well, your Shark Stick Vacuum is ready for use.
Final Checks And Maintenance Tips
After cleaning your Shark Stick Vacuum, it’s important to perform some final checks and follow regular maintenance tips. This ensures your vacuum works efficiently and lasts longer. Here are some steps you should follow:
Running A Test
Once you’ve reassembled your vacuum, run a test to ensure everything is in order. Follow these steps:
- Plug in the vacuum and turn it on.
- Check the suction power. Make sure it is strong and consistent.
- Listen for unusual noises. Any strange sounds could indicate a problem.
- Inspect the brush roll. Ensure it spins freely without obstructions.
- Test the attachments. Attach each one and verify they work properly.
If you notice any issues, you might need to disassemble and check for missed spots or re-clean certain parts.
Regular Maintenance Schedule
To keep your Shark Stick Vacuum in top condition, follow a regular maintenance schedule. Here’s a simple guide:
| Maintenance Task | Frequency |
|---|---|
| Empty the dust cup | After each use |
| Clean the filters | Once a month |
| Check and clean the brush roll | Every two weeks |
| Inspect for blockages | Monthly |
| Wipe down the vacuum body | Weekly |
Following this schedule helps keep your vacuum running smoothly. It also extends its lifespan.
Maintaining your Shark Stick Vacuum is not difficult. Regular care ensures it performs well and lasts longer.
Conclusion
Cleaning your Shark Stick Vacuum is simple and essential. It ensures optimal performance. Follow the steps regularly. Empty the dust cup. Wash the filters. Check for blockages. Keep the brush roll clean. This will extend your vacuum’s life. A clean vacuum works better and lasts longer.
Your home stays cleaner too. Regular maintenance saves time and effort. Enjoy a cleaner home with less hassle.