How to Put Back Together a Wahl Beard Trimmer?
To put back together a Wahl beard trimmer, follow these steps: disassemble the trimmer, clean the components, reassemble them in the correct order, and test the trimmer. Are you struggling with a disassembled Wahl beard trimmer and wondering how to put it back together?
No worries, we’ve got you covered! Whether you accidentally took it apart or simply want to give it a thorough clean, this guide will walk you through the process step by step. By following these instructions, you’ll have your Wahl beard trimmer up and running in no time.

Credit: www.amazon.com
Necessary Tools For Disassembly
Disassembling a Wahl Beard Trimmer may seem like a daunting task, but with the right tools at your disposal, it can be a breeze. Whether you’re replacing a broken part or giving your trimmer a deep clean, having the necessary tools will ensure a smooth and successful disassembly process.
screwdriver set
A screwdriver set is an essential tool for the disassembly of a Wahl Beard Trimmer. This set typically includes various sizes and types of screwdrivers, such as Phillips and flathead. These screwdrivers will enable you to remove screws from the trimmer’s casing and internal components, making it easy to access the parts you need to repair or clean.
tweezers
Tweezers are another indispensable tool to have on hand when taking apart a Wahl Beard Trimmer. They are perfect for gripping and extracting small parts, such as trimmer blades, springs, or hair clippings that may have become lodged inside. With a pair of tweezers, you can carefully maneuver and remove these delicate components, ensuring a thorough disassembly process.
small brush
A small brush, such as a toothbrush or a specialized cleaning brush, is crucial for cleaning hard-to-reach areas during the disassembly of your Wahl Beard Trimmer. This brush will help you remove any dirt, debris, or hair that may have accumulated in the trimmer’s crevices, preventing it from functioning optimally. Regular cleaning with a brush will also prolong the lifespan of your trimmer, ensuring it remains in top-notch condition.
rubbing alcohol
Rubbing alcohol, or isopropyl alcohol, is a handy solution for disinfecting and cleaning the internal components of your Wahl Beard Trimmer. It effectively removes oil, product buildup, and bacteria that can accumulate over time. By dipping a cotton swab or cloth in rubbing alcohol and gently wiping the trimmer’s parts, you can promote optimal hygiene and maintain the trimmer’s performance.
Removing The Outer Casing
One of the essential steps in repairing your Wahl beard trimmer is removing the outer casing. This allows you to access the internal components of the trimmer and diagnose any issues that may be affecting its performance. In this section, we will guide you through the process of removing the outer casing step by step.
Locating and Removing the Screws
To start, you need to locate and remove the screws that hold the outer casing in place. These screws are usually found on the back or bottom of the trimmer, but the exact placement may vary depending on the model. Before you begin, make sure you have a suitable screwdriver that fits the size and shape of the screws.
Once you have your screwdriver ready, follow these steps:
- Place the trimmer on a flat surface, preferably covered with a soft cloth to prevent scratching.
- Inspect the trimmer carefully to locate the screws. They may be covered by labels or small caps, so be sure to remove any obstructions.
- Insert the screwdriver into the screw head and turn counterclockwise to loosen and remove the screws. Keep them in a safe place so that they don’t get lost.
Separating the Casing
Once you have successfully removed all the screws, it’s time to separate the trimmer’s outer casing. This step requires caution and a gentle touch to prevent any damage to the internal components. Follow these instructions:
- Gently pry the casing apart using your fingers or a thin, flat tool, such as a plastic opening tool or a small screwdriver. Start from one corner and work your way around the trimmer, applying equal pressure.
- As you separate the casing, be mindful of any cables or wires attached to it. Carefully disconnect them if needed, paying attention to their orientation for easy reassembly later.
- Once the casing is fully detached, set it aside in a safe place. Take a moment to inspect the internal components for any visible signs of damage, wear, or dirt accumulation.
Disassembling The Motor Component
Disassembling the Motor Component
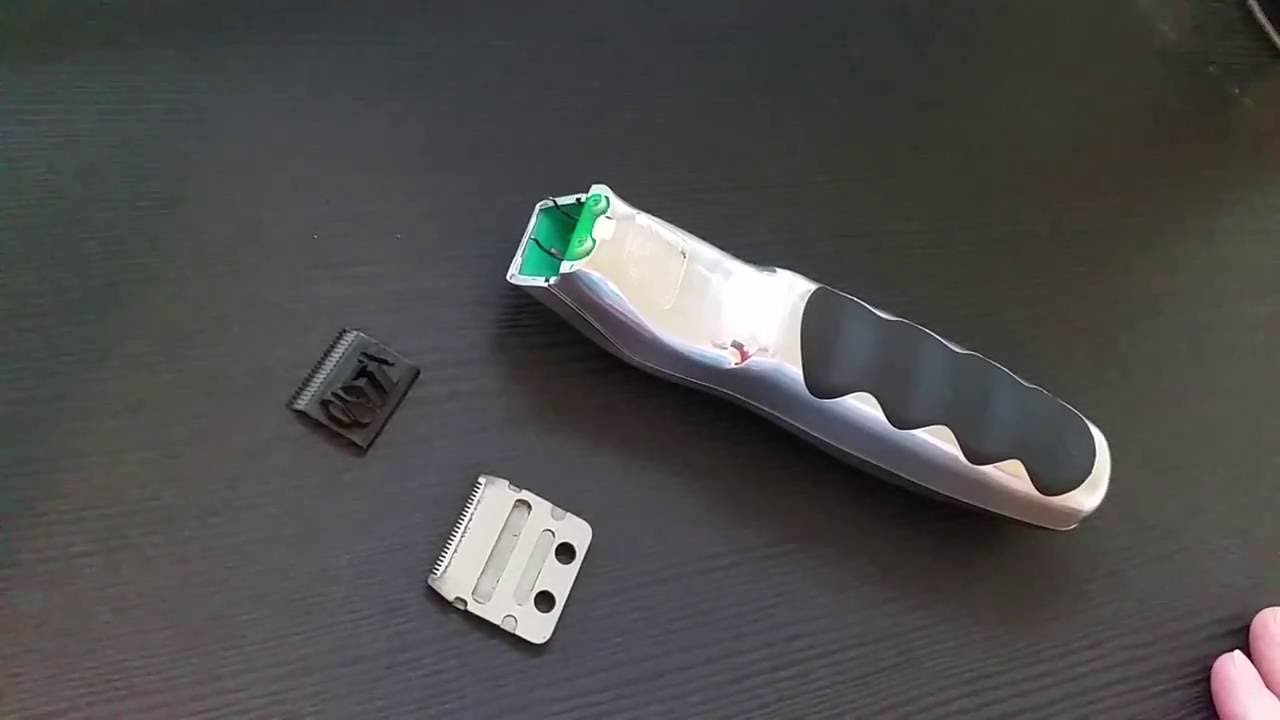
If you need to repair or clean your Wahl beard trimmer, you may need to disassemble the motor component. This is an integral part of the trimmer and requires careful handling and attention to detail. Follow these steps to successfully detach the blade assembly and remove the motor:
Detaching the Blade Assembly
To start disassembling the motor component of your Wahl beard trimmer, you first need to detach the blade assembly. This assembly includes the trimmer blades and any other parts attached to them. Follow these steps:
- Make sure the trimmer is turned off and disconnected from any power source.
- Set the trimmer on a clean surface and locate the release button or lever near the blade assembly.
- Press the release button or lift the lever to unlock the blade assembly.
- Gently pull the blade assembly away from the trimmer housing.
- Place the blade assembly in a safe and clean location to prevent any damage or loss of small parts.
Removing the Motor
Once you have successfully detached the blade assembly, you can proceed to remove the motor from the trimmer. The motor is the main power source of the trimmer and is responsible for its functionality. Follow these steps:
- Locate the screws or fasteners that hold the motor in place. These are usually located on the sides or bottom of the trimmer housing.
- Using an appropriate screwdriver or tool, carefully unscrew and remove the screws or fasteners.
- Gently lift the motor out of the trimmer housing.
- Inspect the motor for any signs of damage or wear. Replace the motor if necessary.
- Set aside the motor in a secure location until you are ready to reassemble the trimmer.
By following these steps, you can safely and effectively disassemble the motor component of your Wahl beard trimmer. Make sure to keep track of all the parts and take proper precautions to avoid any damage. In the next section, we will explore how to put everything back together.
Cleaning And Inspecting The Parts
Cleaning and Inspecting the Parts
After disassembling your Wahl beard trimmer, the next step to ensure its optimal functionality is to clean and inspect the individual parts. This will help remove any debris or buildup that may be affecting its performance, as well as identify any potential damage that might need to be addressed.
Cleaning the Blade Assembly
The blade assembly is one of the most crucial parts of a Wahl beard trimmer, as it determines the precision and effectiveness of your trimming experience. To clean it effectively:
- Use a small brush, such as a toothbrush, to remove any loose hair or debris from the blades.
- For a more thorough clean, you can detach the blade assembly from the trimmer and rinse it under warm running water, ensuring you remove all hair particles and product residue.
- Dry the blade assembly thoroughly before reattaching it to the trimmer. Moisture can lead to rust or damage the motor.
Inspecting the Motor for Any Damage
The motor is the powerhouse of your Wahl beard trimmer, responsible for providing the necessary cutting power. Inspecting it for any damage is crucial to avoid performance issues or, in worst-case scenarios, complete motor failure. To inspect the motor:
- Check for any visible signs of damage, such as cracks, burnt components, or loose wires. If you notice anything suspicious, it may be advisable to consult a professional for repair or replacement.
- Ensure that the motor turns smoothly and without any unusual sounds. If you hear grinding or buzzing noises, it could indicate a problem.
- Inspect the motor’s ventilation holes to make sure they are not blocked or clogged with dust. A clean and well-ventilated motor will run more efficiently and last longer.
By regularly cleaning and inspecting the parts of your Wahl beard trimmer, you can extend its lifespan and maintain its performance at its best. These simple steps help ensure the blades are clean and sharp, and the motor is in optimal condition. Now that you have cleaned and inspected the parts, you are ready to put the Wahl beard trimmer back together.
Reassembling The Motor Component
Once you have disassembled your Wahl Beard Trimmer for cleaning or maintenance, it’s time to put it back together. The motor component is an essential part that ensures the trimmer functions properly. In this section, we will guide you through reassembling the motor component of your Wahl Beard Trimmer to get it back in working order.
Placing the Motor Back into Position
Firstly, locate the motor component of your Wahl Beard Trimmer. It should be a compact, cylindrical unit with wires attached. To place the motor back into position, follow these steps:
- Ensure that the trimmer housing is clean and free from any debris or hair that may have accumulated during disassembly. A clean housing will provide a secure fit for the motor.
- Align the motor’s prongs with the corresponding slots or connectors inside the trimmer housing. Take care to position it correctly, as an improper fit may lead to malfunction.
- Gently press down on the motor component, using even pressure, until it is securely seated in its place. You may hear a click or feel a slight resistance when the motor is correctly positioned.
Reattaching the Blade Assembly
Now that you have successfully placed the motor back into position, it’s time to reattach the blade assembly. This step is crucial to ensuring the trimmer functions properly and delivers precise, clean cuts. Follow the steps below:
- Retrieve the blade assembly that you removed earlier. Ensure that it is clean and free from any hair or debris.
- Align the blade assembly with the motor’s drive shaft, making sure it fits securely and snugly. The drive shaft is typically a small, protruding piece near the center of the motor.
- Once aligned, gently press the blade assembly onto the drive shaft, applying even pressure. Ensure that it is fully seated and latched onto the shaft.
- Give the blade assembly a slight tug to confirm that it is securely attached. If it moves or feels loose, repeat the previous steps to ensure a proper fit.
With the motor component back in place and the blade assembly securely reattached, your Wahl Beard Trimmer is now ready to provide you with precise, effortless grooming. Remember to test the trimmer before use to ensure that everything is working correctly. Happy grooming!
Fixing Any Loose Components
When it comes to fixing any loose components of your Wahl Beard Trimmer, it’s essential to identify the problem areas and secure or replace the necessary parts. Keeping your trimmer in top-notch condition will ensure a precise and comfortable beard grooming experience. In this guide, we will discuss the steps involved in identifying loose or broken parts, securing or replacing them, and making sure your trimmer is back in working order.
Identifying Loose or Broken Parts
The first step in fixing your Wahl Beard Trimmer is identifying any loose or broken components. This can be done by inspecting the trimmer carefully and looking for any signs of damage or looseness. Here’s a quick checklist to help you identify these parts:
- Examine the blade assembly for any wobbling or displacement.
- Check the guide combs to ensure they are securely attached and not loose.
- Inspect the power switch and its surrounding area for any signs of damage or instability.
- Ensure the battery compartment is intact and the batteries are properly positioned.
- Inspect the attachment heads and their connection points for any looseness or damage.
By following these steps, you’ll be able to identify any loose or broken components that need attention.
Securing or Replacing the Components
Once you’ve identified the loose or broken parts, the next step is to secure or replace them as necessary. Here are some ways to do it:
- Tighten: For loose screws or bolts, use a screwdriver or wrench to tighten them securely.
- Replace: If any components are beyond repair or broken, it’s recommended to replace them with genuine Wahl replacement parts. You can purchase these parts from authorized dealers or the Wahl website.
- Repair: In some cases, you may be able to fix minor damages yourself. For example, if the power switch is loose, you can carefully open the trimmer and reattach it firmly.
By securing or replacing the loose or broken components, you’ll ensure that your Wahl Beard Trimmer is back to its optimal performance.
Putting The Trimmer Back Together
Once you have successfully disassembled and cleaned your Wahl beard trimmer, it’s time to put it back together. Putting the trimmer back together requires attention to detail and careful alignment of the casing and screw holes. In this section, we will guide you through the process step by step, ensuring a seamless reassembly of your trimmer.
Aligning the Casing and Screw Holes
To begin putting your Wahl beard trimmer back together, make sure the casing and screw holes are correctly aligned. This ensures a proper fit and easy functioning of the trimmer. Follow these steps:
- Take the main casing and locate the corresponding holes on the trimmer body.
- Gently align the casing with these holes, ensuring that they match up perfectly.
- Once aligned, press the casing firmly against the body to secure a good fit.
Ensuring the proper alignment of the casing and screw holes is essential for the trimmer to function optimally. By following these steps, you will be one step closer to having your Wahl beard trimmer fully reassembled.
Carefully Tightening the Screws
Now that you’ve aligned the casing and screw holes, it’s time to carefully tighten the screws. Tightening the screws securely ensures the stability and durability of your trimmer. Here’s what you need to do:
- Take the appropriate screwdriver and tighten each screw in a clockwise direction.
- Ensure that each screw is tightened firmly but not excessively, as overtightening can lead to damage.
- Work your way around the trimmer, tightening each screw evenly until they are all snug.
Taking your time and being diligent while tightening the screws will help prevent any future problems with your Wahl beard trimmer. With the casing properly aligned and the screws securely fastened, your reassembled trimmer is now ready for use.
Following these simple steps will allow you to successfully put back together your Wahl beard trimmer with confidence. Remember to align the casing and screw holes meticulously and carefully tighten the screws. By doing so, you can ensure a smooth reassembly that will extend the lifespan of your trimmer and keep your beard looking its best.
Testing The Trimmer
Ensuring All Functions Work Properly
After successfully putting back together your Wahl beard trimmer, it is important to test all its functions to ensure everything is working smoothly. Testing the trimmer not only ensures that it is safe to use, but also guarantees a precise and efficient trimming experience. To test the trimmer, follow these simple steps:
- Power on the trimmer and check if the motor is running smoothly. Listen for any unusual sounds or vibrations that may indicate a problem.
- Inspect the on/off switch to ensure it is functioning correctly. Make sure the trimmer turns on and off as expected.
- Adjust the trimming settings, if applicable, and make sure the blade length changes accordingly. Move the adjustment lever or switch while observing the blades to ensure they move smoothly and lock into place securely.
- Hold the trimmer in your hand and test out the ergonomic design. Make sure it feels comfortable and easy to handle during use.
- Place the trimmer against a small section of hair and test its cutting ability. The blades should glide smoothly through the hair without any pulling or tugging.
- Check if the trimmer has any additional functions such as a detailer or nose trimmer attachment. Attach and detach these accessories to ensure they work properly.
- Finally, test the battery life or corded functionality, depending on the trimmer’s power source. Run the trimmer continuously for a few minutes to ensure it lasts without any interruptions or loss of power.
By following these steps, you can ensure that your Wahl beard trimmer is in optimal working condition and ready to provide you with precise and hassle-free trimming.
Cleaning and Oiling the Blades
Cleaning and oiling the blades of your Wahl beard trimmer is key to maintaining its performance and prolonging its lifespan. Regular maintenance will prevent the accumulation of hair and debris, reducing the risk of clogging and ensuring the blades remain sharp. Here are the steps to clean and oil the blades:
- Before cleaning, ensure the trimmer is turned off and unplugged from any power source. This ensures your safety during the maintenance process.
- Remove any detachable or adjustable parts, such as comb attachments or detailer heads, to access the blades.
- Using a small brush or a toothbrush, gently remove any hair or debris that may be stuck between the blades. Be careful not to apply excessive force and avoid touching the sharp edges of the blades.
- Once the blades are free from hair and debris, apply a few drops of Wahl blade oil to ensure smooth operation. Run the trimmer for a few seconds to allow the oil to distribute evenly.
- Wipe off any excess oil with a clean cloth, ensuring the blades are clean and dry.
- If your trimmer came with a cleaning brush, use it to further clean the blades and remove any remaining debris.
- Finally, reassemble the trimmer by attaching any removed parts and perform a quick test to ensure everything is functioning correctly.
Regularly cleaning and oiling the blades of your Wahl beard trimmer will keep it in optimal condition and ensure a smooth and precise trimming experience every time.
Maintaining The Trimmer For Longevity
Regular Cleaning and Maintenance
To ensure the longevity of your Wahl Beard Trimmer, regular cleaning and maintenance are essential. By keeping your trimmer clean, you can prevent hair build-up, which can affect its performance and durability. Here are a few simple steps to follow for regular cleaning:
- Remove the trimmer head: Carefully detach the trimmer head from the main unit, following the instructions in the user manual.
- Clean the trimmer head: Use a small brush or toothbrush to gently remove any trapped hairs or debris from the blades and teeth. Be thorough but gentle to avoid damaging the delicate components.
- Rinse the trimmer head: Rinse the detached trimmer head under running water to remove any remaining residue. Ensure that you do not get the main unit wet, as this can cause damage.
- Dry the trimmer head: Shake off any excess water and allow the trimmer head to air dry completely before reattaching it to the main unit. This will prevent any moisture from causing rust or corrosion.
- Oil the blades: Using the provided Wahl blade oil or a similar lubricant, apply a few drops to the blades and teeth of the trimmer head. This will help maintain the smooth operation of the trimmer and prevent friction.
- Reassemble the trimmer: Once the trimmer head is dry and oiled, carefully reattach it to the main unit, ensuring a secure fit. You are now ready to use your trimmer efficiently.
Replacing Worn-Out Components as Needed
Over time, certain components of your Wahl Beard Trimmer may wear out, impacting its performance. It’s crucial to replace these worn-out parts promptly to maintain the longevity of your trimmer. Here are a few indicators that suggest components need replacement:
- Dull blades: If you notice that the trimmer is no longer cutting as effectively as before, it may be a sign that the blades need to be replaced. Dull blades can cause uneven trimming and discomfort.
- Worn-out battery: If the trimmer’s battery doesn’t hold a charge or requires frequent recharging, it could indicate that the battery needs replacement. A worn-out battery can lead to inconsistent trimming power.
- Malfunctioning switches or cords: If you experience issues with the trimmer’s switches or cords, such as difficulty turning it on or a loose connection, it may be time to replace those components. Faulty switches and cords can affect the trimmer’s overall performance and safety.
Remember to refer to the user manual or contact Wahl’s customer support for specific instructions on how to replace these components. By taking the initiative to replace worn-out parts, you can breathe new life into your trimmer and enjoy many more precise and comfortable trims.
Maintaining your Wahl Beard Trimmer for longevity doesn’t have to be complicated. Follow the regular cleaning steps and promptly replace worn-out components as needed to ensure that your trimmer remains in excellent condition. By doing so, you can continue to achieve the well-groomed beard you desire.
Frequently Asked Questions On How To Put Back Together A Wahl Beard Trimmer
How Do You Put Together Wahl Trimmers?
To put together Wahl trimmers, follow these steps:
1. Attach the blade securely to the trimmer body.
2. Slide on the comb attachments for desired hair length.
3. Insert the blade guide into the trimmer.
4. Snap on the trimmer guide for further cutting options.
5. Finally, plug in and switch on the trimmer to start grooming.
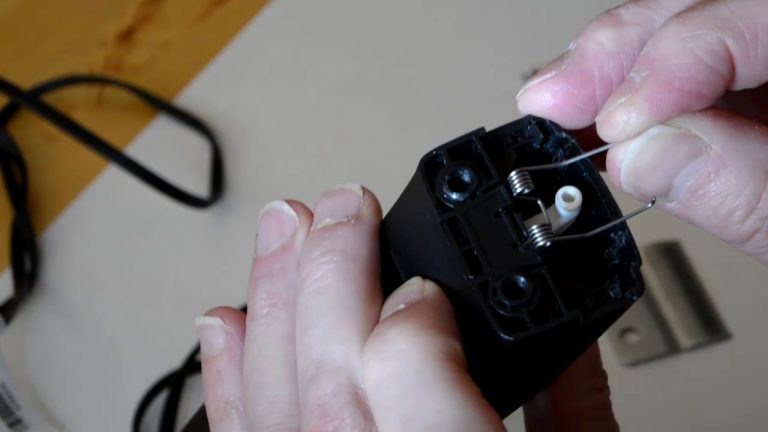
How Do You Put The Spring Back On Wahl Clippers?
To put the spring back on Wahl clippers, follow these steps carefully:
1. Locate the small groove inside the clipper where the spring should fit.
2. Insert one end of the spring into the groove.
3. Gently press down and slide the other end into position.
4. Ensure the spring is secure and doesn’t come loose.
5. Test the clipper to ensure it’s functioning properly.
How Do You Put A Wahl Nose Trimmer Back Together?
To put a Wahl nose trimmer back together, follow these simple steps:
1. Place the blades back into the trimmer’s head, ensuring they fit securely.
2. Align the trimmer’s body with the head and twist to lock them together.
3. Insert the battery, if necessary, and secure the battery compartment.
4. Test the trimmer to ensure it’s working properly.
5. Enjoy your neatly groomed nose hair!
How Do I Change The Head On My Wahl Trimmer?
To change the head on your Wahl trimmer, follow these steps:
1. Turn off and unplug the trimmer for safety.
2. Hold the trimmer firmly and locate the release button or lever.
3. Press or slide the button/lever to release the head.
4. Remove the old head and replace it with a new one.
5. Firmly press the head into place until it clicks or locks.
Conclusion
Reassembling your Wahl beard trimmer doesn’t have to be a daunting task. With our guide, you’ve gained the knowledge and steps to put it back together efficiently. Remember to take your time, follow the instructions carefully, and you’ll have your trimmer in working order in no time. Enjoy the satisfaction of maintaining your grooming tool, and may your Wahl trimmer continue to provide precise and reliable performance.